Overview
Integrating GetResponse with FlexiFunnels allows you to automatically collect leads, add contacts to your GetResponse lists, apply tags, and trigger email automation whenever someone submits a form or purchases a product.
The integration works seamlessly with FlexiFunnels Forms and Product Rules, making it easy to automate your email marketing and customer journeys.
The recommended integration method is the Standard OAuth Integration, which securely connects your GetResponse account without requiring API keys.
Before You Begin
Before connecting GetResponse, make sure you have:
- An active GetResponse account.
- Administrator access to your GetResponse account.
- Access to your FlexiFunnels Dashboard.
- At least one contact list created in GetResponse (recommended).
Method 1: Connect GetResponse Using the Standard Integration (Recommended)
Step 1: Open Autoresponder Integrations
- Log in to your FlexiFunnels account.
- Click Settings.
- Navigate to Autoresponder Integrations.
- Click + Add Autoresponder.
A list of supported autoresponders will appear.

Step 2: Select GetResponse
Locate GetResponse and click Connect.

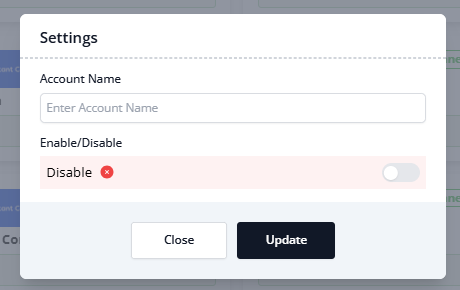
Step 3: Enter an Account Name
Provide an account name to identify this integration inside FlexiFunnels.
Examples:
- Main GetResponse
- Marketing Account
- Newsletter Account
Note: This account name is only used for identification within your FlexiFunnels account.
Click Connect.
Step 4: Authorize the Integration
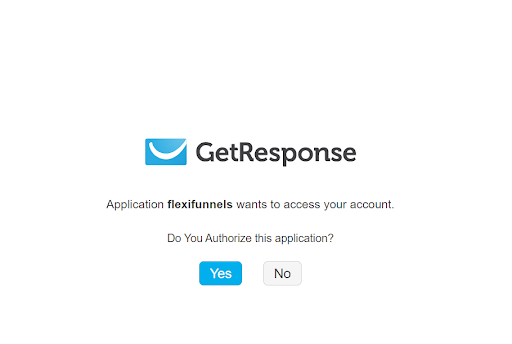
You'll be redirected to the GetResponse login page.
- Sign in to your GetResponse account.
- Review the requested permissions.
- Click Yes to authorize FlexiFunnels.
After successful authorization, you'll automatically return to FlexiFunnels.

Step 5: Verify the Connection
After returning to FlexiFunnels:
- Your connected GetResponse account will appear under Autoresponder Integrations.
- The account name you entered will be displayed.
Your GetResponse account is now successfully connected.

Steps to add the set rules to the product.
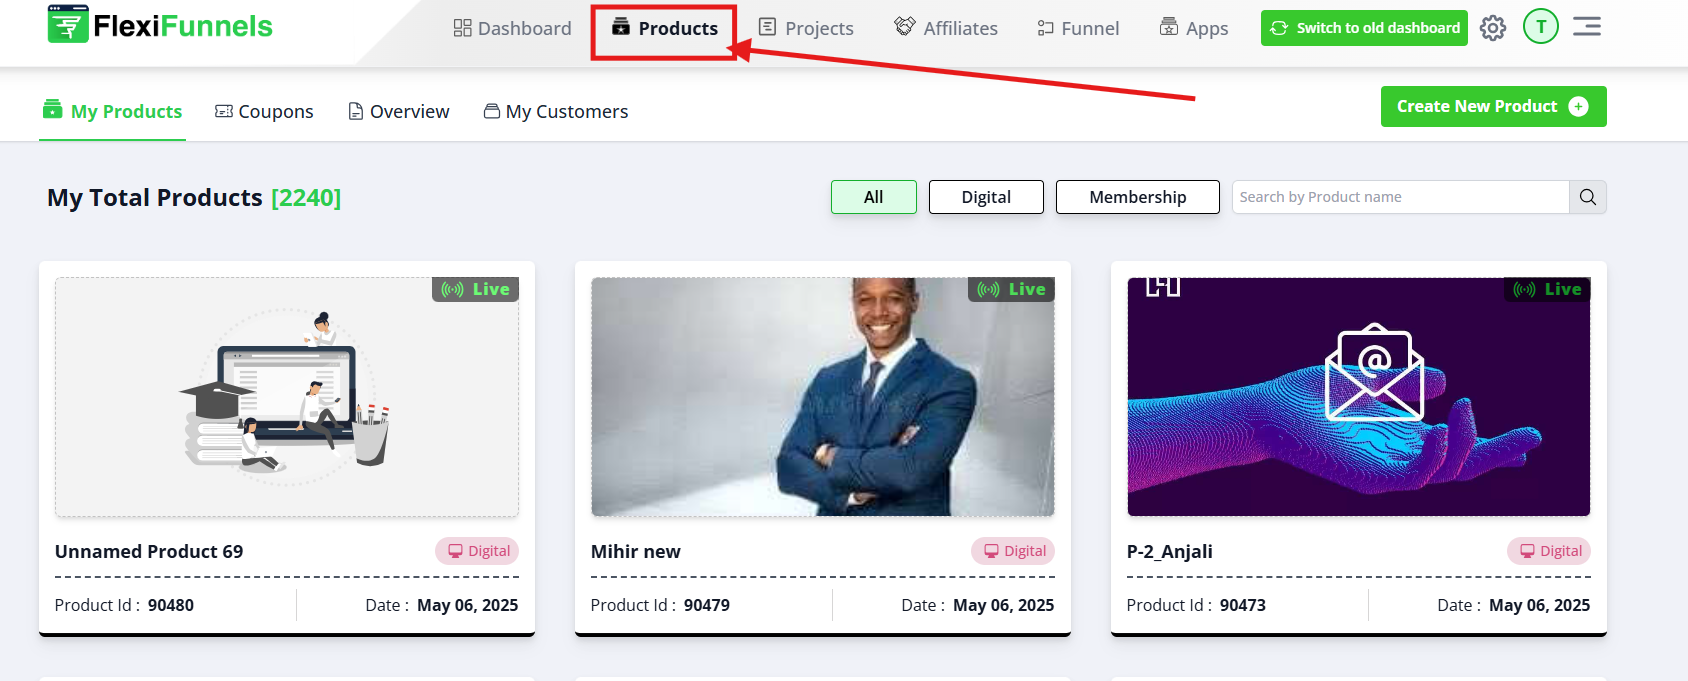
1. Navigate to the Products Tab
- Click on the "Products" tab located in the top menu bar.
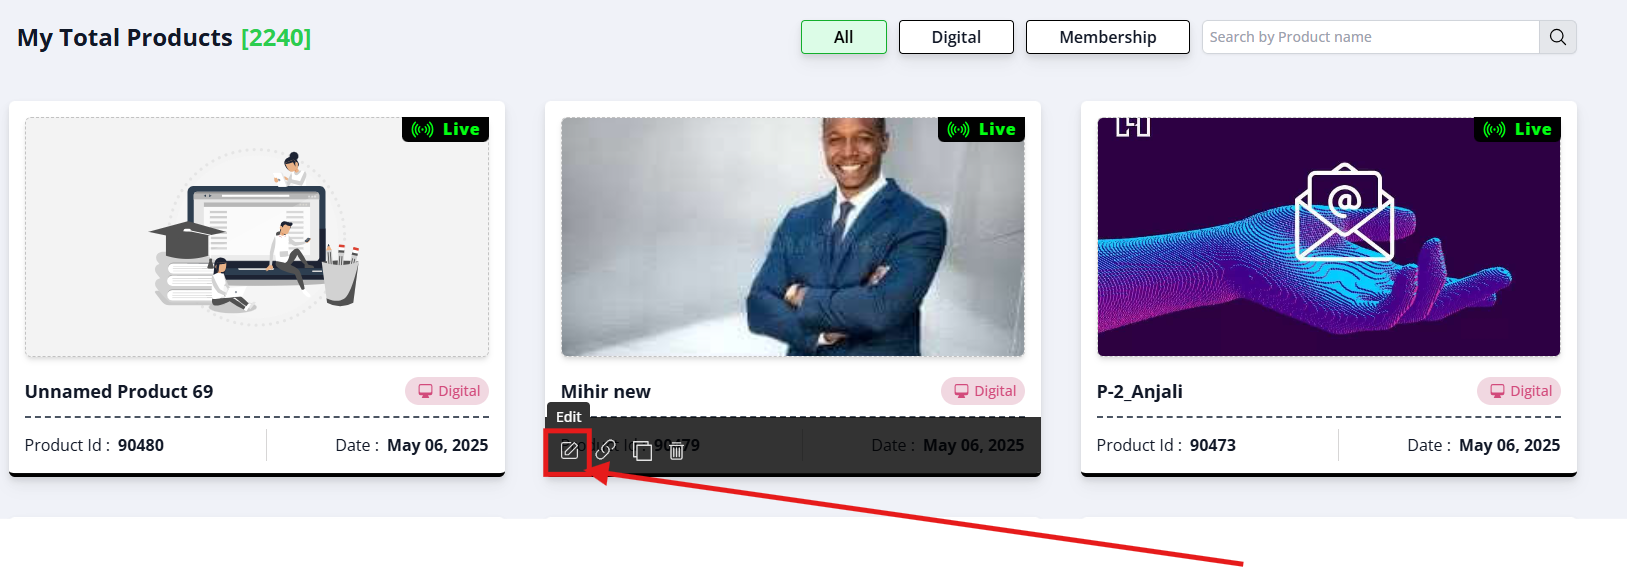
2. Select Your Product
- From the list of products, select the product you want to set up rules for.
- Click on the product name to open its settings.
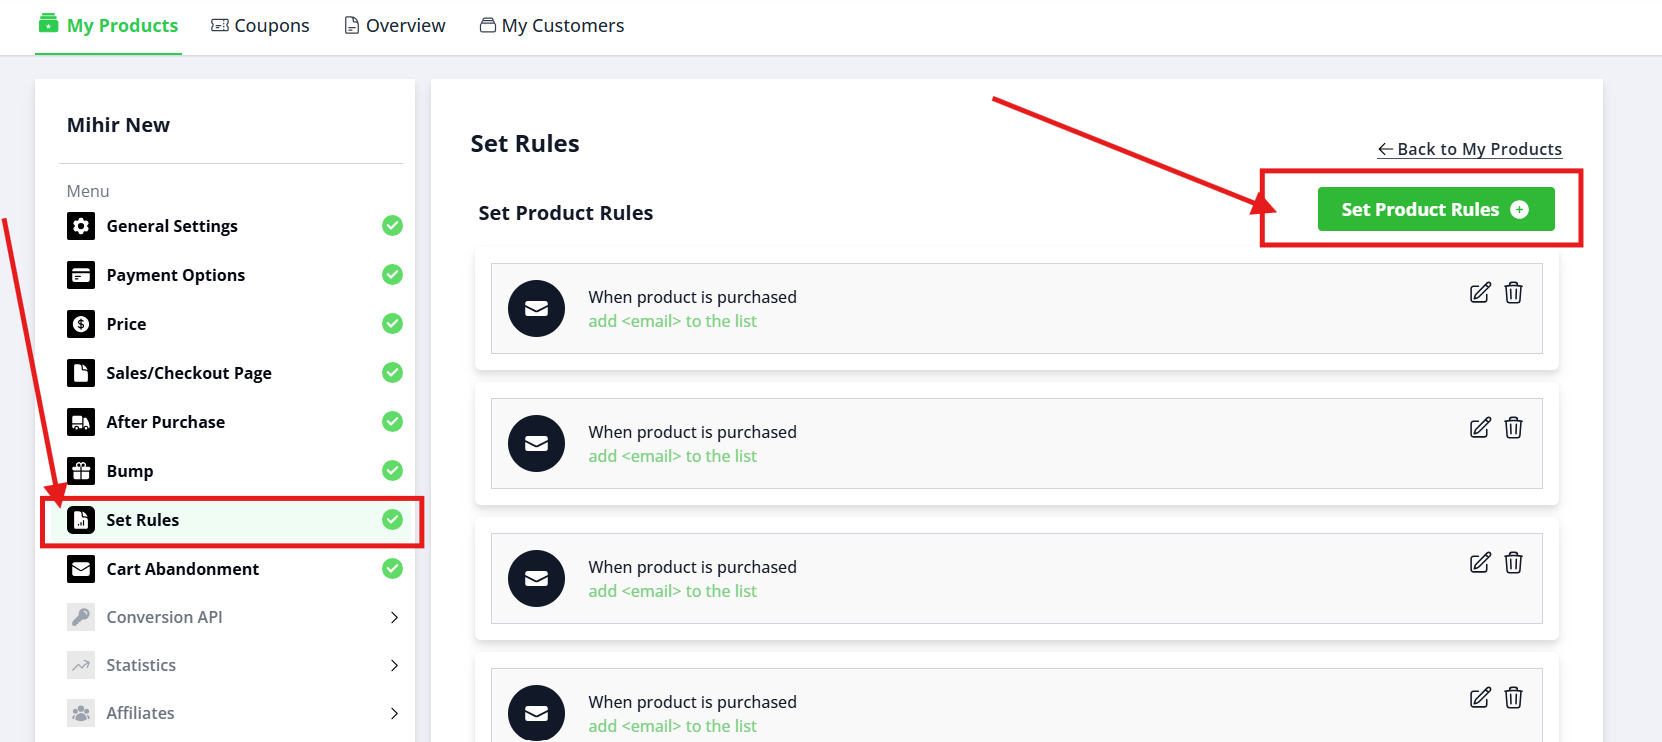
3. Open the Set Rules Option
- In the product settings menu on the left side, click on the "Set Rules" option.
- This will open a new dialog box for setting rules for your product.
4. Select Autoresponder
- If you want to add the members to an autoresponder, select an autoresponder from the "Select an autoresponder" dropdown menu.
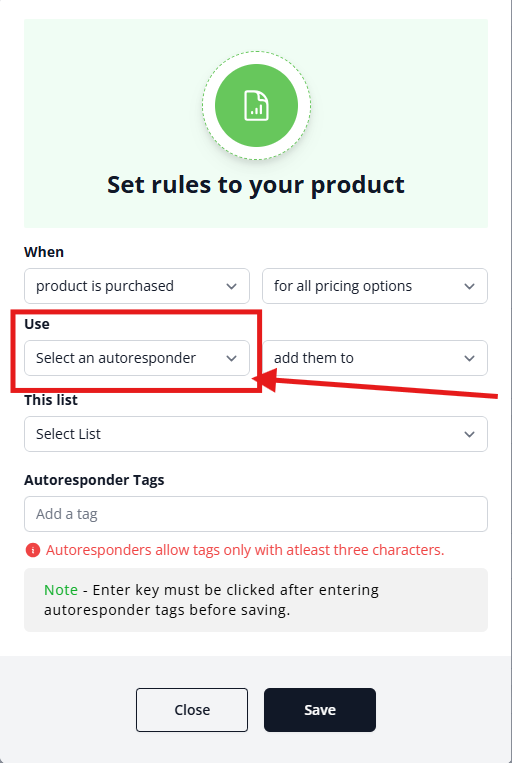
5. Add to a List (If Continuing with Autoresponders Selection)
- Choose a list from the "Add them to this list" dropdown menu where you want to add the members.
- This step ensures that members who abandon their cart are added to the correct list for easy management.
6. Set Autoresponder Tags (If Continuing with Autoresponders Selection)
- In the "Autoresponder Tags" field, you can add tags to organize your members.
- Note that autoresponder tags must be at least three characters long.
7. Save Your Settings (If Continuing with Autoresponders Selection)
- Once you have configured all the necessary settings, click the blue "Save" button at the bottom of the dialog box.
In FlexiFunnels, you can collect leads using Standard Integration by connecting your Email Autoresponder software.
STEP 1 - Connect your Email Autoresponder with FlexiFunnels Account by going above process step by step. (Standard Integration)
STEP 2 - Once you have connected your email autoresponder with FlexiFunnels.
Now connect a “form” element in a landing page with an email autoresponder.
In order to connect a “form” element with Autoresponder, one needs to create a landing page inside a project.

Click on the “+create new project” button.
Click on "Projects” displayed on the FlexiFunnels Dashboard Screen.
Click on the "+create new" button displayed on the Projects Screen.

Then type your "Project name" and click on the "+ADD project" button
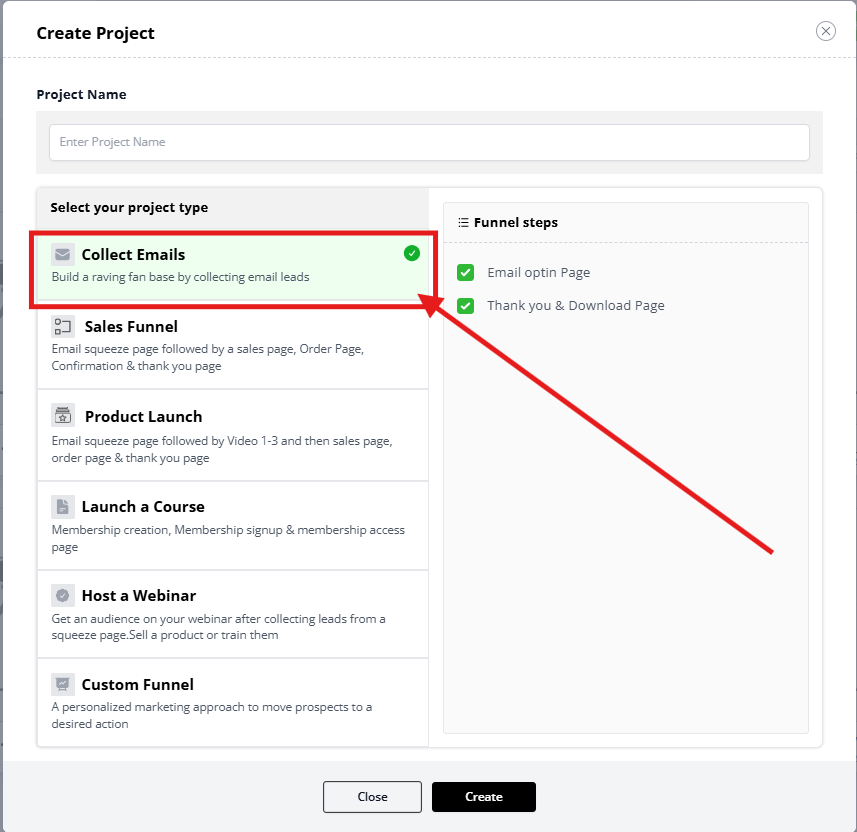
After completing these steps.
Select the Landing Page category
We have Different Landing Page Template Categories and Different Templates in Each Category
Select Your Landing Page Category
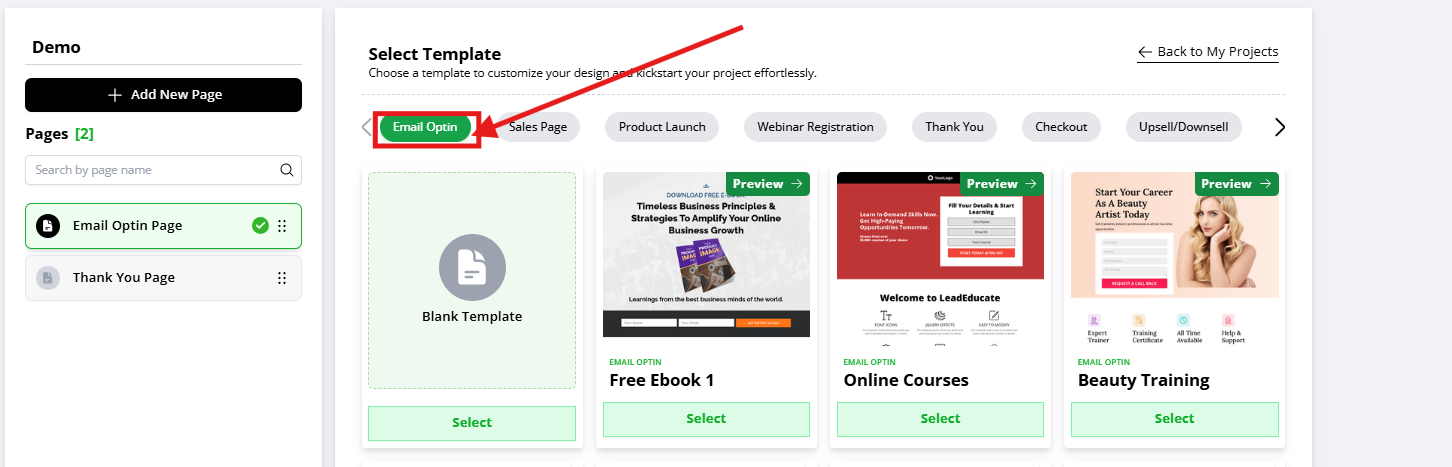
Then select the preferred template for your landing page
After selecting the Preferred Landing Page Template
The Screen will look like this
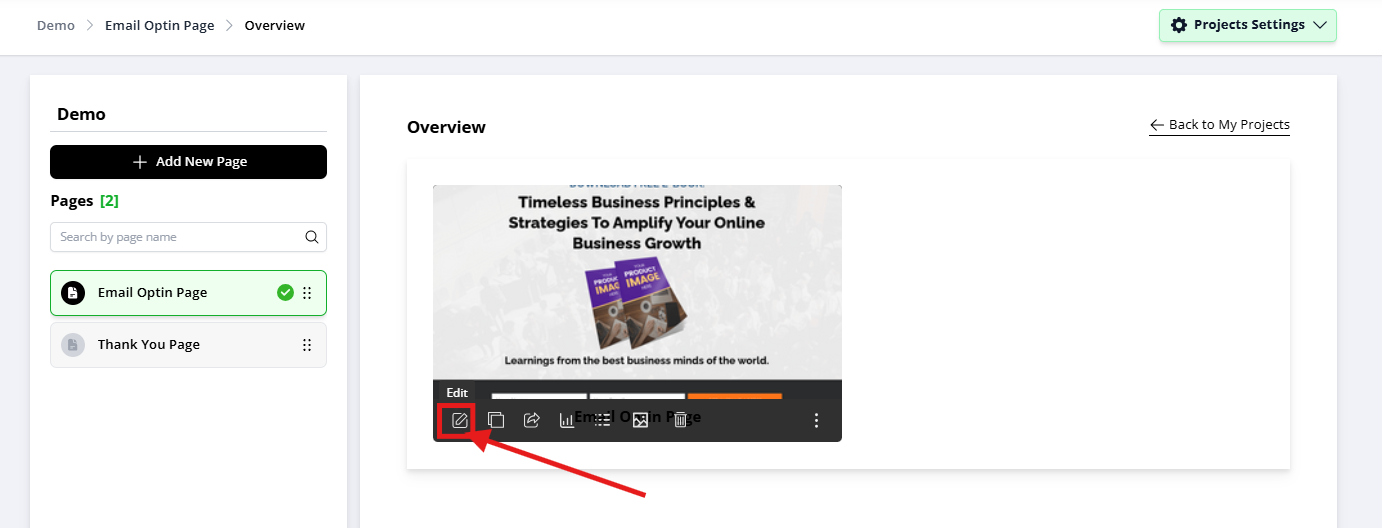
You have successfully created a Project in FlexiFunnels with a Landing Page.
Now, Click on the "Edit Page" Button.
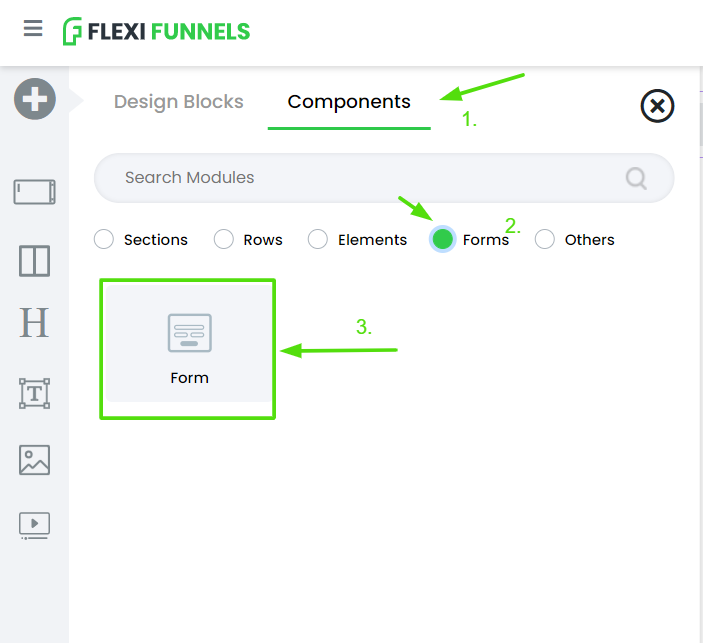
Click on the sidebar “plus” button and select the “forms” option under components to add forms inside the FlexiFunnels Page Editor.
Once a “form” element is imported into the FlexiFunnels editor, click on the “form” element gear icon settings to open the form element gear settings
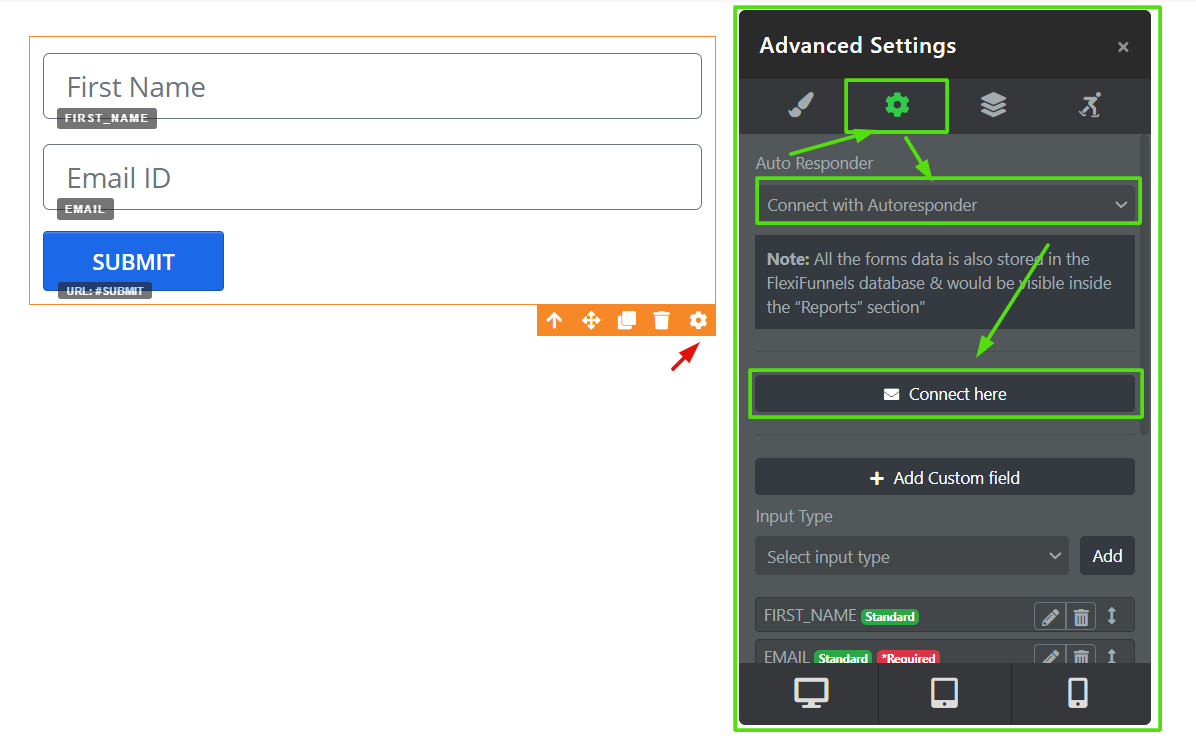
After opening the “Form” element gear settings, click on Advanced Settings, as shown in the image above.
Then select the “Connect with autoresponder” option from the Dropdown.
Then click on the “connect here” button
After clicking on the “connect here” button, select your autoresponder connected in the FlexiFunnels autoresponder settings
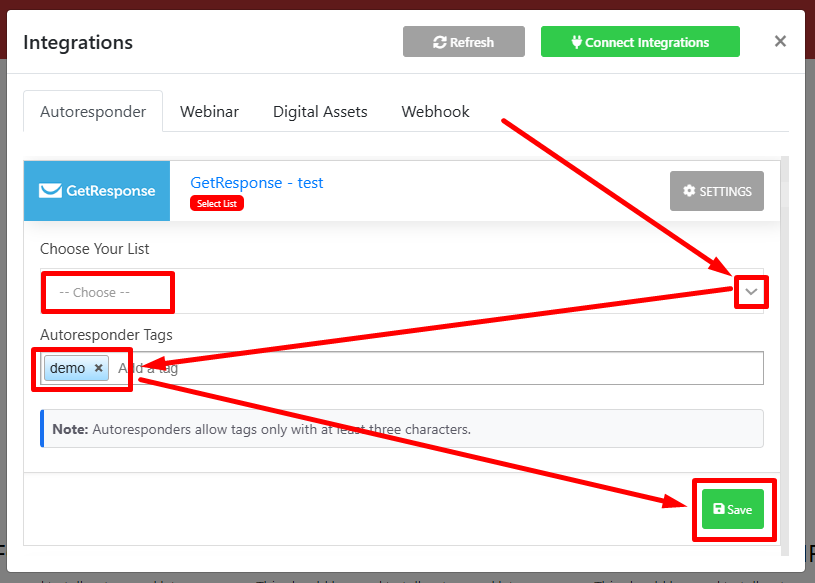
Choose your email list from the dropdown. (optional)
And write down the tag to be passed in the autoresponder tags field. (optional)
One can pass multiple tags here.
Click on the “save” button.
When successfully connected, it will show “active.”
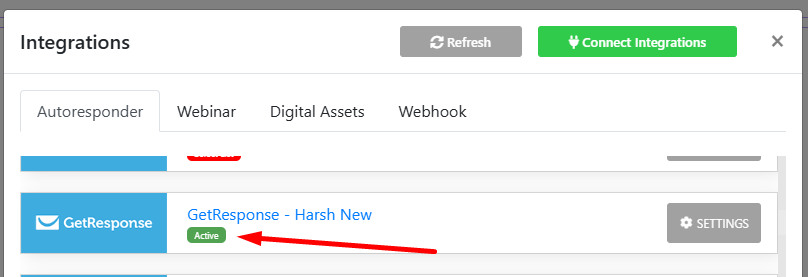
Here, your autoresponder is connected with the FlexiFunnels “form” element.
Now, you can publish the landing page, using the “publish” button at the top, and start collecting leads.
The leads submitted on the published page will be directly reflected in your email autoresponder software connected with the “form” element.
Know how to connect specific autoresponder in detail:-
Active Campaign - https://help.flexifunnels.com/support/solutions/articles/36000308410-active-campaign-autoresponder-integration
Constant Contact - https://help.flexifunnels.com/support/solutions/articles/36000308412-constant-contact-autoresponder-integration
Mailchimp - https://help.flexifunnels.com/support/solutions/articles/36000308520-mailchimp-integration
Common Scenarios
My GetResponse account isn't connecting.
Check the following:
- You're signing in with the correct GetResponse account.
- You clicked Yes when prompted to authorize FlexiFunnels.
- Your browser isn't blocking redirects or pop-ups.
- You're using an updated browser such as Google Chrome or Microsoft Edge.
My contacts aren't appearing in GetResponse.
Verify that:
- The landing page has been published.
- The form is connected to GetResponse.
- The correct contact list has been selected.
- You're submitting the live page rather than testing inside the editor.
Tags aren't being added.
Check that:
- Tags contain at least 3 characters.
- The tags were saved after configuration.
- The correct GetResponse account is connected.
Customers aren't being added after purchasing.
Verify that:
- Product Rules have been configured.
- The correct GetResponse account is selected.
- The correct contact list is selected.
- The product has been saved after updating the rules.
The authorization page isn't opening.
Try the following:
- Refresh the page.
- Clear your browser cache.
- Disable browser extensions that block pop-ups or redirects.
- Try using an Incognito/Private browser window.
Best Practices
- Use the Standard Integration whenever possible.
- Create separate contact lists for leads and customers.
- Use descriptive tags to organize contacts and automate campaigns.
- Test your form integration before publishing your funnel.
- Perform a test purchase to verify product automation.
Before Contacting Support
Before contacting our support team, please verify the following:
- ✅ Your GetResponse account is connected successfully.
- ✅ You authorized FlexiFunnels during the connection process.
- ✅ The correct contact list has been selected.
- ✅ Product Rules or Form Settings have been configured correctly.
- ✅ The landing page has been published.
- ✅ You've tested the integration using a live form submission or test purchase.
If the issue still persists, please provide:
- A screenshot of your GetResponse integration in FlexiFunnels.
- A screenshot of the Product Rules or Form Settings.
- The contact list you're using.
- Any authorization or error message displayed.
- A brief description of the issue and the troubleshooting steps you've already completed.
Was this article helpful?
That’s Great!
Thank you for your feedback
Sorry! We couldn't be helpful
Thank you for your feedback
Feedback sent
We appreciate your effort and will try to fix the article