Overview
Integrating ActiveCampaign with FlexiFunnels allows you to automatically collect leads, add contacts to lists, apply tags, and trigger email automation whenever someone submits a form or purchases a product.
There are two ways to connect ActiveCampaign with FlexiFunnels:
- Standard API Integration (Recommended) – Connect ActiveCampaign using your API URL and API Key.
- Custom HTML Form Integration – Embed an ActiveCampaign form using its HTML code.
The Standard API Integration is recommended because it offers better automation, tagging, list management, and product rule support.
Before You Begin
Before starting the integration, make sure you have:
- An active ActiveCampaign account.
- Access to your ActiveCampaign API URL and API Key.
- Access to your FlexiFunnels Dashboard.
- Administrator permissions for both accounts.
Step 1: Open Autoresponder Integrations
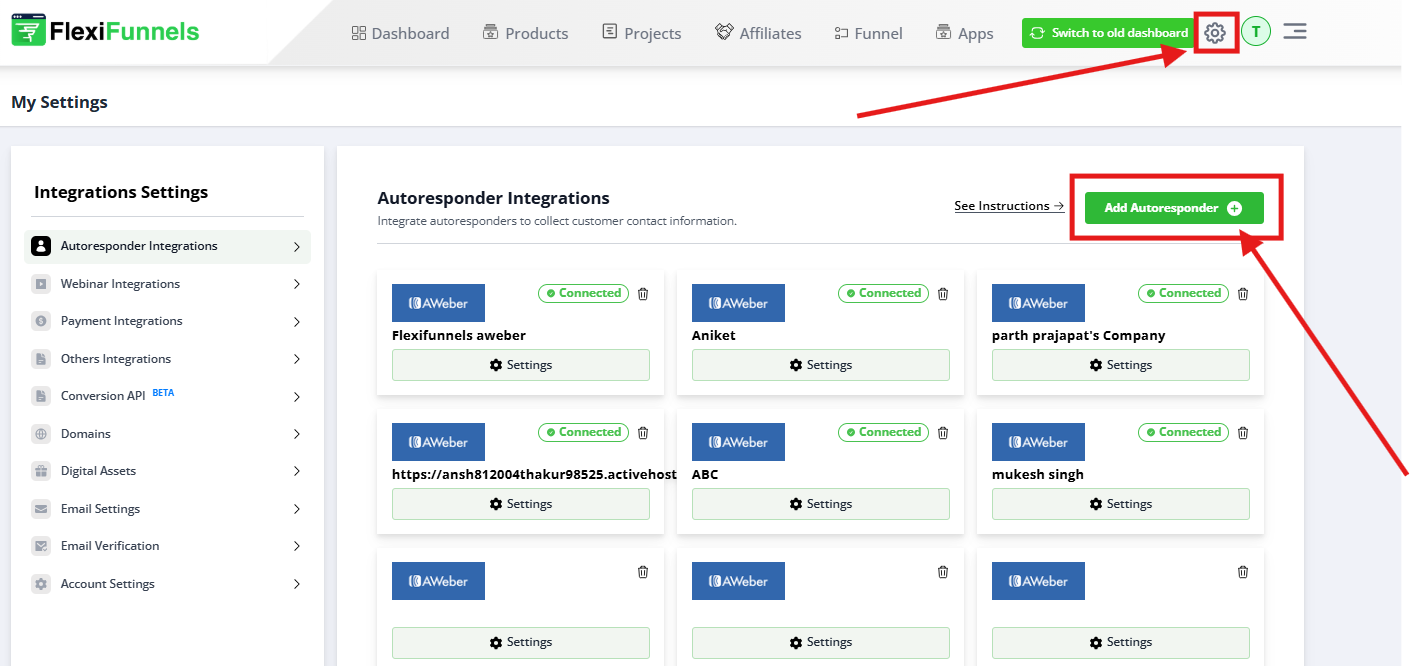
- Log in to FlexiFunnels.
- Click Settings.
- Select Autoresponder Integrations.
- Click + Add Autoresponder.
A list of supported autoresponders will appear.
Step 2: Select ActiveCampaign
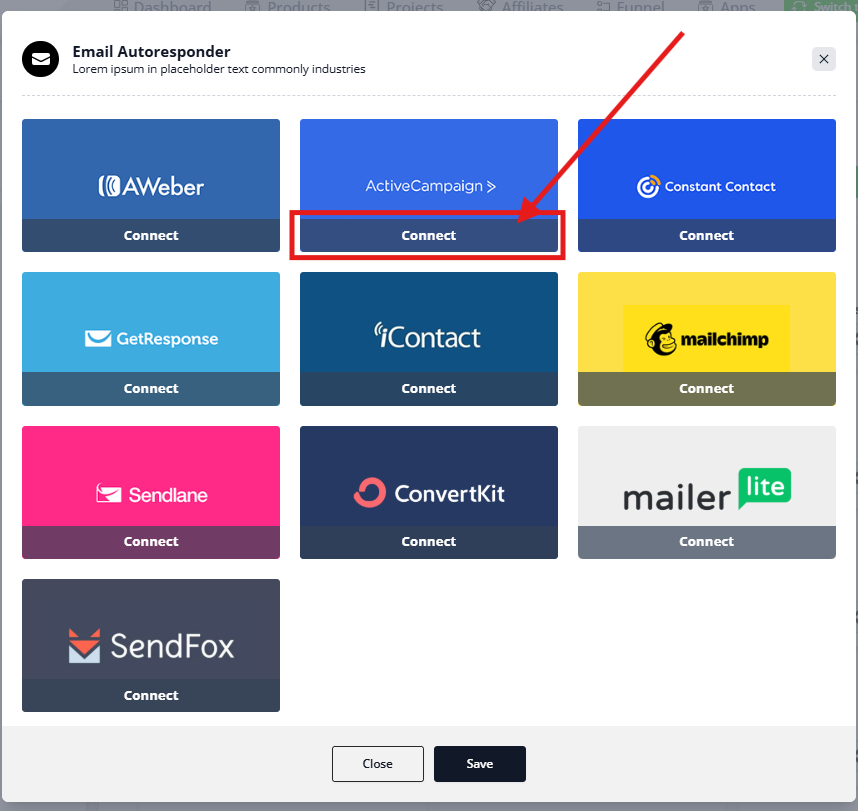
- Locate ActiveCampaign.
- Click Connect.
A configuration window will open.
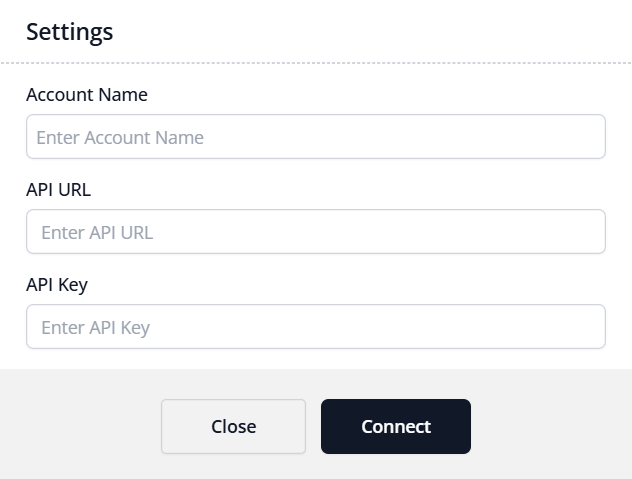
Step 3: Enter Your Account Details
Provide the following information:
Account Name
Enter any name that helps you identify the connection.
Example:
- Main ActiveCampaign
- Business Account
API URL
Paste your ActiveCampaign API URL.
Important: If your copied API URL does not include
https://, manually add it before saving.
Correct Example
https://youraccount.api-us1.com
API Key
Paste your ActiveCampaign API Key.
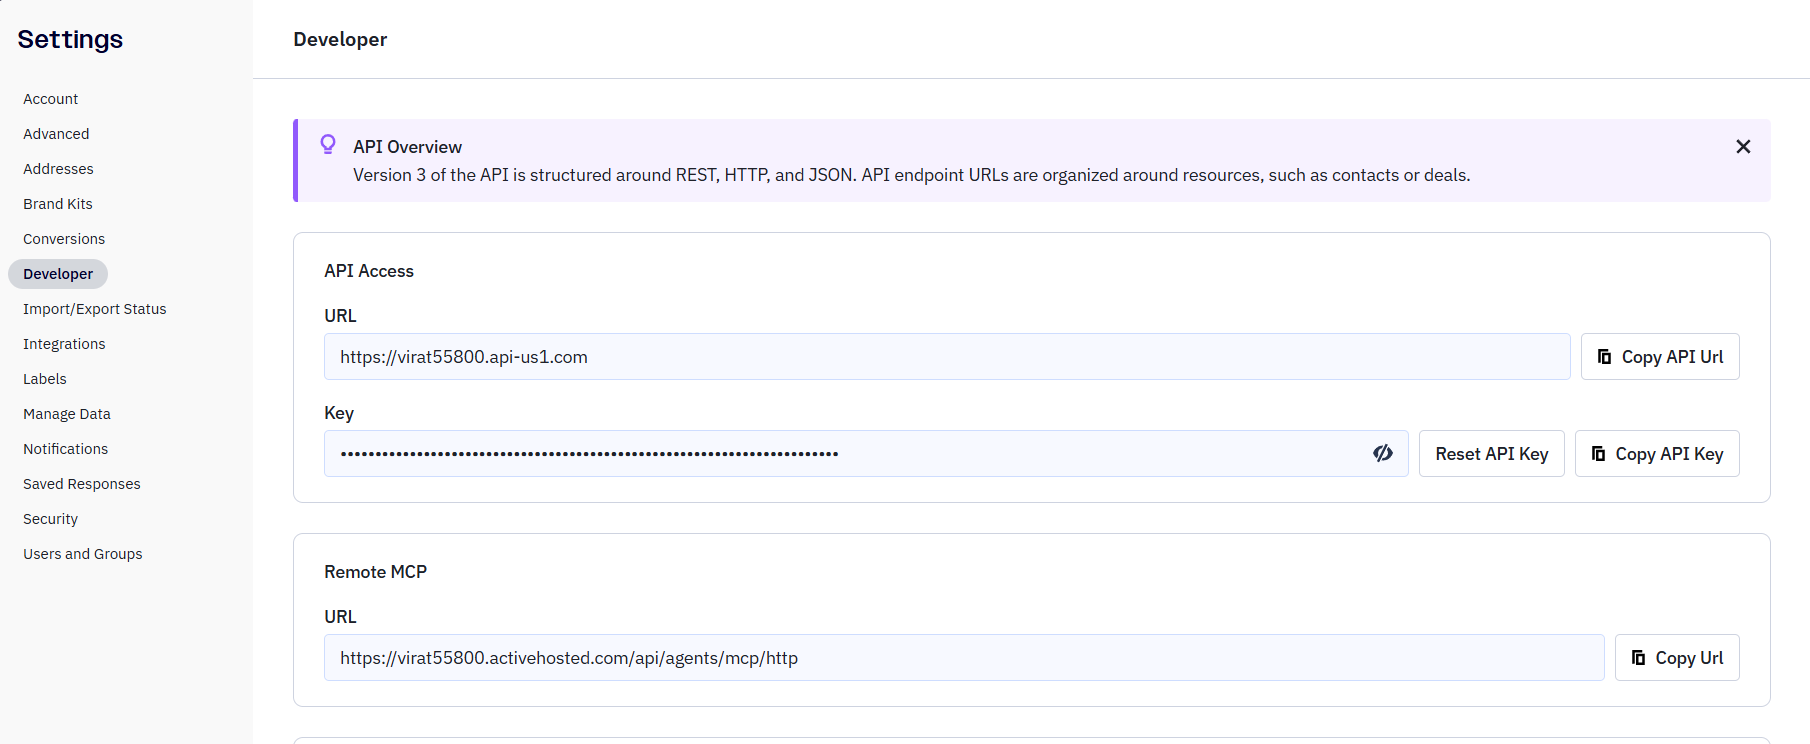
How to Find Your ActiveCampaign API URL & API Key
Inside ActiveCampaign:
- Click Settings.
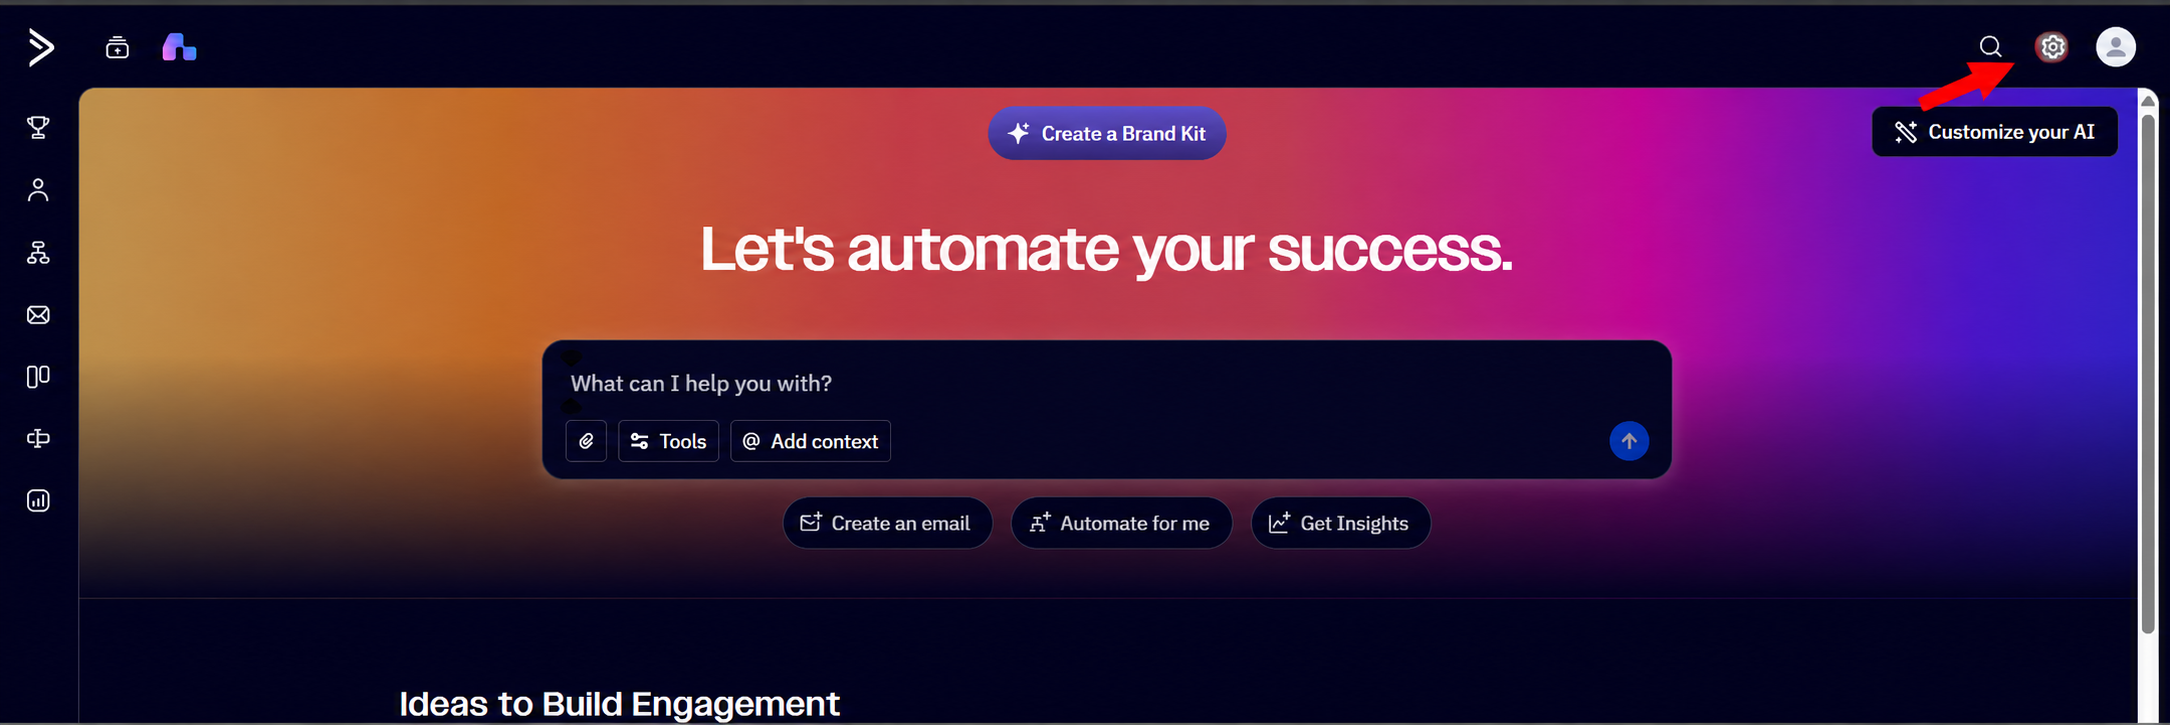
Select Developer.
Copy:
- API URL
- API Key
Paste both values into FlexiFunnels during the integration process.
Important: Some ActiveCampaign accounts display the API URL without
https://. If this happens, manually add it before connecting.
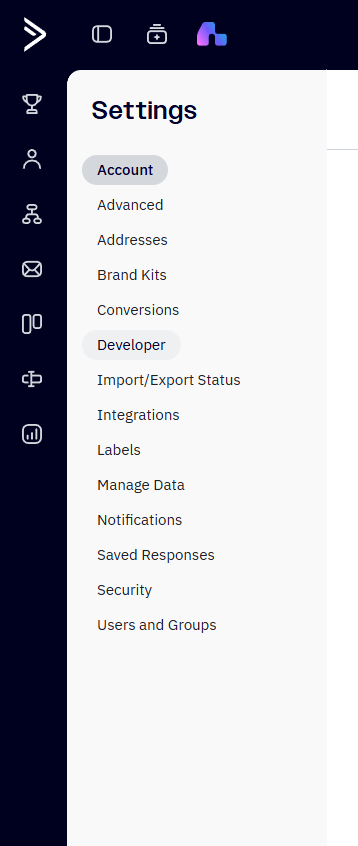
The Developer Settings page will load and will display your ActiveCampaign API URL and Key. You can copy and paste this information.
Step 4: Connect the Account
Click Connect.
If the credentials are valid, your ActiveCampaign account will be connected successfully.
Steps to add the set rules to the product.
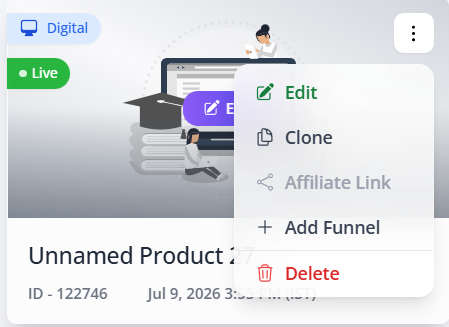
1. Navigate to the Products Tab
- Click on the "Products" tab located in the top menu bar.

2. Select Your Product
- From the list of products, select the product you want to set up rules for.
- Click on the product name to open its settings.
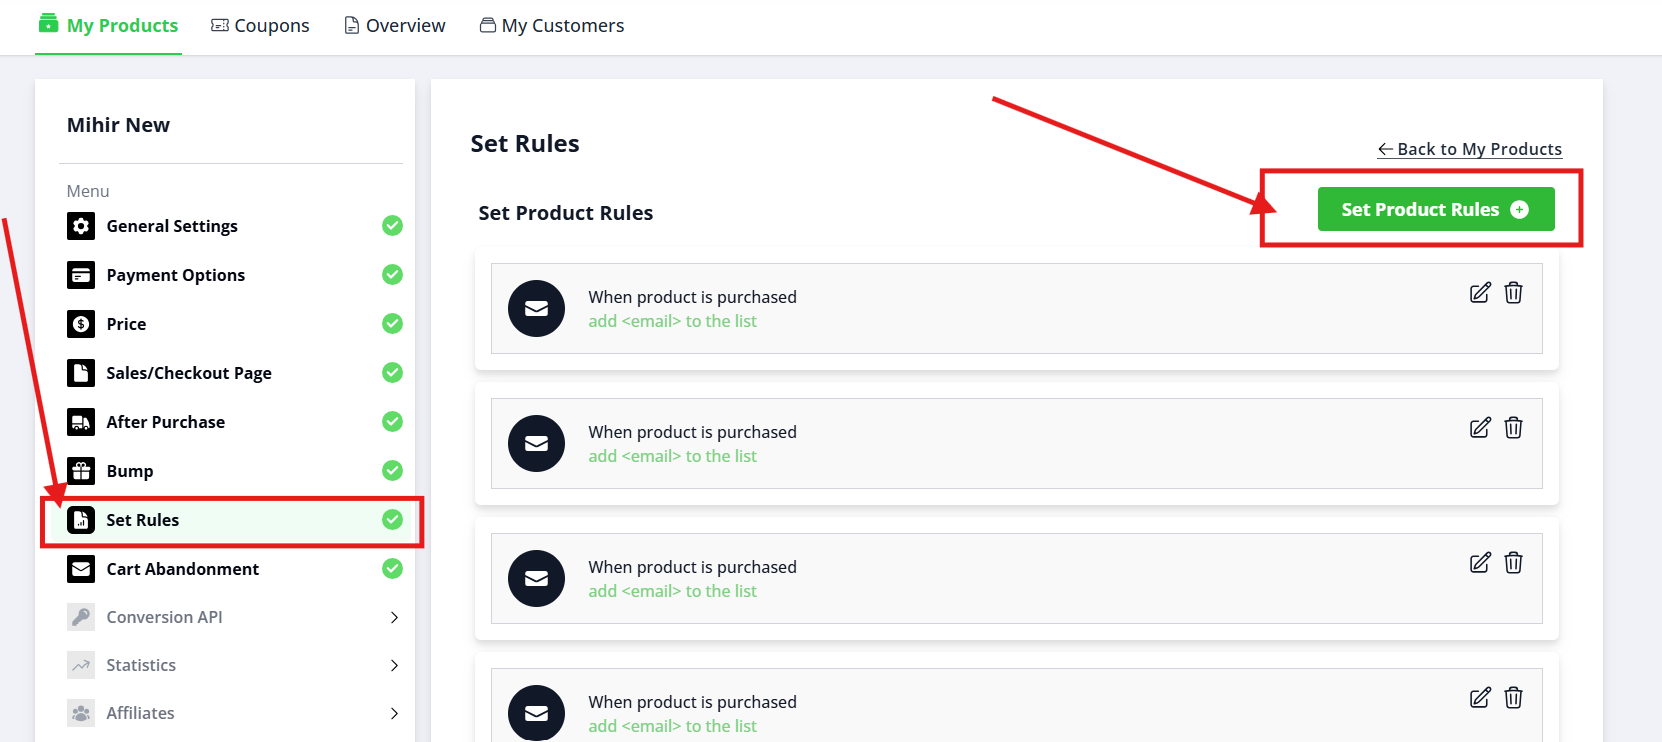
3. Open the Set Rules Option
- In the product settings menu on the left side, click on the "Set Rules" option.
- This will open a new dialog box for setting rules for your product.
4. Select Autoresponder
- If you want to add the members to an autoresponder, select an autoresponder from the "Select an autoresponder" dropdown menu.
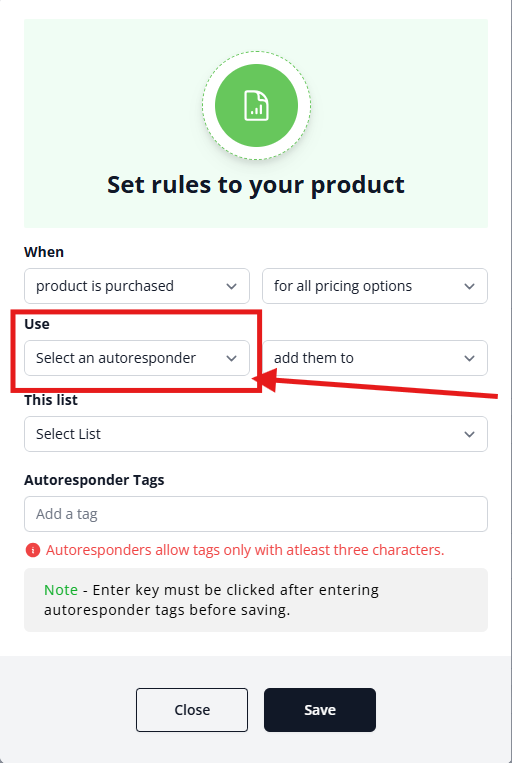
5. Add to a List (If Continuing with Autoresponders Selection)
- Choose a list from the "Add them to this list" dropdown menu where you want to add the members.
- This step ensures that members who abandon their cart are added to the correct list for easy management.
6. Set Autoresponder Tags (If Continuing with Autoresponders Selection)
- In the "Autoresponder Tags" field, you can add tags to organize your members.
- Note that autoresponder tags must be at least three characters long.
7. Save Your Settings (If Continuing with Autoresponders Selection)
- Once you have configured all the necessary settings, click the blue "Save" button at the bottom of the dialog box.
In Flexifunnels, one can collect leads using two options.
1 - By integrating an Email Autoresponder Software with FlexiFunnels.
2 - By using Custom coded form generated in a Users Email Autoresponder Software.
Let's cover the first option, in which we will explain how one can integrate an Email autoresponder software in FlexiFunnels
STEP 1 - Connect your Email Autoresponder with FlexiFunnels Account by going above process step by step. (Standard Integration)
STEP 2 - Once you have connected your email autoresponder with FlexiFunnels.
Now connect a “form” element in a landing page with an email autoresponder.
In order to connect a “form” element with Autoresponder, one needs to create a landing page inside a project.

Click on the “+create new project” button.
Click on "Projects” displayed on the FlexiFunnels Dashboard Screen.
Click on the "+create new" button displayed on the Projects Screen.

Then type your "Project name" and click on the "+ADD project" button
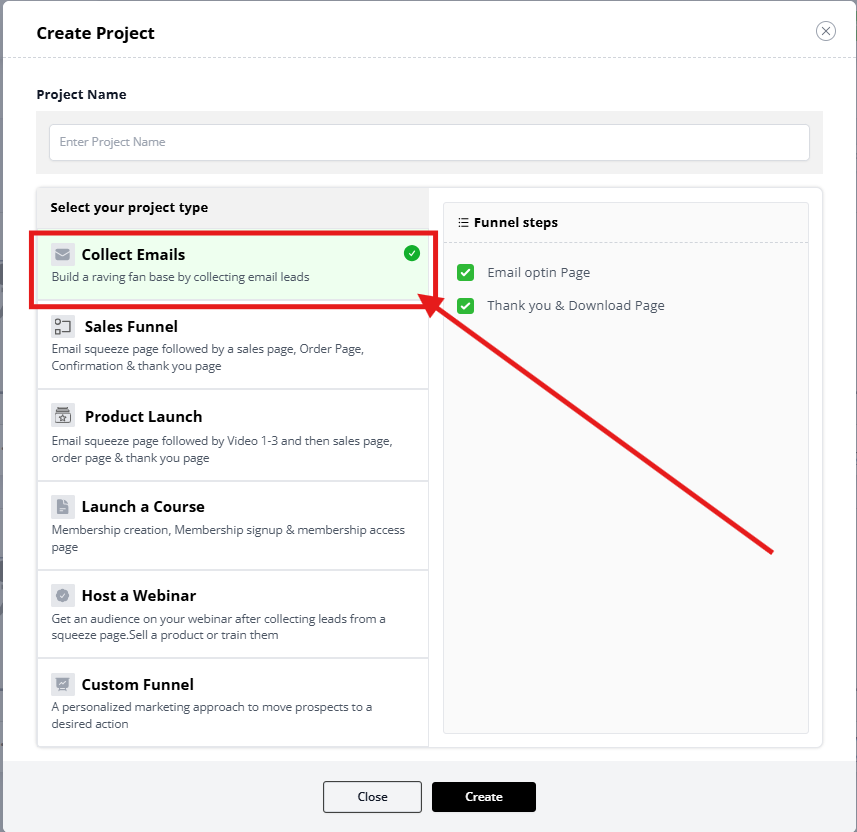
After completing these steps.
Select the Landing Page category
We have Different Landing Page Template Categories and Different Templates in Each Category
Select Your Landing Page Category
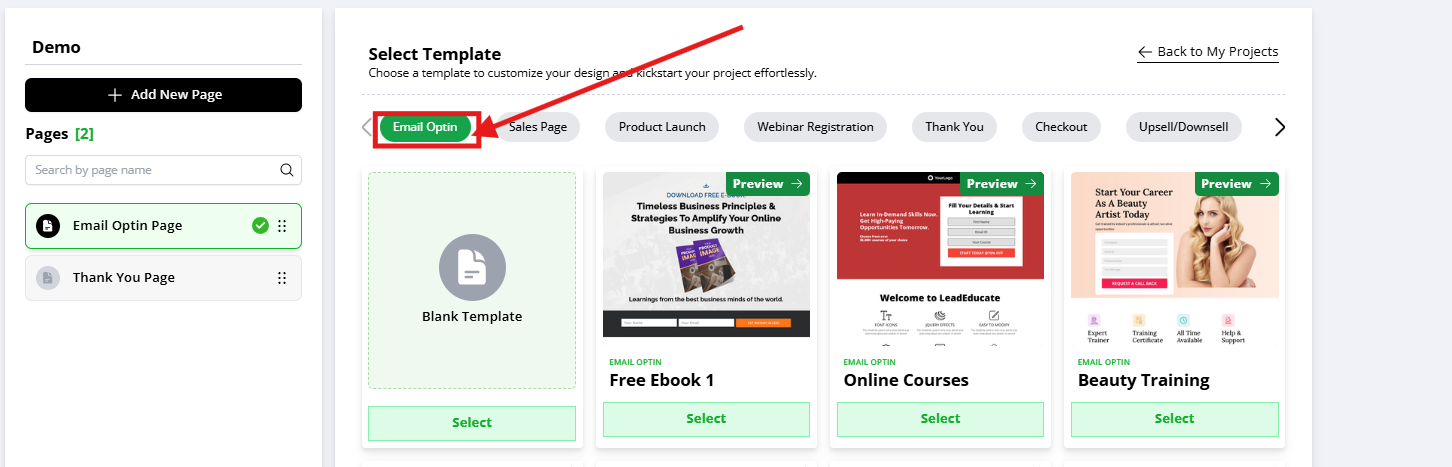
Then select the preferred template for your landing page
After selecting the Preferred Landing Page Template
The Screen will look like this
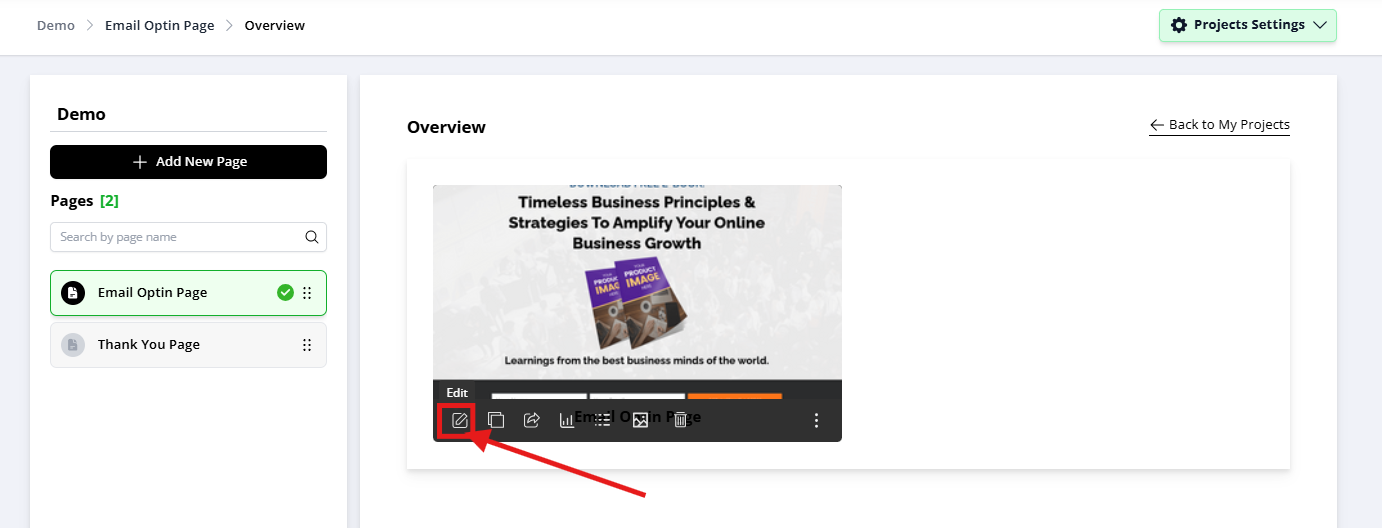
You have successfully created a Project in FlexiFunnels with a Landing Page.
Now, Click on the "Edit Page" Button.
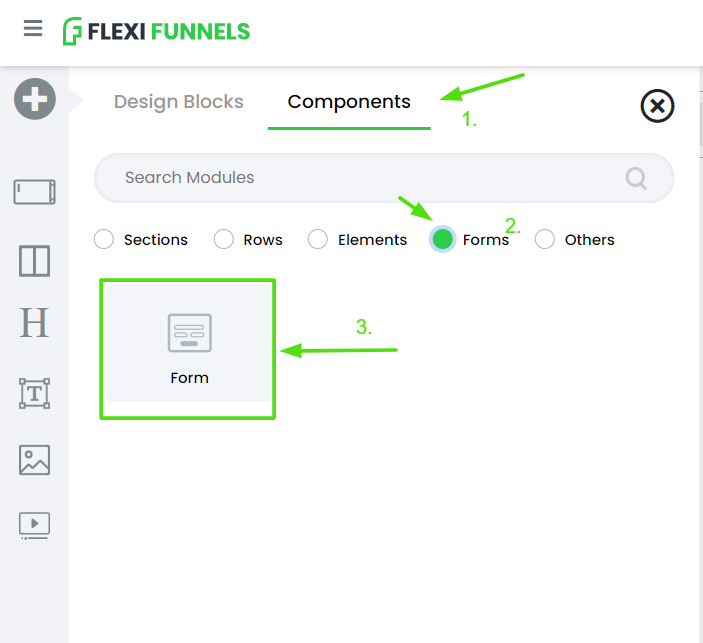
Click on the sidebar “plus” button and select the “forms” option under components to add forms inside the FlexiFunnels Page Editor.
Once a “form” element is imported into the FlexiFunnels editor, click on the “form” element gear icon settings to open the form element gear settings
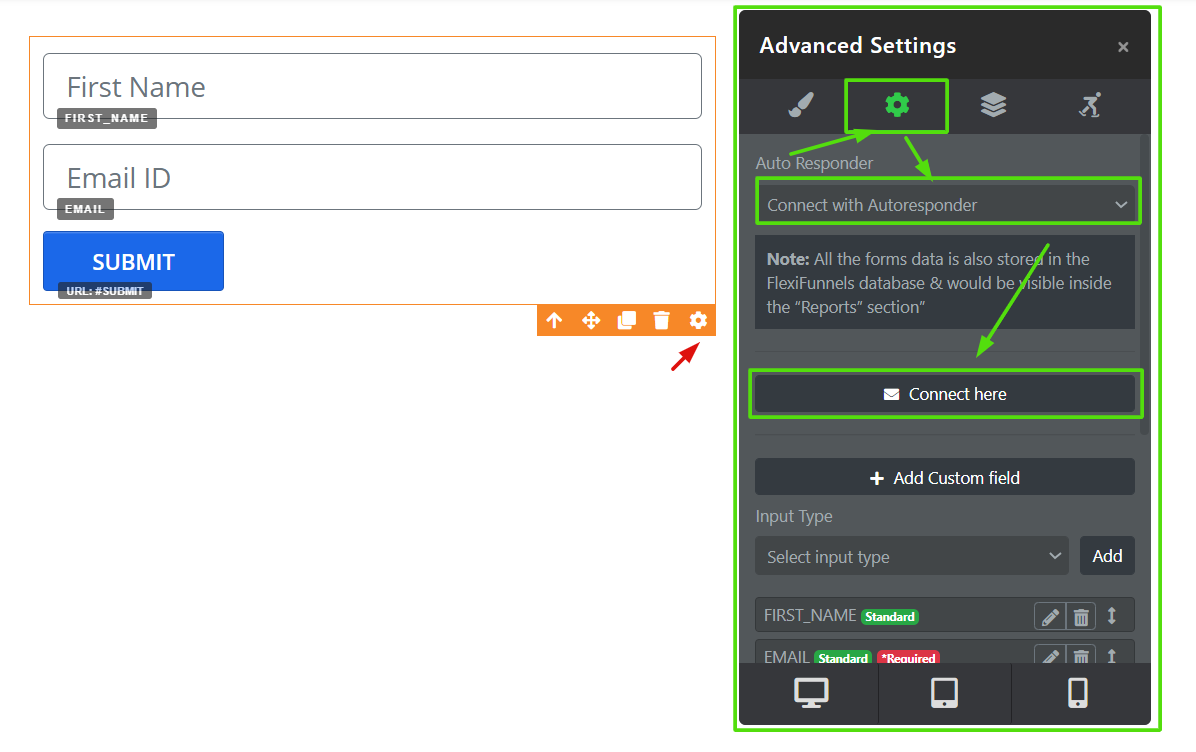
After opening the “Form” element gear settings, click on Advanced Settings, as shown in the image above.
Then select the “Connect with autoresponder” option from the Dropdown.
Then click on the “connect here” button
After clicking on the “connect here” button, select your autoresponder connected in the FlexiFunnels autoresponder settings
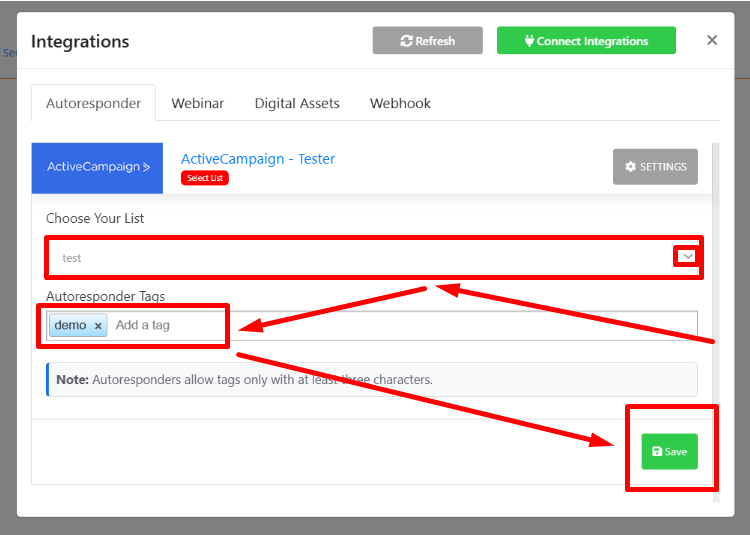
Choose your email list from the dropdown. (optional)
And write down the tag to be passed in the autoresponder tags field. (optional)
One can pass multiple tags here.
Click on the “save” button.
When successfully connected, it will show “active.”
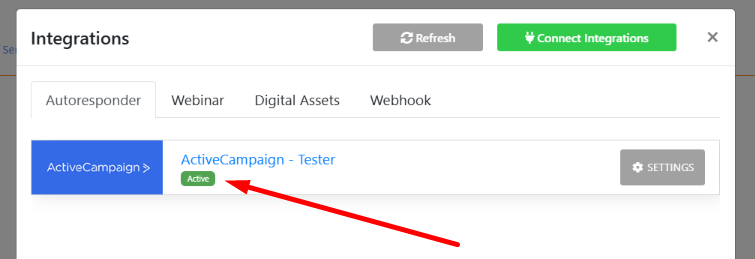
Here, your autoresponder is connected with the FlexiFunnels “form” element.
Now, you can publish the landing page, using the “publish” button at the top, and start collecting leads.
The leads submitted on the published page will be directly reflected in your email autoresponder software connected with the “form” element.
Second Method to collect leads from Flexifunnels(Custom Form Code)
Here we will be taking an example of ActiveCampaign Email Autoresponder Software.
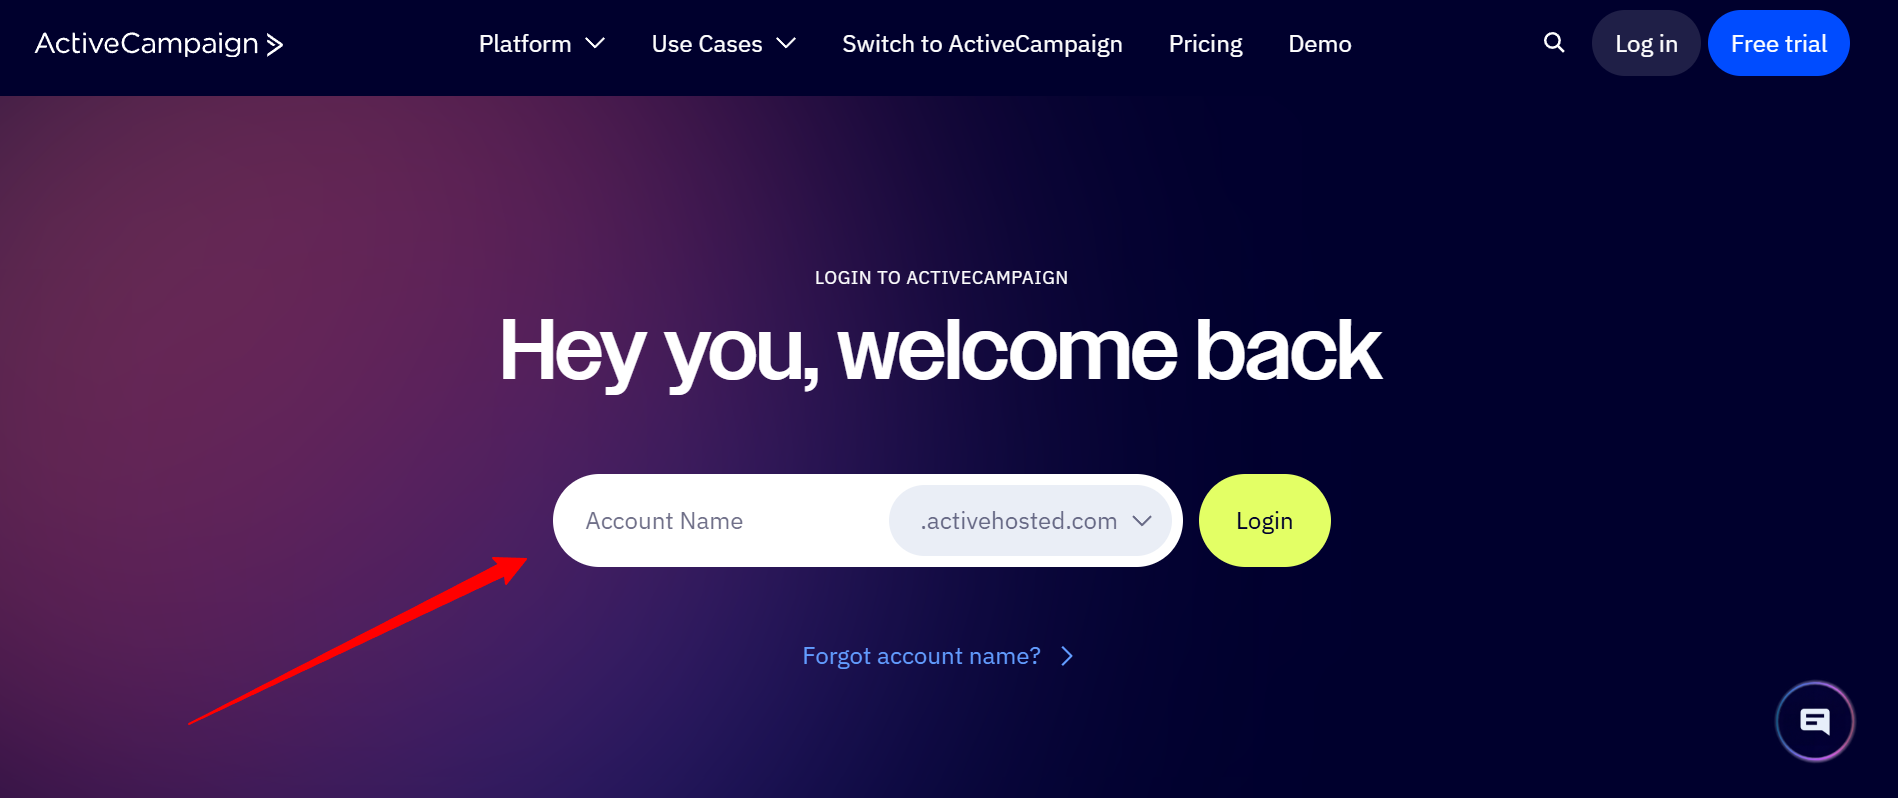
Login to your ActiveCampaign account Dashboard, and click on Signup Forms from the dashboard panel.
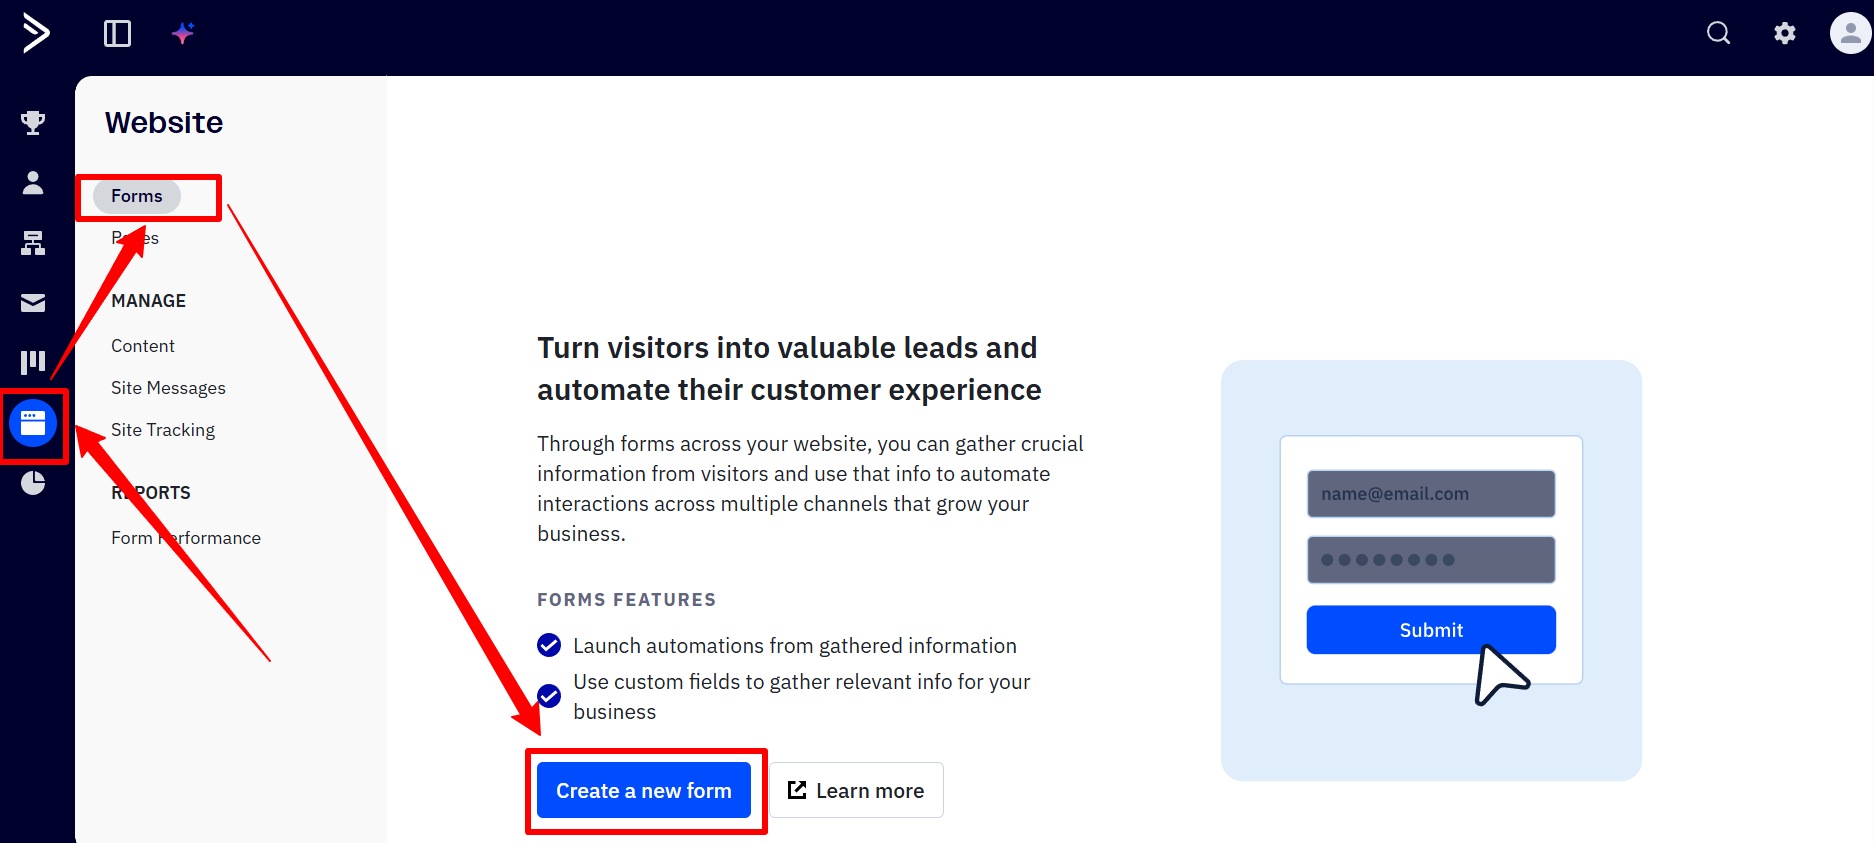
Click on the “Create a new Form” Button for Custom Form Code option.
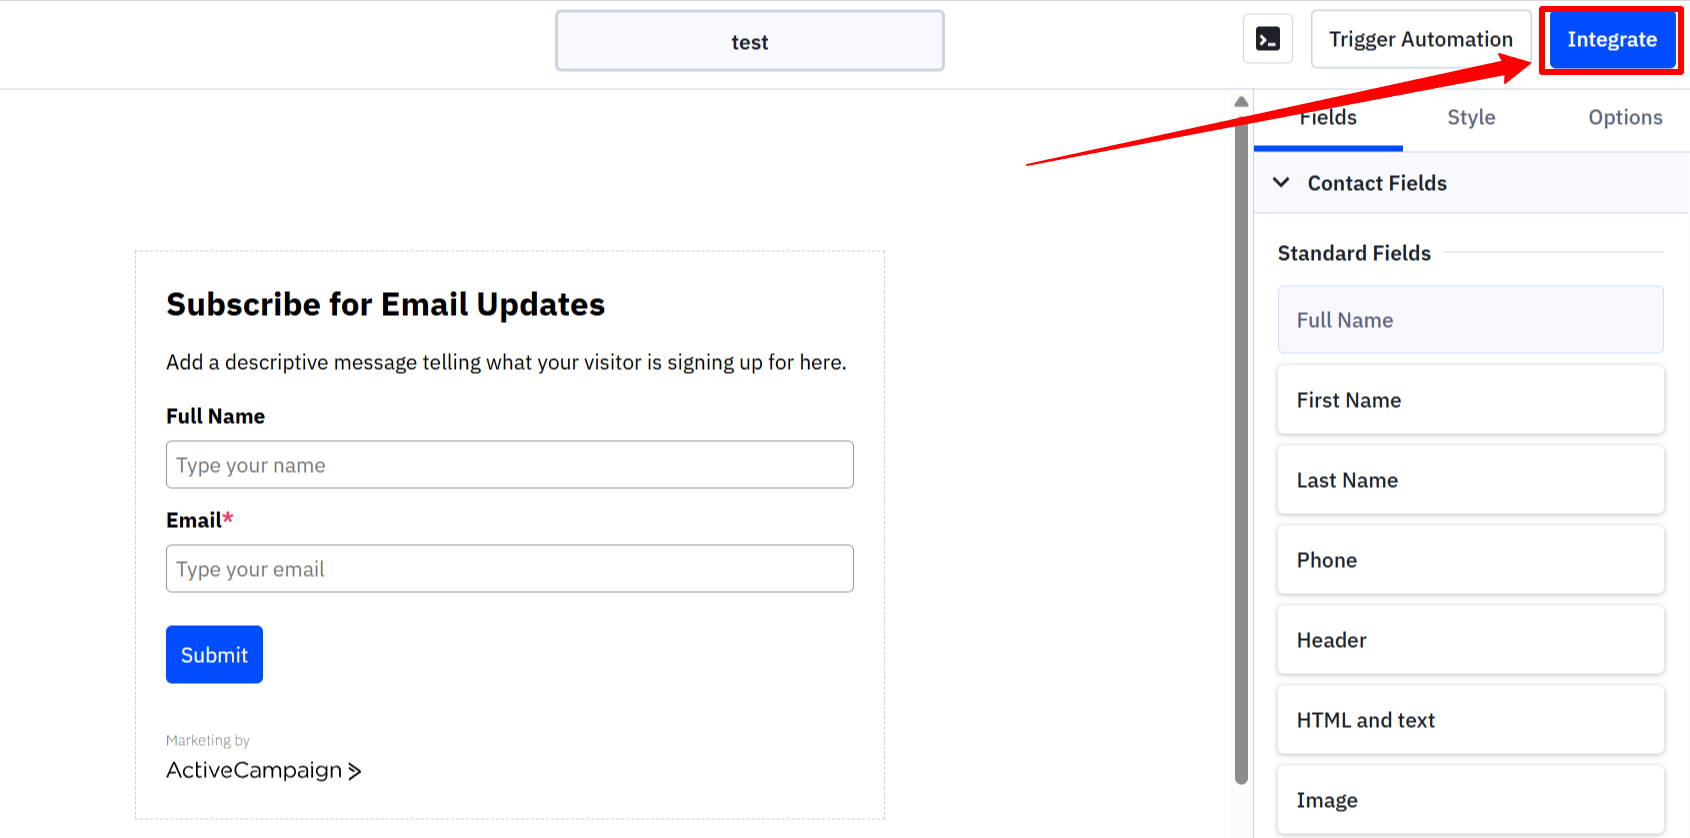
On the last step of form, click on "Integrate option" and copy the HTML code.
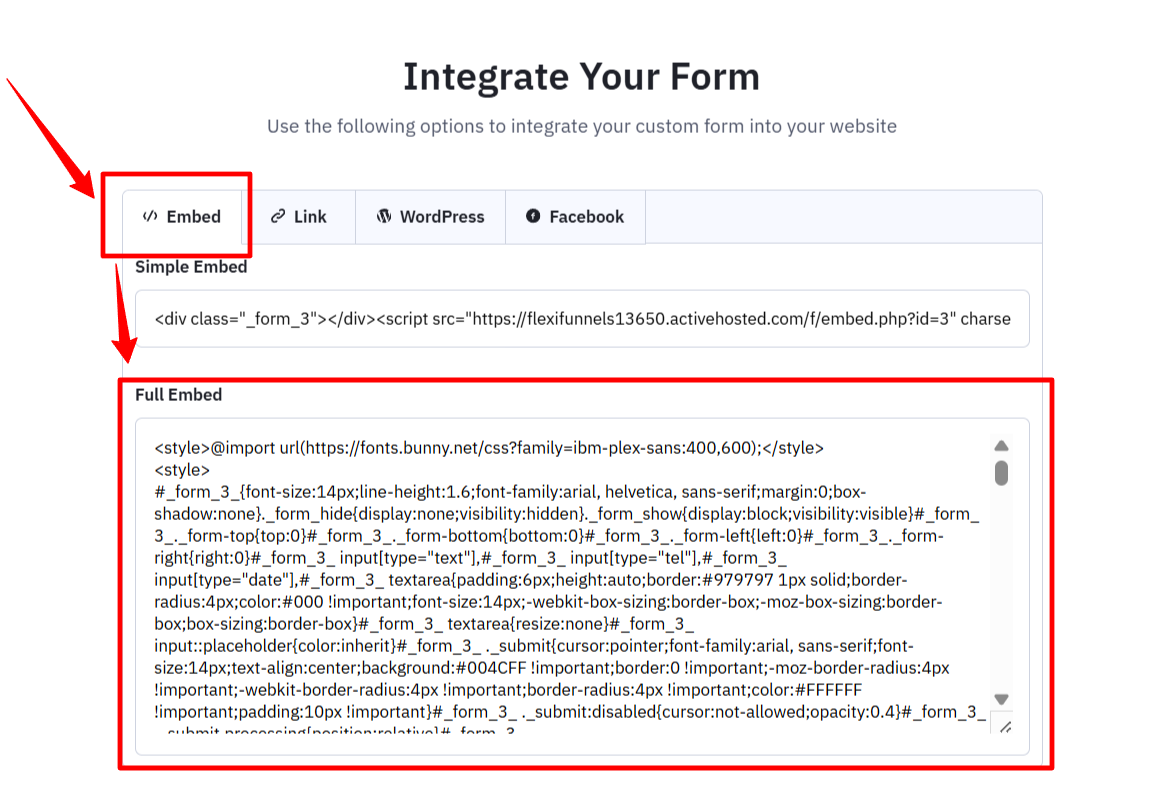
Now, once you have generated HTML Form code from your email autoresponder, connect a “form” element in a landing Page with the copied HTML Form code.
In order to connect a “form” element with HTML Form code, one needs to create a landing page inside a project.

Click on "Projects” displayed on the FlexiFunnels Dashboard Screen.
Click on the "+create new" button displayed on the Projects Screen.

Then type your "Project name" and click on the "+ADD project" button
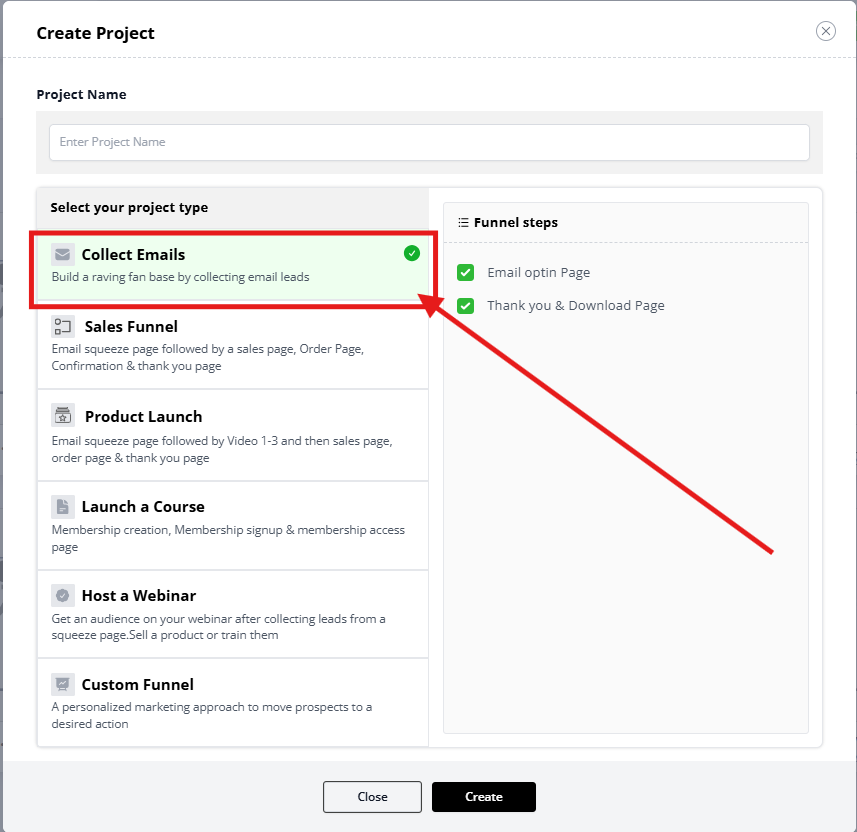
After completing these steps.
Select the Landing Page category
We have Different Landing Page Template Categories and Different Templates in Each category.
Select Your Landing Page Category
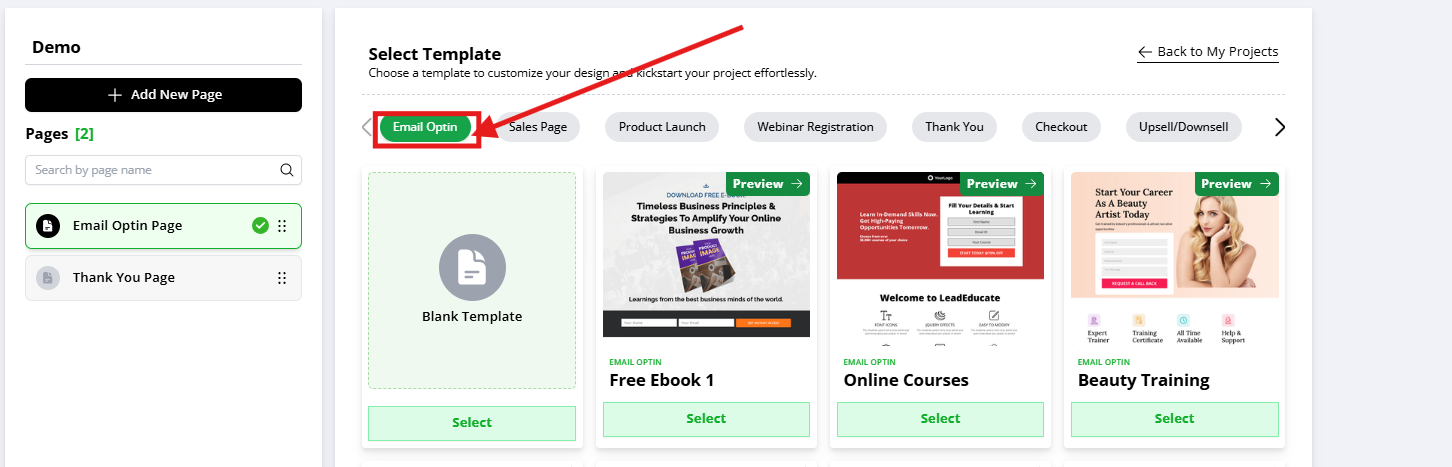
Then select the preferred template for your landing page
After selecting the Preferred Landing Page Template
The Screen will look like this
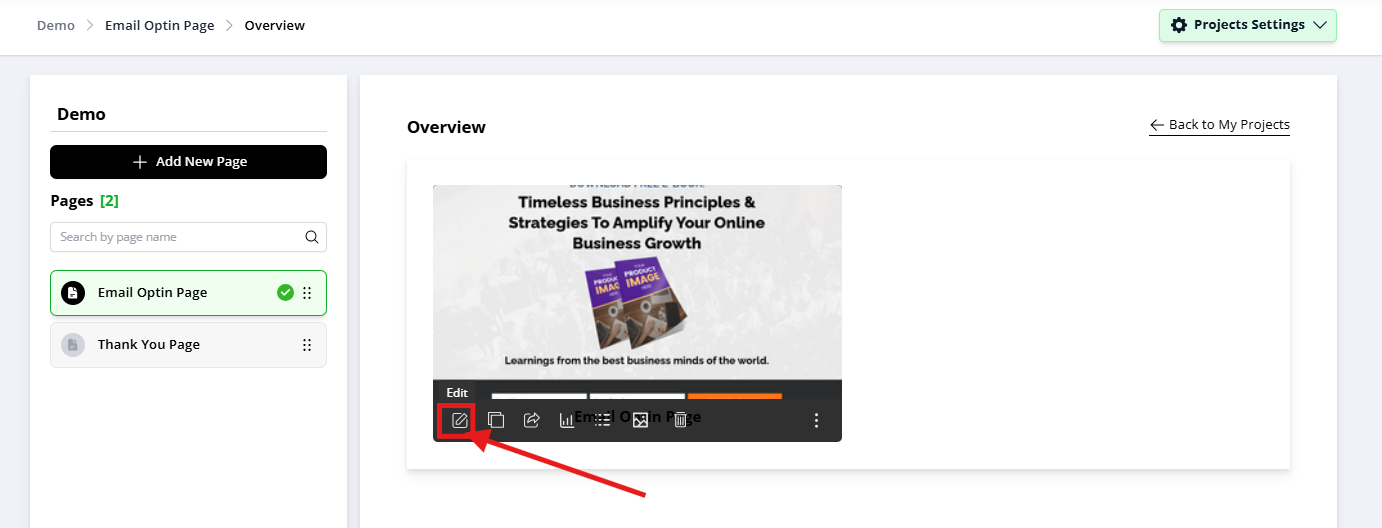
You have successfully created a Project in Flexifunnels With a Landing Page.
Now, Click on the "Edit Page" Button.
Click on the sidebar “plus” button and select the “forms” option under components to add forms inside the Flexifunnels Page Editor.
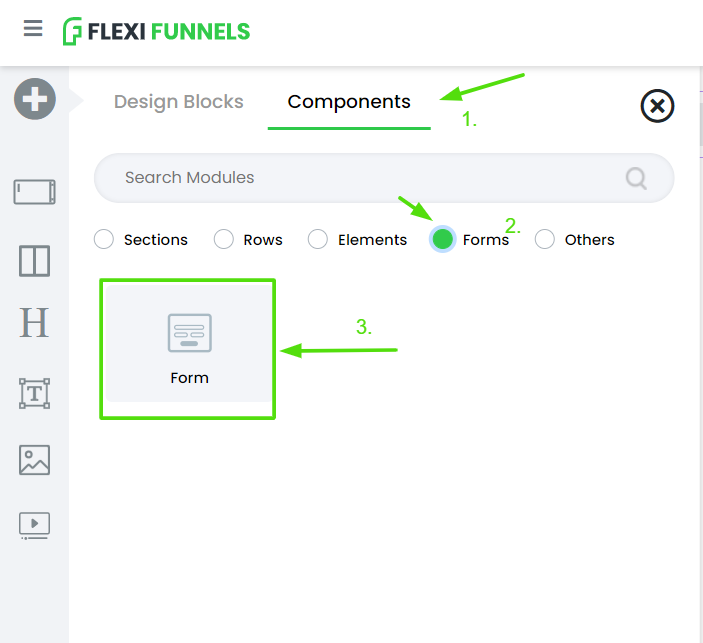
Once a “form” element is imported into the FlexiFunnels editor, click on the “form” element gear icon settings to open the form element gear settings
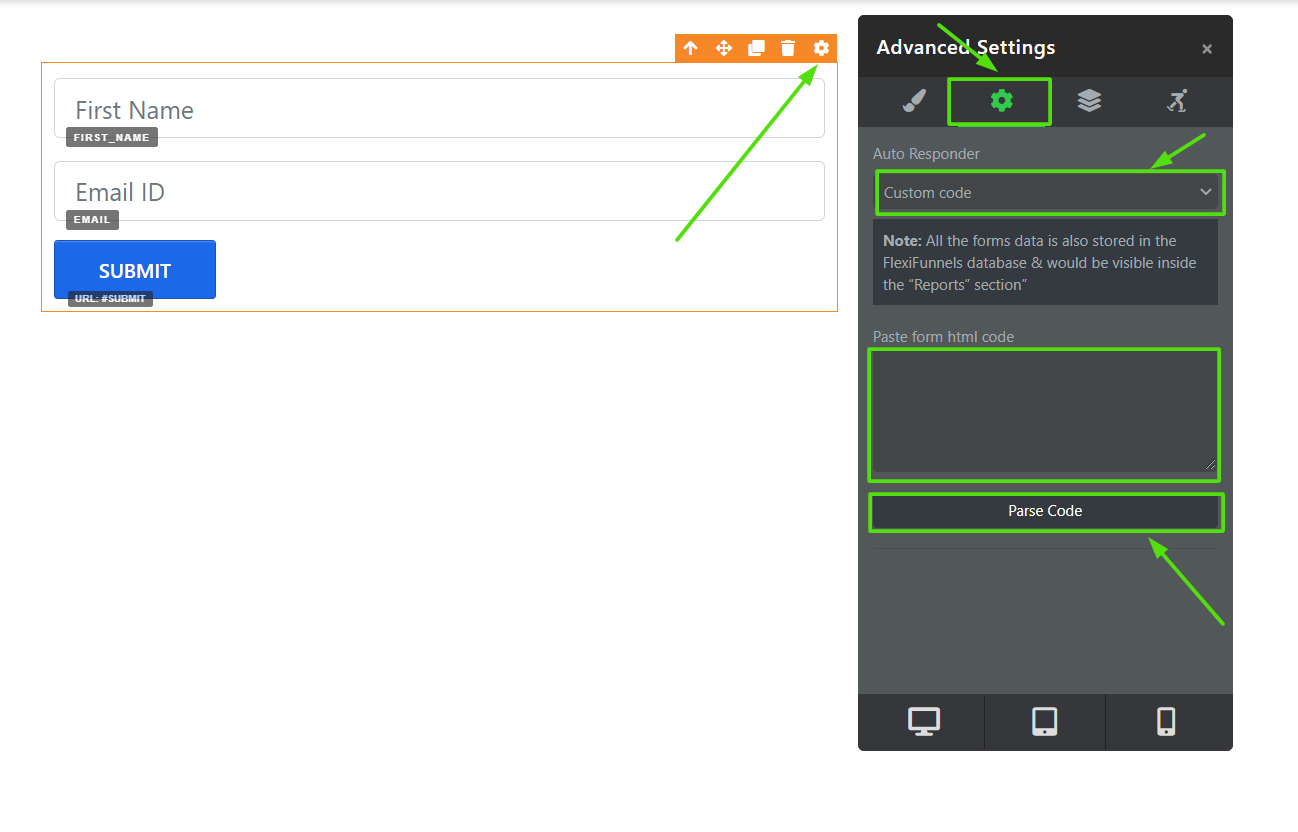
After opening the “Form” element gear settings, click on Advanced Settings, as shown in the image above.
Then select the “Custom Code” option from the dropdown.
Then paste the copied HTML Form code in the Paste the HTML form code space and click on the “parse code” button.
After clicking on the “parse code” button, the copied form code will now be integrated with the “form” element.
Now you can publish the landing page, using the “publish” button at the top, and start collecting leads.
The leads submitted on the published page will be directly reflected in your email autoresponder software connected with the “form” element using the HTML Form code option.
In a similar way, you can connect the rest of the autoresponders.
Know how to connect a specific autoresponder in detail:-
ActiveCampaign - https://help.flexifunnels.com/support/solutions/articles/36000308410-active-campaign-autoresponder-integration
Constant Contact - https://help.flexifunnels.com/support/solutions/articles/36000308412-constant-contact-autoresponder-integration
GetResponse - https://help.flexifunnels.com/support/solutions/articles/36000308517-get-response-integration
Mailchimp - https://help.flexifunnels.com/support/solutions/articles/36000308520-mailchimp-integration
Common Scenarios
ActiveCampaign isn't connecting.
Check the following:
- The API URL is correct.
https://has been added to the beginning of the API URL.- The API Key is valid.
- There are no extra spaces before or after the copied values.
My contacts aren't appearing in ActiveCampaign.
Verify:
- The landing page has been published.
- The form is connected to ActiveCampaign.
- The correct list has been selected.
- You're submitting the published page, not the editor preview.
Tags aren't being applied.
Check that:
- Tags contain at least 3 characters.
- Tags were saved after configuration.
- The correct ActiveCampaign account is selected.
Customers aren't being added after purchasing.
Verify:
- Product Rules have been configured.
- The correct ActiveCampaign account is selected.
- The correct list is selected.
- The product has been saved after updating the rules.
I receive an authentication error.
This usually happens because:
- The API Key is incorrect.
- The API URL is incomplete.
https://is missing.- The wrong ActiveCampaign account is being used.
Best Practices
- Use the Standard API Integration whenever possible.
- Keep separate lists for leads and customers.
- Use descriptive tags to organize contacts.
- Test your forms before launching campaigns.
- Submit a test lead to confirm that contacts are being added correctly.
Before Contacting Support
Before reaching out to our support team, please verify the following:
- ✅ ActiveCampaign is connected successfully.
- ✅ The API URL includes
https://. - ✅ The API Key is valid.
- ✅ The integration is enabled.
- ✅ The correct list is selected.
- ✅ Product Rules or Form Settings have been configured correctly.
- ✅ The landing page has been published.
- ✅ You've tested the integration using a live form submission or test purchase.
If the issue still persists, please provide:
- A screenshot of your ActiveCampaign integration settings.
- A screenshot of the Product Rules or Form Settings.
- The API URL (hide sensitive information if necessary).
- The exact error message (if any).
- A brief description of the issue and the troubleshooting steps you've already completed.
Was this article helpful?
That’s Great!
Thank you for your feedback
Sorry! We couldn't be helpful
Thank you for your feedback
Feedback sent
We appreciate your effort and will try to fix the article