How to Integrate ConvertKit (Kit) with FlexiFunnels
Connecting ConvertKit (now called Kit) to FlexiFunnels lets you automatically capture leads, add tags to subscribers, and trigger email automations the moment someone opts in or makes a purchase — no manual list management required.
This guide covers connecting your account, finding your API credentials, and setting up both purchase-based and form-based automations.
Before You Start
- You'll need an active ConvertKit account with API access
- Have your ConvertKit login handy — you'll need to retrieve your API Key and API Secret partway through this guide
Part 1: Connect Your ConvertKit Account to FlexiFunnels
Step 1: Log in to your FlexiFunnels account.
Step 2: Click Settings → Autoresponder Integrations.

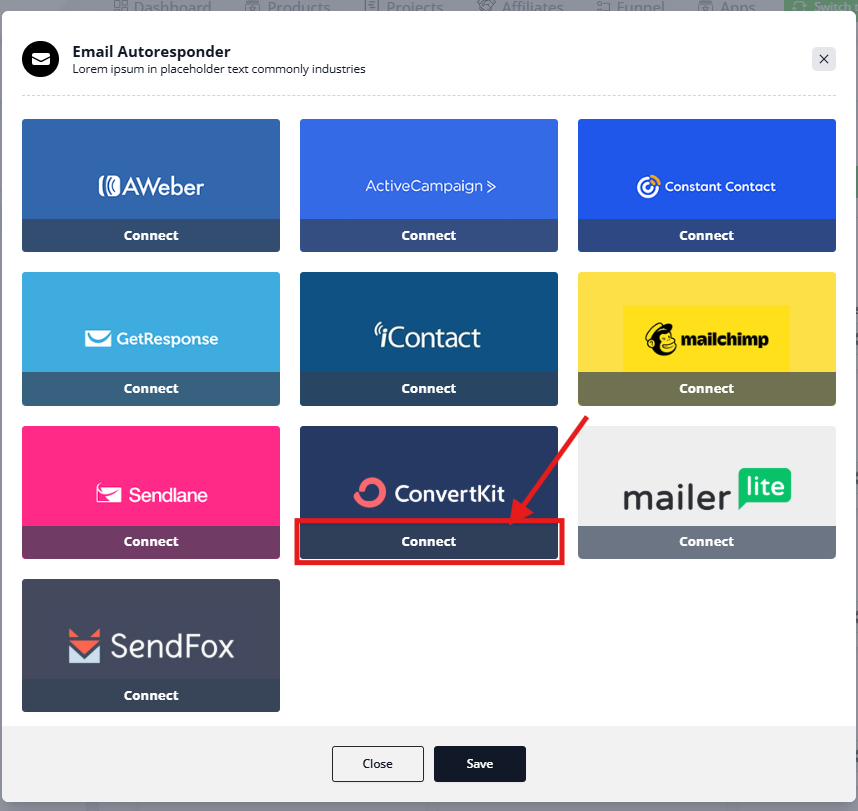
Step 3: Click + Add Autoresponder to see the full list of supported providers.

Step 4: Find ConvertKit in the list and click Connect.
Step 5: Give the integration a name (this is only for your own reference inside FlexiFunnels — it's not shown to customers). Then enter your API Key and API Secret (see Part 2 below if you don't have these yet), and click Save.

Part 2: Find Your ConvertKit API Key & API Secret
These two credentials authenticate the connection between ConvertKit and FlexiFunnels. Here's where to find them.
Step 1: Log in to ConvertKit and click your Account Name in the top-right corner.

Step 2: Click Settings from the dropdown.

Step 3: Scroll down in the left-hand menu and click Developer. Your API credentials live here, alongside other developer settings.

Step 4: Copy your API Key and API Secret, then paste them into the matching fields back in the FlexiFunnels integration window.
Step 5: Click Save.
Your ConvertKit account is now linked and ready to use with Product Rules and Forms.
Method 1: Auto-Add Customers to ConvertKit After Purchase
Use Product Rules to automatically subscribe someone to ConvertKit the moment they buy a specific product.
Step 1: Open Products
From your dashboard, click Products.

Step 2: Select the Product
Open the product you want to trigger a ConvertKit subscription after purchase.
Step 3: Open Product Rules
Click Set Rules — this controls what happens automatically right after a purchase completes.

Step 4: Choose Your ConvertKit Account
Under Select an Autoresponder, choose the ConvertKit account you connected in Part 1.

Step 5: Choose the Destination List or Form
Select which ConvertKit form or subscriber list new customers should land in. This decides which email sequence they enter.
Step 6: Add Tags (Optional)
Tags help you segment and trigger automations based on what someone bought. Common examples:
- customer
- course-buyer
- premium-member
- webinar
- upsell
Step 7: Save
Click Save. Every future purchase of this product will now automatically add the customer to ConvertKit.
Method 2: Capture Leads Using a FlexiFunnels Form
Use this method to send opt-ins, webinar registrations, or any landing page form submission straight into ConvertKit — independent of any purchase.
Step 1: Open Your Landing Page
Create a new landing page, or open an existing one.
Step 2: Edit the Page
Click Edit Page to open the Page Builder.
Step 3: Add a Form Element
Drag a Form element onto the page.
Step 4: Open Form Settings
Click the form, then click the Settings (⚙) icon.
Step 5: Connect to ConvertKit
Go to Advanced Settings → Connect with Autoresponder, then click Connect Here.
Step 6: Configure the Connection
Select:
- Your connected ConvertKit account
- The destination form/list (optional)
- Tags (optional)
Click Save.
Publish the page. Every form submission from now on will be sent to ConvertKit automatically.
Method 3: Embed a ConvertKit Form Directly (Alternative)
Already using a ConvertKit embedded form? You can paste its HTML directly into FlexiFunnels instead of using the API-based form connection above.
Step 1: Create the Form in ConvertKit
In ConvertKit, go to Landing Pages & Forms → Create New.
Step 2: Choose the Form Type
Select Form, then the Inline type.
Step 3: Copy the Embed Code
Customize your form, open the Embed section, and copy the HTML code.
Step 4: Add a Form Element in FlexiFunnels
Open your landing page in the Page Builder and drag a Form element onto the page.
Step 5: Open Custom Code Settings
Click the form's Settings (⚙), then go to Advanced Settings → Custom Code.
Step 6: Paste and Parse the Code
Paste the HTML you copied from ConvertKit, then click Parse Code. FlexiFunnels will detect the form fields automatically.
Publish the page. Submissions will now go directly to ConvertKit through the embedded form.
Which Method Should You Use?
| Method | Best For |
|---|---|
| Product Rules (purchase-based) | Automatically subscribing customers after a sale, with tagging |
| FlexiFunnels Form (API-connected) | Capturing leads from opt-ins, webinars, and landing pages |
| Embedded HTML Form | Users who already built a form inside ConvertKit and want to reuse it as-is |
Use the API-connected methods (Product Rules or FlexiFunnels Form) over the embedded HTML form where possible — they support tagging, automatic subscriber routing, and integrate more reliably with FlexiFunnels' own tracking.
Common Issues & Fixes
ConvertKit won't connect
- Double-check the API Key and API Secret for typos or extra spaces
- Confirm you copied credentials from the correct ConvertKit account (if you manage multiple)
- Reconnect the integration after re-entering credentials
Subscribers aren't showing up in ConvertKit
- Confirm the landing page is actually published, not just saved in the editor
- Verify the form is connected to the correct ConvertKit account and list
- Test on the live published page — the Page Builder preview doesn't submit real data
Tags aren't being applied
- Make sure each tag is at least 3 characters
- Confirm you clicked Save after adding tags
- Check you're editing the correct form or product — tags don't carry over between them
Customers aren't added after purchase
- Confirm Product Rules are set up on the specific product being purchased
- Verify the correct ConvertKit account and list are selected
- Re-save the product after any changes — unsaved rules won't trigger
"Authentication Failed" or "Invalid API Credentials"
- Recheck your API Key and API Secret
- If you regenerated credentials inside ConvertKit, reconnect using the new values — old ones stop working immediately
- Confirm your ConvertKit account is active and not suspended/expired
Best Practices
- Prefer the API-connected methods over embedded HTML forms when possible
- Use separate lists or tags per campaign so you can track what's working
- Always test with a real form submission or test purchase before considering setup "done"
- Periodically check that ConvertKit automations are sending subscribers into the right sequence
Pre-Support Checklist
Before contacting support, confirm:
- ✅ ConvertKit is connected and shows as active
- ✅ API Key and API Secret are correct and current
- ✅ The correct list/form destination is selected
- ✅ Product Rules or Form Settings are saved
- ✅ The landing page is published
- ✅ You've tested with a real submission or test purchase, not just the preview
If it's still not working, send support:
- A screenshot of your ConvertKit integration settings
- A screenshot of your Product Rules or Form configuration
- The name of the ConvertKit list/form you're using
- Any exact error message shown
- What you've already tried
ConvertKit is now connected to FlexiFunnels. Leads and customers will flow in automatically through Product Rules and Forms, with tags applied exactly as you've configured them.
Was this article helpful?
That’s Great!
Thank you for your feedback
Sorry! We couldn't be helpful
Thank you for your feedback
Feedback sent
We appreciate your effort and will try to fix the article