You can now send visitors to different pages depending on what they choose in your form. Add a radio button or dropdown field, give each option its own redirect URL, and every visitor lands exactly where their answer should take them.
Think of it like a receptionist directing visitors. Everyone walks through the same front door and signs the same visitor book — but the receptionist asks "who are you here to see?" and points each person down the right corridor. Your form is the visitor book; the radio/dropdown selection is the question; the redirect URL is the corridor.
⚠️ Important: The first field added winsThis feature works with either radio buttons or a dropdown — whichever is added first inside the form. And as the settings panel itself notes: if more than one field has redirect URLs, the field highest up the form wins. So plan your form order: put the field that should control the redirect at the top.
✅ Why this mattersWithout this, every person who fills in your form lands on the same thank-you page — and you then have to sort them out manually by email. With option-based redirection, a beginner and an expert, or a buyer and a browser, each go straight to the page that fits them. The right next step happens automatically, the moment they submit.
Part 1: For the Radio Button Option
Step 1: Open the Editor
Open the page you want to work on in the FlexiFunnels page editor.
Step 2: Add the Form Element
Add the Form element to your page (or select the form you already have).
Step 3: Go to the Form Advanced Settings
With the form selected, open its Advanced Settings panel.
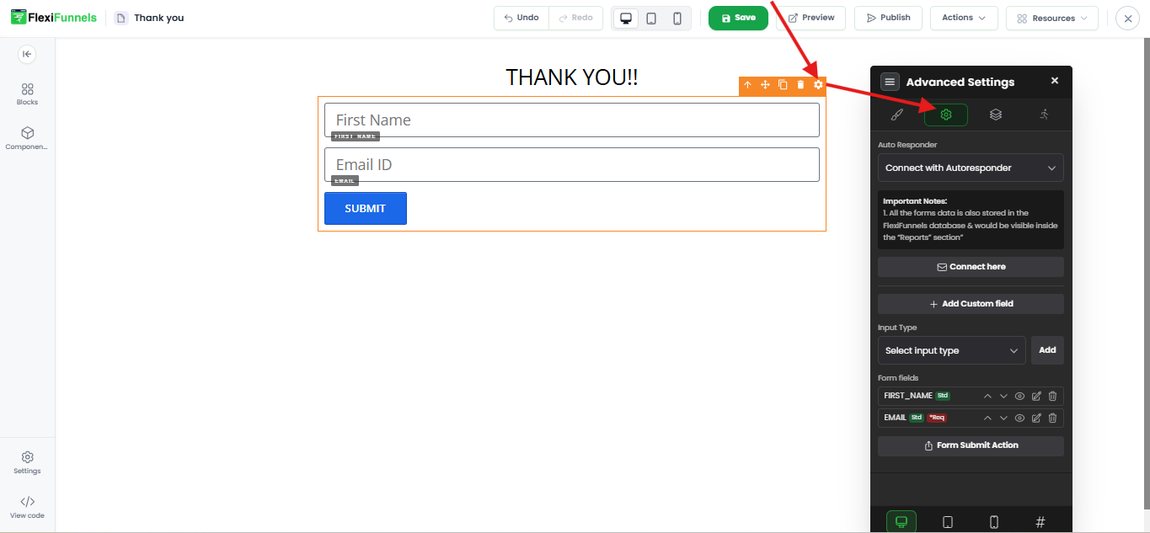
Open the form's Advanced Settings panel
Step 4: Click the Add Custom Field Button
In the Advanced Settings panel, click + Add Custom Field.
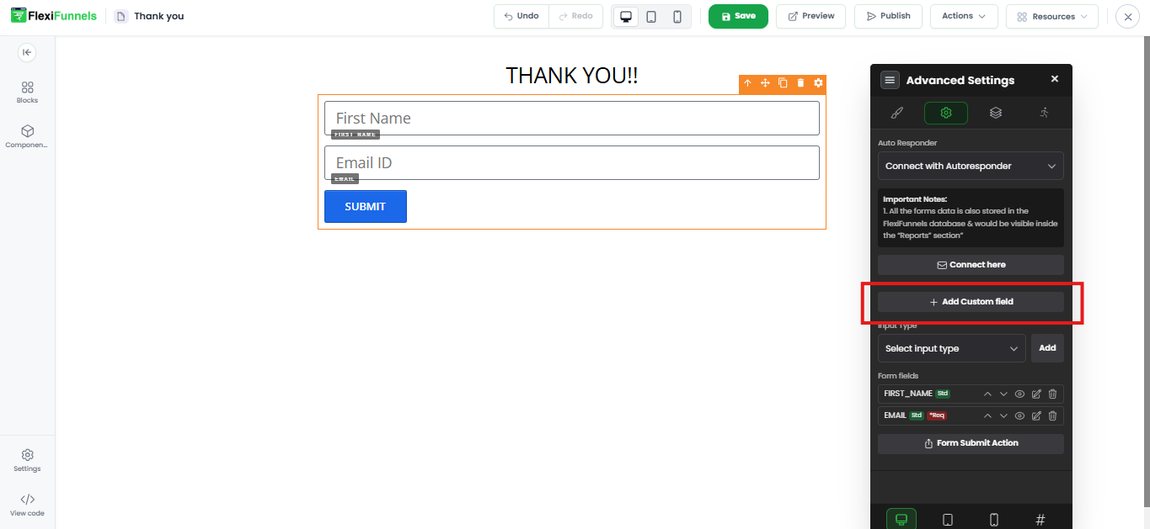
Click + Add Custom Field
Step 5: Select Radio Button as the Field Type
The Custom Field window opens. From the Field Type dropdown, select Radio Button.
Step 6: Click the Link Option
Next to Option1, click the link (chain) icon. A Redirect URL when this option is chosen field appears beneath that option.
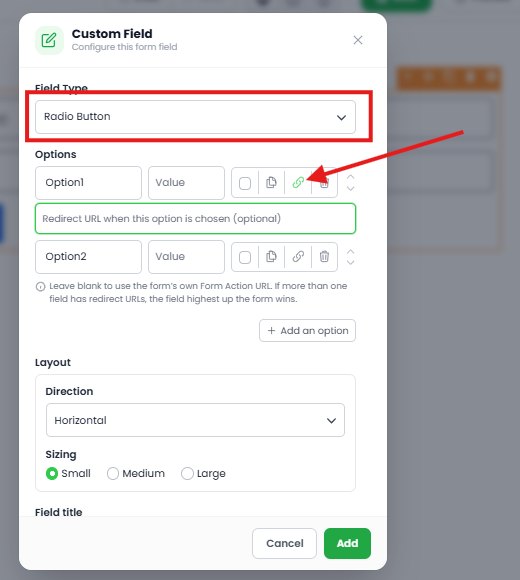
Select Radio Button, then click the link icon on the option you want to redirect
Step 7: Enter the Redirect URL
Type the page URL this option should send visitors to. Repeat Steps 6–7 for each option that needs its own destination — use + Add an option to add more choices.
? Leave it blank to use your normal thank-you pageThe redirect URL is optional for each option. As the panel notes, if you leave it blank, that option simply uses the form's own Form Action URL — your standard destination. So you only need to fill in URLs for the options that should go somewhere different.
Step 8: Click the Add Button
Set your Layout (Direction: Horizontal or Vertical, and Sizing) and Field title if you want, then click Add to add the field to your form.
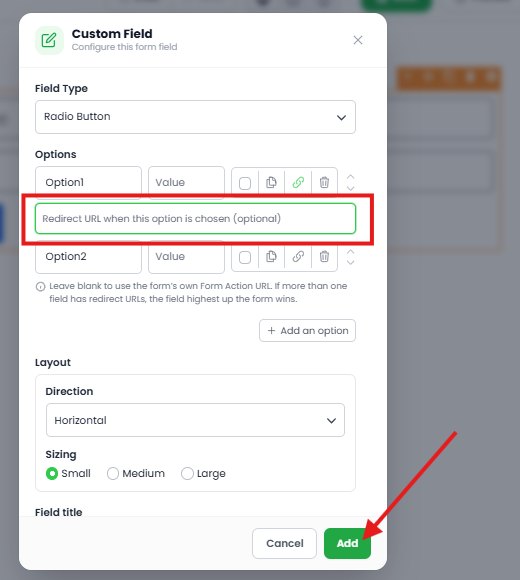
Enter the redirect URL, then click Add
Step 9: Publish the Page
After making the changes, publish the page.
Part 2: For the Dropdown Option
The process is identical — you only change the field type in Step 5.
Steps 1–4: Same as Above
Open the Editor → add the Form element → go to Form Advanced Settings → click + Add Custom Field.
Step 5: Select Dropdown as the Field Type
In the Custom Field window, choose Dropdown from the Field Type dropdown.
Step 6: Click the Link Option
Click the link (chain) icon next to the option you want to redirect. The Redirect URL when this option is chosen field appears.
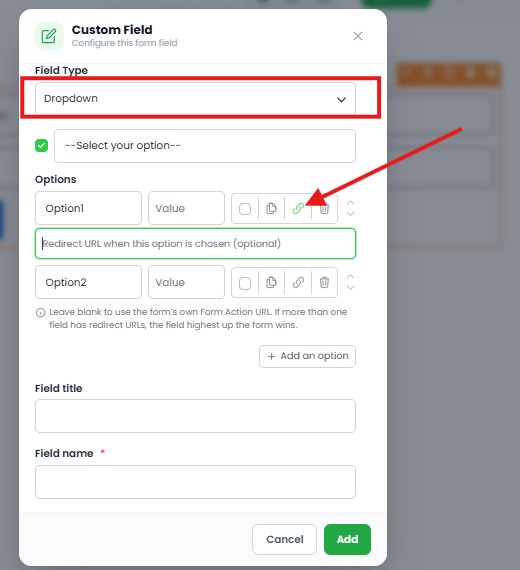
Select Dropdown, then click the link icon on the option
Step 7: Enter the Redirect URL
Type the destination URL for that option, and repeat for any other options that need their own page.
Step 8: Click the Add Button
Fill in the Field title and the Field name (required for dropdowns), then click Add.
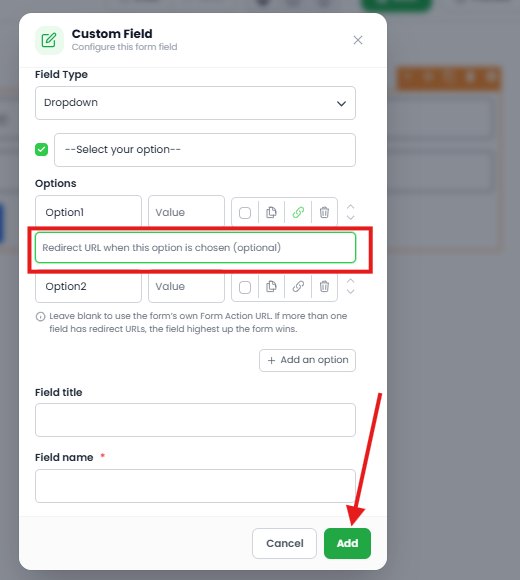
Enter the redirect URL and click Add — note that Field name is required for dropdowns
⚠️ Field name is mandatory for dropdownsUnlike the radio button field, the dropdown has a required Field name (marked with a red asterisk). If you skip it, the field won't be added — fill it in before clicking Add.
Step 9: Publish the Page
After making the changes, publish the page.
⚠️ Nothing goes live until you publishAdding the field and clicking Add only saves it inside the editor. Your visitors won't see the new field — or get redirected — until you click Publish. Always test the live page afterwards by submitting the form once with each option.
What Can You Use It For? (Use Cases)
1. Segment leads by interestAsk "What are you most interested in?" and send each answer to a dedicated page — one for coaching, one for the course, one for done-for-you services.
2. Route by experience levelBeginners go to a starter guide and a gentle offer; advanced users go straight to the pro-level page. Same form, two very different next steps.
3. Show the right pricing or plan pageLet visitors pick their plan (Basic / Premium / Elite) and land directly on that plan's checkout instead of a generic pricing page.
4. Book the right kind of call"What do you want to discuss?" routes each visitor to the matching calendar link — sales call, support call, or partnership enquiry.
5. Deliver the right freebieGive visitors a choice of lead magnets and send each selection straight to its own download page.
6. Split by location, language, or service areaLet people choose their city, country, or language and land on the page built for them.
7. Qualify or disqualify prospectsAsk about budget or company size, then send qualified leads to a booking page and everyone else to a self-serve option — without your team filtering them by hand.
8. Route support requests"What do you need help with?" sends visitors to the relevant help page, cutting down on tickets for issues that are already documented.
Common Situations & Quick Fixes
❓ "My form isn't redirecting — everyone lands on the same page."Check three things: (1) you clicked the link icon and actually entered a URL for that option, (2) you clicked Add to save the field, and (3) you published the page. Then test the live page, not the editor.
❓ "I have both a radio field and a dropdown — only one redirect works."That's expected. The feature uses whichever field was added first, and when multiple fields have redirect URLs, the field highest up in the form wins. Keep the deciding field at the top and remove redirect URLs from the others.
❓ "One option should go to my normal thank-you page. What URL do I use?"Leave that option's redirect URL blank — it will use the form's own Form Action URL automatically.
❓ "My dropdown field won't save."The Field name is required for dropdown fields (red asterisk). Fill it in, then click Add.
❓ "Visitors get an error page after submitting."The redirect URL is probably mistyped or incomplete. Use the full URL (including https://), paste it rather than typing it, and confirm the destination page is published too.
❓ "Will I still receive the lead data if visitors are redirected?"Yes — the submission is saved as normal, and form data is also stored in the FlexiFunnels database and visible in the Reports section. The redirect only changes where the visitor goes next.