Overview
UTM parameters are tags added to a URL to identify the source and performance of traffic from marketing campaigns. When visitors open a UTM-enabled FlexiFunnels landing page and submit a form or purchase a product, the captured UTM values can be sent to Google Sheets through a webhook.
Use UTM tracking to understand which channels, campaigns, advertisements, keywords, or partners generate leads and sales. This article uses Zutrix as an example UTM builder. Zutrix is a third-party tool and is not an official FlexiFunnels recommendation; you may use another UTM builder that meets your requirements.
Before You Begin
- A FlexiFunnels account with access to the relevant landing page, form, or product.
- A published FlexiFunnels landing page URL.
- A Google account and a Google Sheet that will receive the submitted data.
- A configured webhook for the lead form or product.
- The campaign source, medium, campaign name, and any optional term or content values you want to track.
Understanding UTM Parameters
UTM parameters are appended to the end of a destination URL. They provide reporting systems with information about the marketing activity that brought a visitor to the page.
- Campaign Source (
utm_source): Identifies the traffic source, such as Google, Facebook, or an email newsletter. - Campaign Medium (
utm_medium): Identifies the marketing medium, such as CPC, banner, social, or email. - Campaign Name (
utm_campaign): Identifies the campaign, such as OctoberSale. - Campaign Term (
utm_term): Optionally identifies a keyword, such as winter shoes. - Campaign Content (
utm_content): Optionally distinguishes similar advertisements or links, such as ad1 and ad2.
Example UTM link:
Step 1: Create a Google Sheets Webhook
Create a webhook connection that sends lead form or product data to Google Sheets. This connection ensures that UTM values submitted by visitors are available in your spreadsheet for reporting and analysis.
For detailed setup instructions, see https://help.flexifunnels.com/en/support/solutions/articles/36000478569-how-to-send-the-product-data-and-lead-form-data-to-google-sheets-without-using-the-3rd-party-tool-.
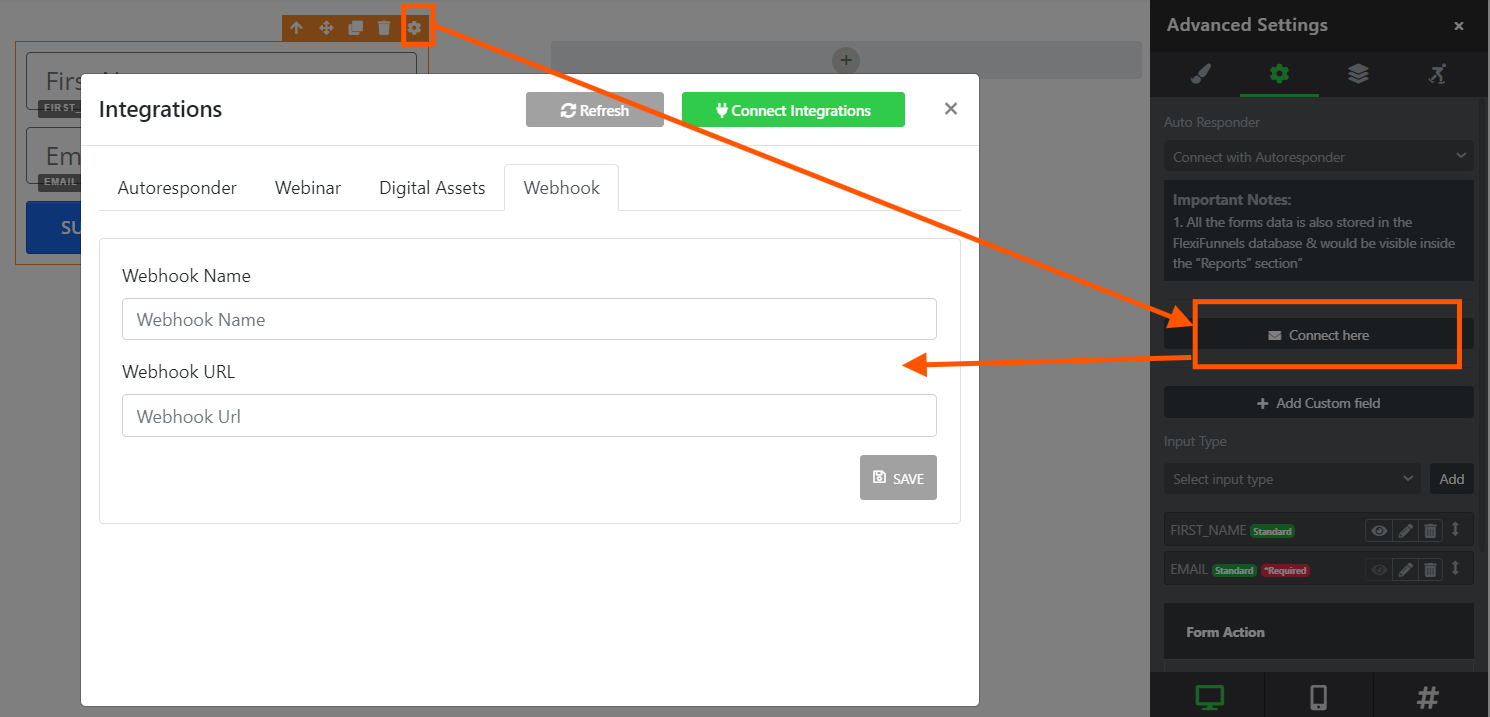
Step 2: Add the Webhook to Your Form or Product
Add the webhook URL to the FlexiFunnels lead generation form or product that should collect UTM information. This allows submitted data to flow from FlexiFunnels to the connected Google Sheet.
Use the relevant FlexiFunnels documentation for your setup: Webhook , Form , or Product.
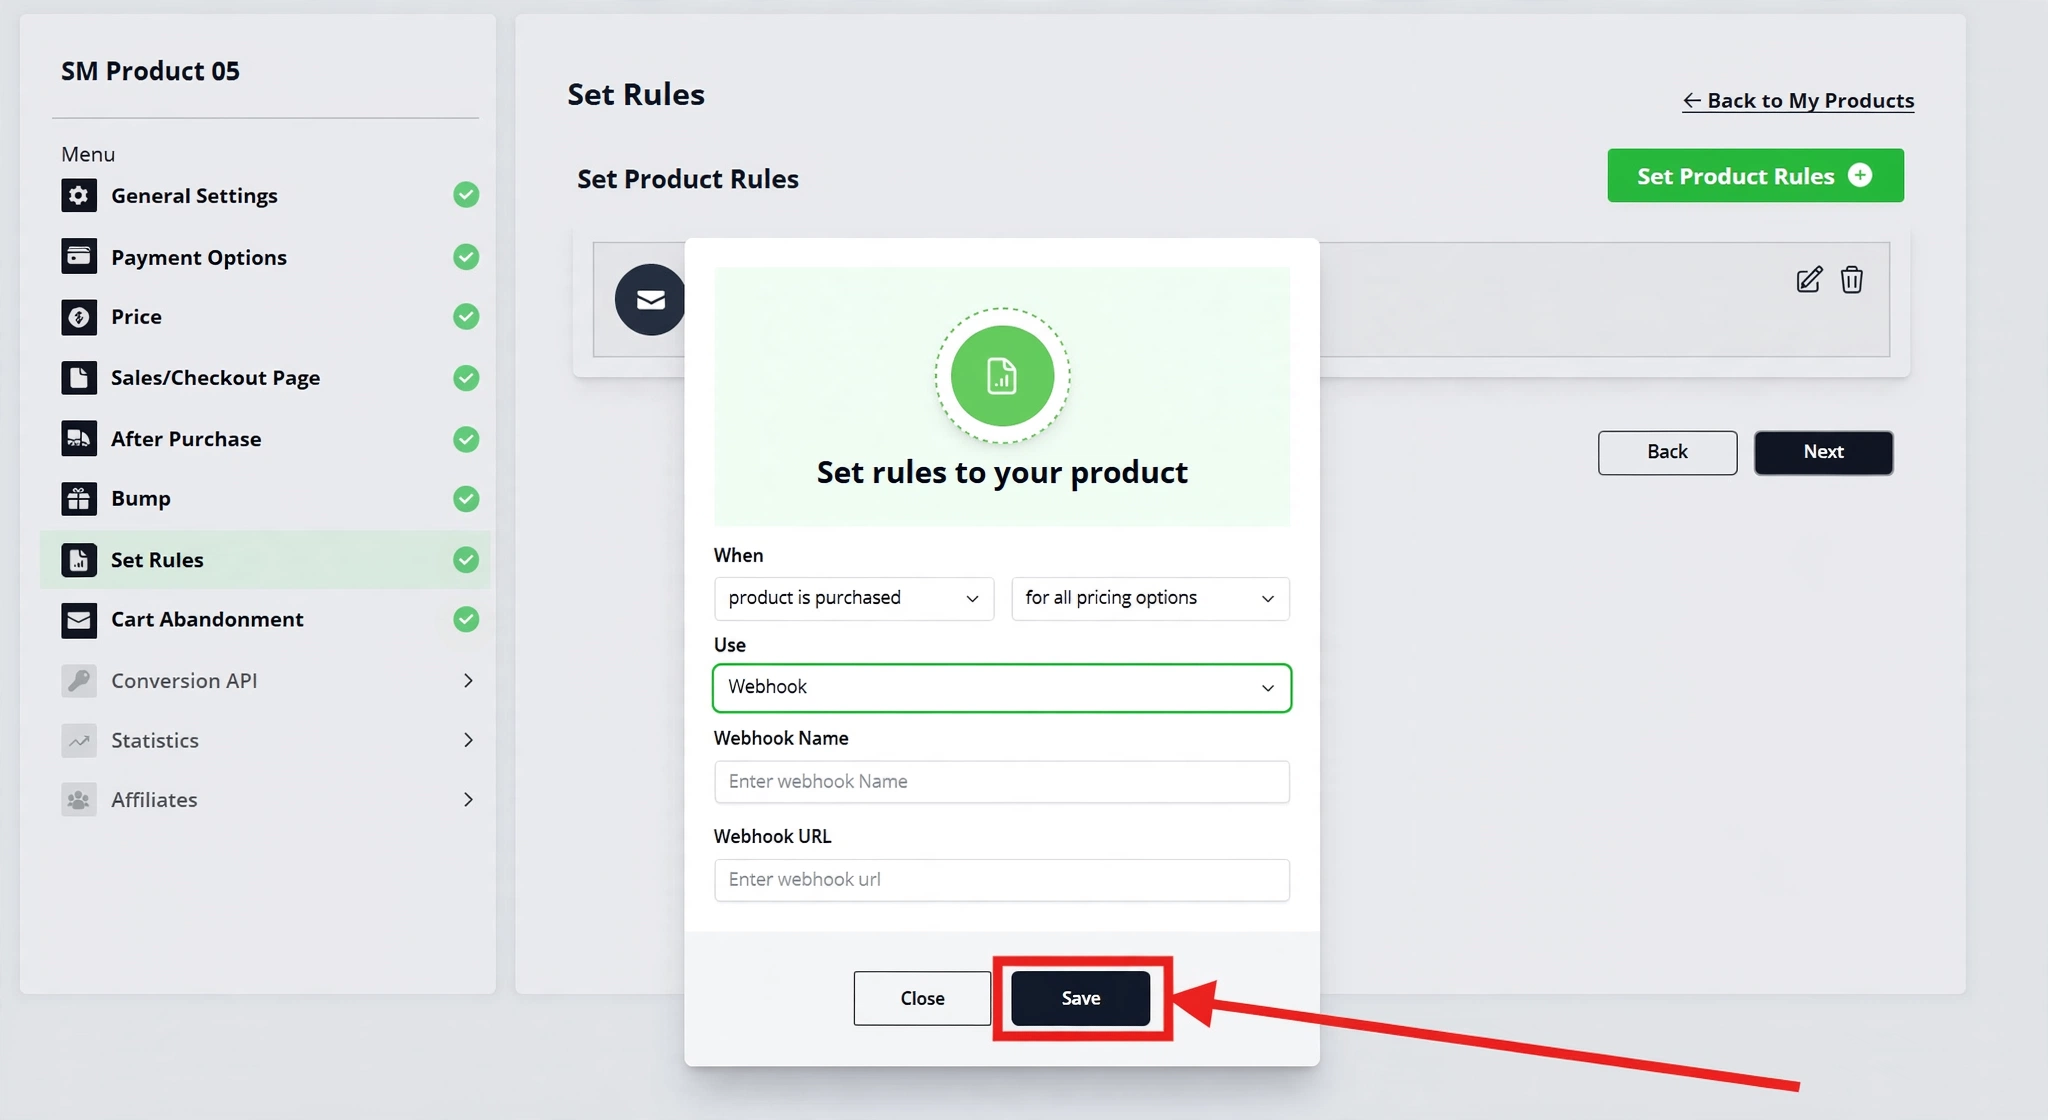
Step 3: Build a UTM-Enabled URL
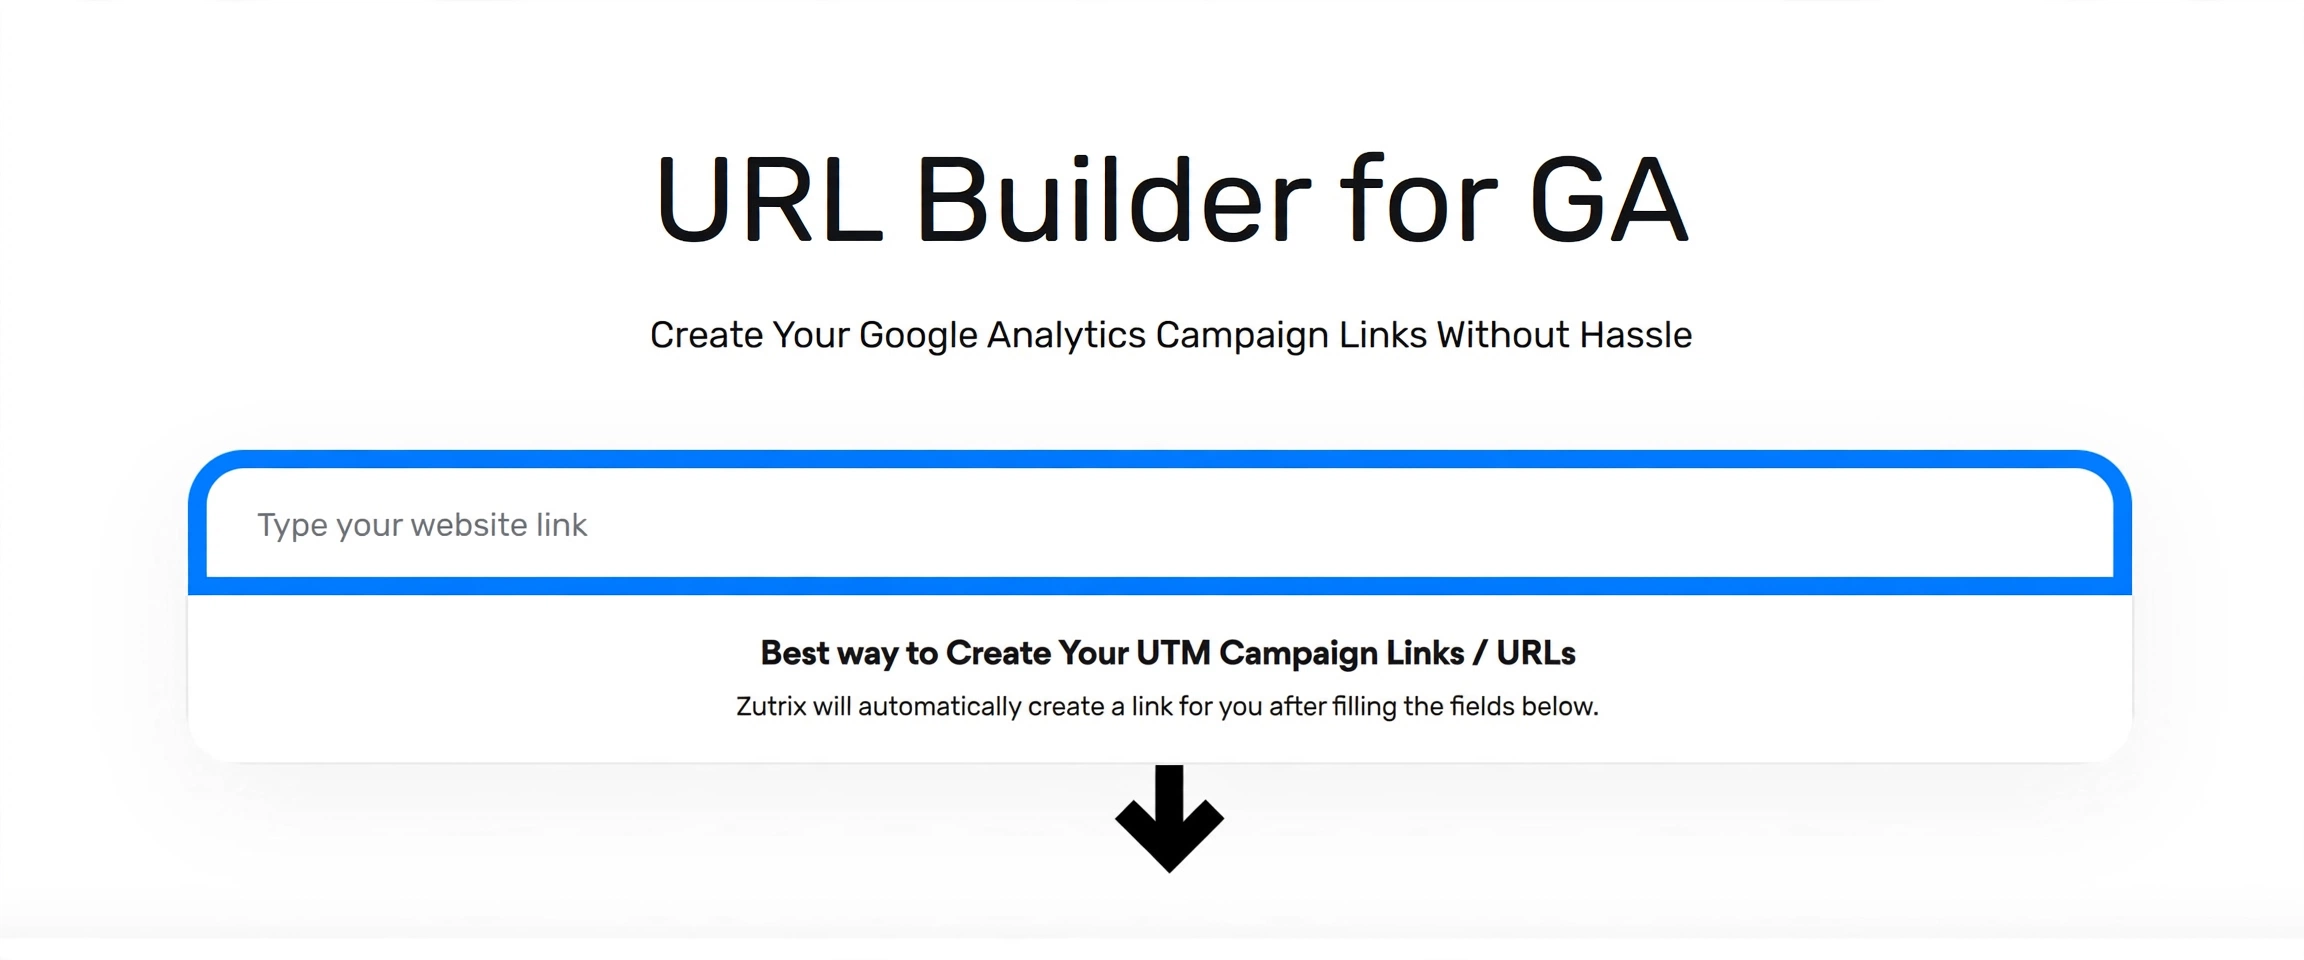
Open your preferred UTM builder. In this example, use the Zutrix UTM Builder, then enter the published URL of your FlexiFunnels landing page as the destination URL.
https://zutrix.com/analytics-url-builder?gad_source=1&gclid=Cj0KCQiA67CrBhC1ARIsACKAa8SlwzIE7e-f9CMZNCVmOpR9eoWstlvn8DRx1cbb656Vq4Urm1gwVE8aAu1pEALw_wcB
Step 4: Enter Campaign Information
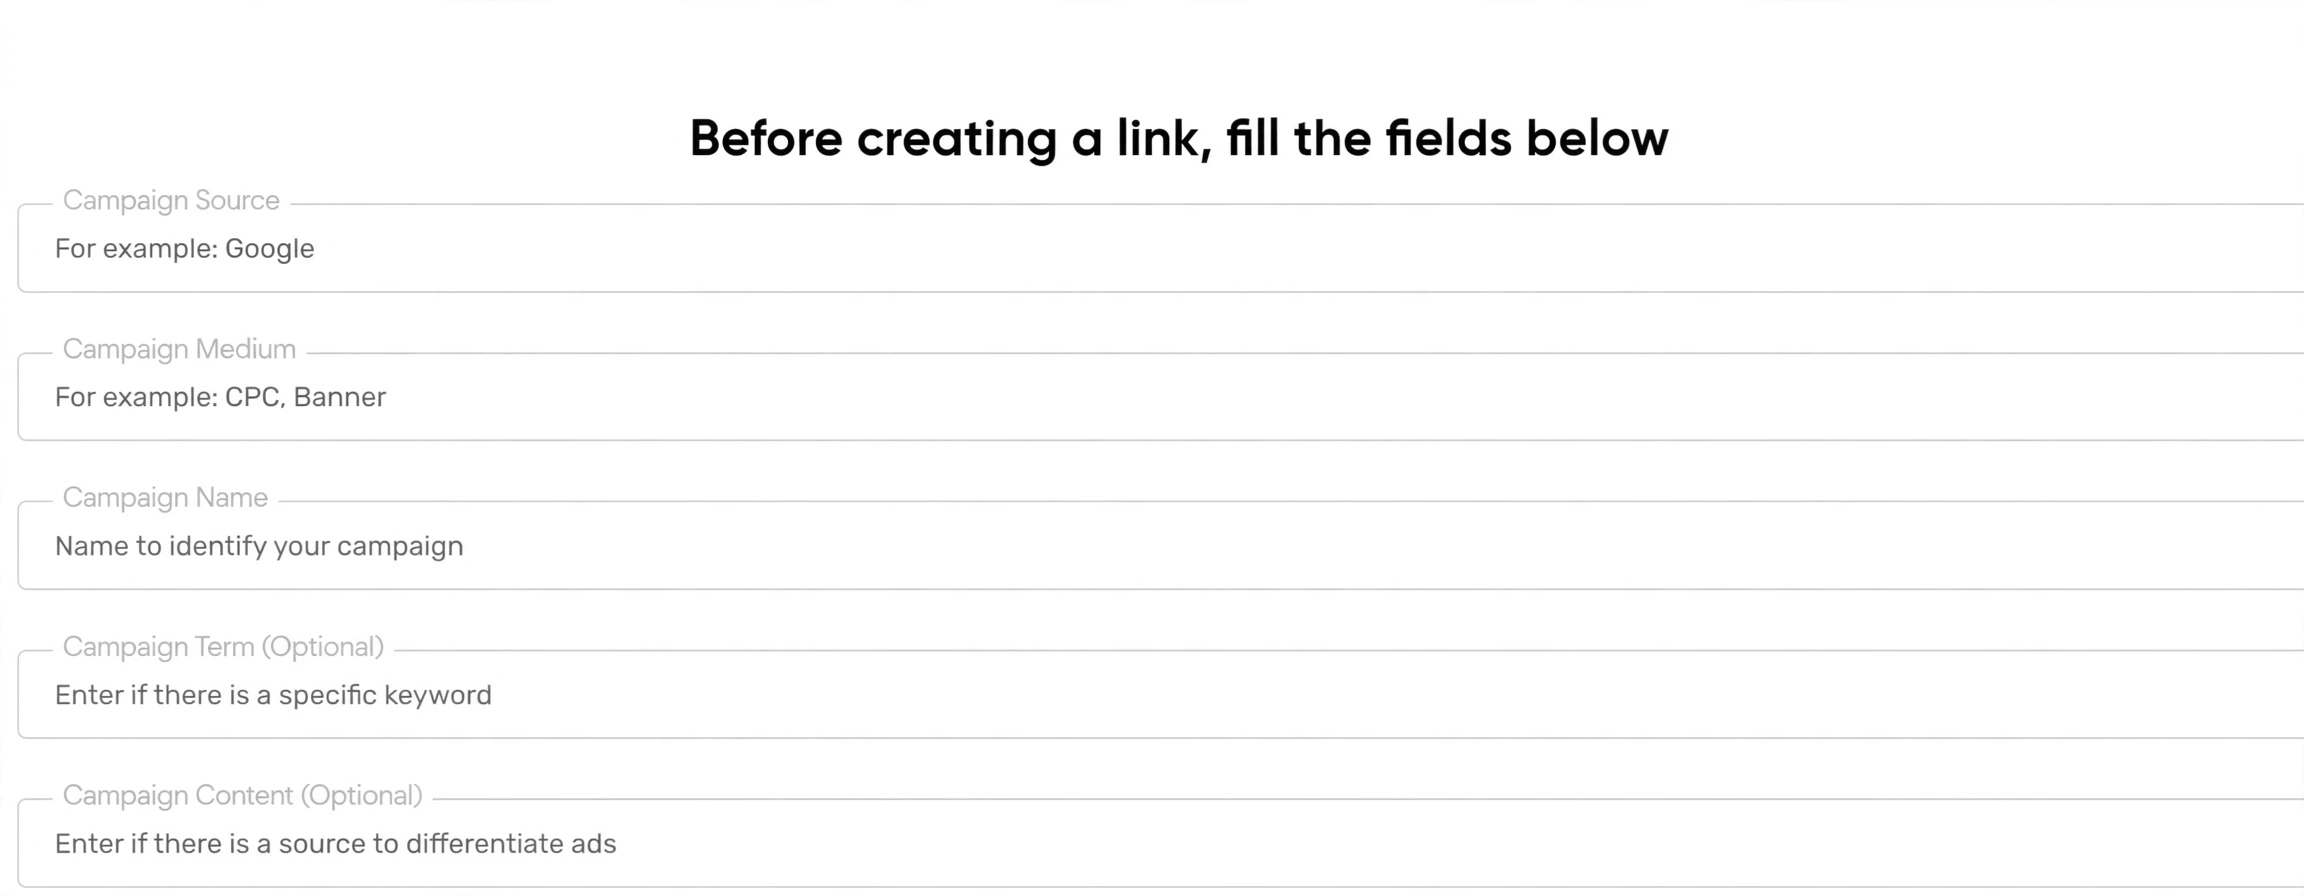
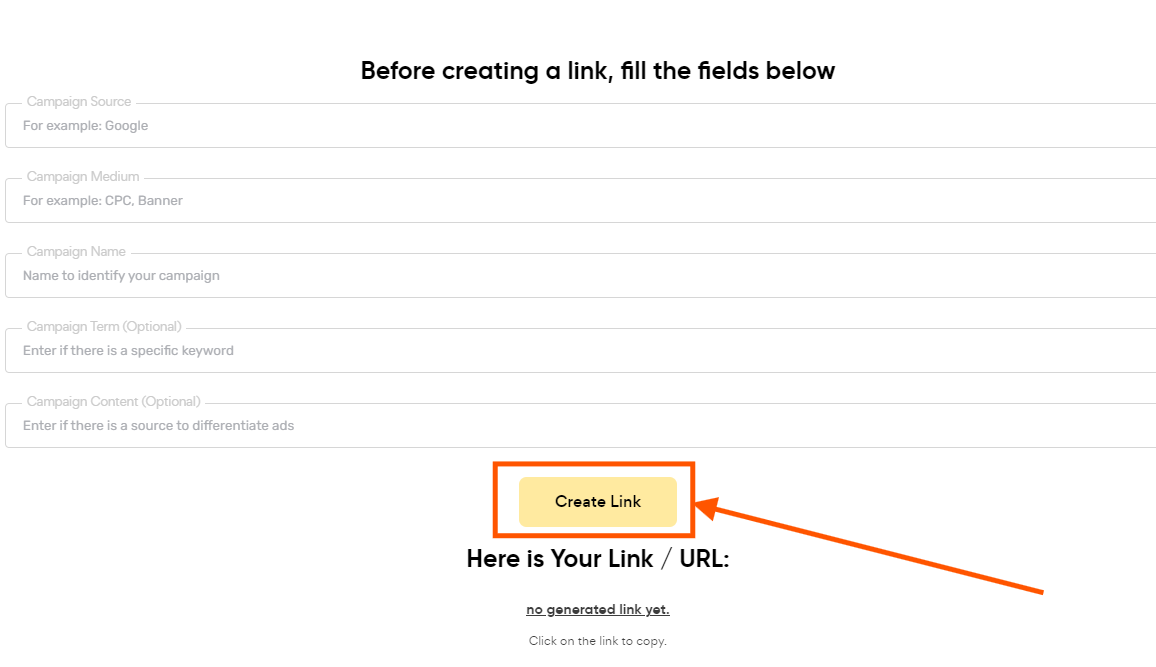
Complete the campaign fields in the UTM builder. Use a consistent naming convention so that your Google Sheets data remains easy to filter and compare.
- Campaign Source: Enter the traffic source, for example, Google.
- Campaign Medium: Enter the marketing medium, for example, CPC or Banner.
- Campaign Name: Enter a descriptive campaign identifier, for example, OctoberSale.
- Campaign Term: Optionally enter the keyword used for the campaign.
- Campaign Content: Optionally enter a value that identifies a specific advertisement or link variation.
Step 5: Generate the UTM Link
Select Create Link in Zutrix to generate the UTM-enabled URL. Use this generated URL in the applicable advertisement, email, social media post, affiliate promotion, or other campaign channel.
Step 6: Test the UTM Link
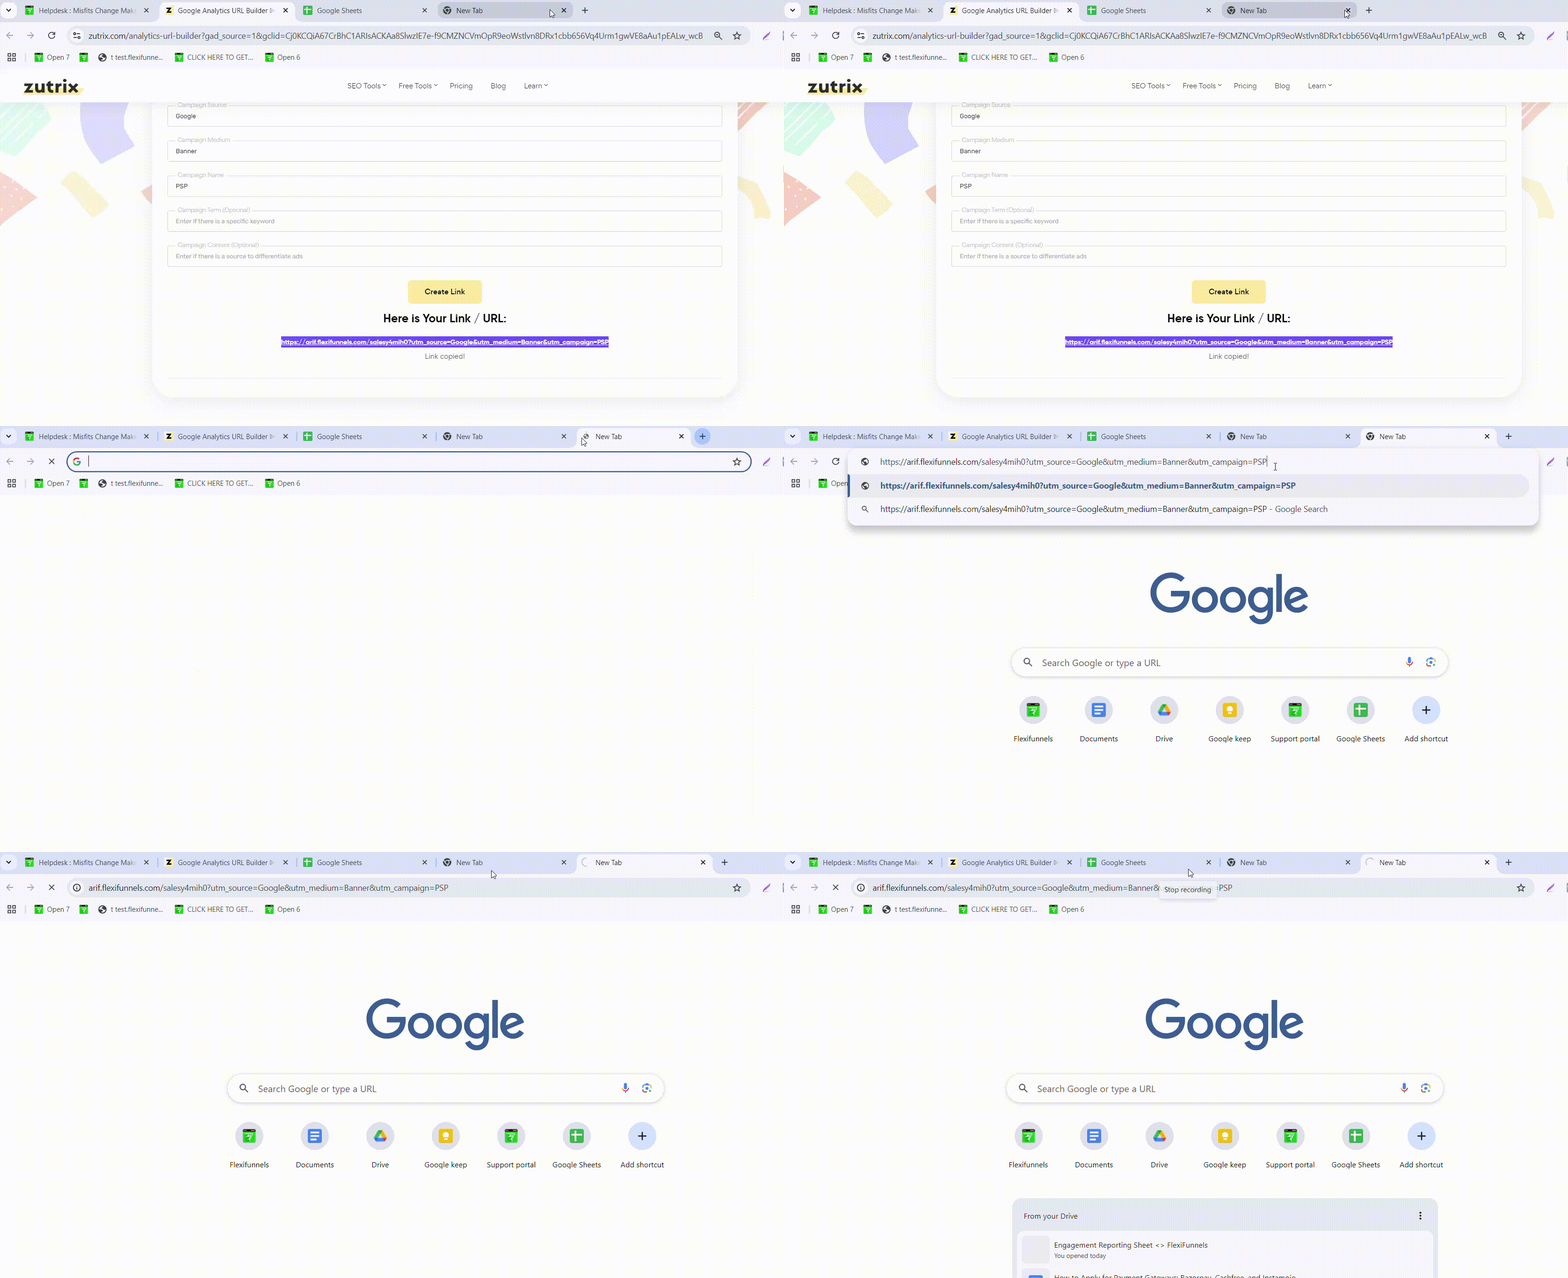
Open the generated UTM link in a test environment and submit a sample lead form or product order. This confirms that the page loads correctly and that the UTM values are passed through the configured data flow.
Step 7: Validate UTM Data in Google Sheets
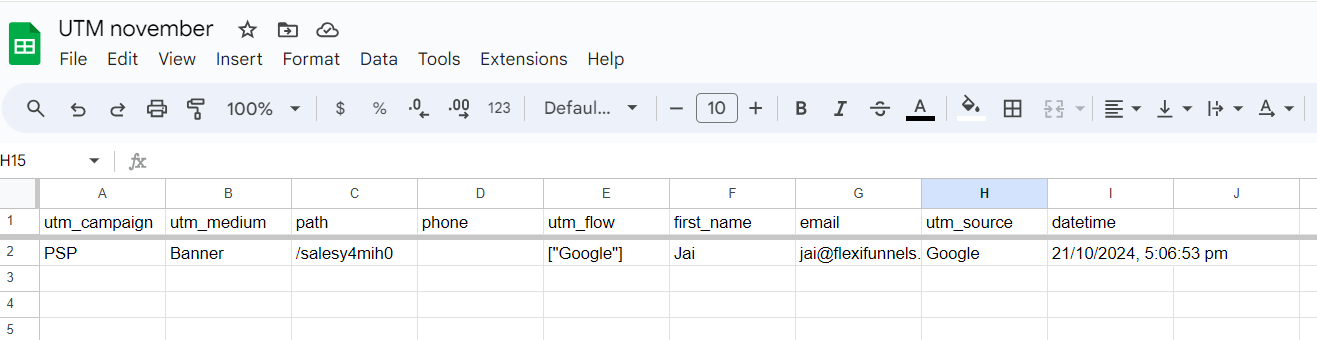
Open the Google Sheet connected to the webhook and confirm that the test submission appears with the expected UTM values. Use this data to identify the sources and campaigns that generate leads or sales.
Verify the Configuration
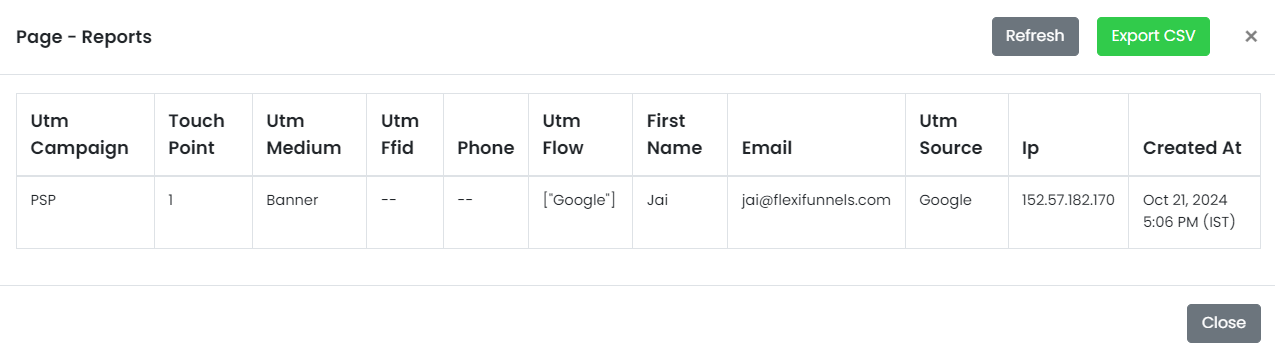
Confirm that the generated URL includes the expected utm_source, utm_medium, and utm_campaign values. Submit a test entry using this URL, then verify that the Google Sheet receives the same UTM information along with the form or product data.
Common Scenarios
- Campaign performance tracking: Compare lead and sales results from Google Ads, email, social media, and other channels.
- A/B testing advertisements: Use distinct campaign content values to compare similar ad variations.
- Affiliate and partner tracking: Use separate UTM source values to identify traffic and sales generated by each partner.
- Social media analysis: Compare engagement and conversion results from platforms such as Instagram and Facebook.
- Offer tracking: Use campaign names to compare performance across launches, sales, and seasonal promotions.
Best Practices
- Use a consistent naming convention for sources, mediums, campaigns, terms, and content values.
- Use lowercase values to prevent duplicate reporting entries caused by inconsistent capitalization.
- Use clear campaign names that identify the promotion and reporting period.
- Use the campaign content parameter to distinguish different ad creatives or call-to-action buttons.
- Test every UTM-enabled link before using it in a live campaign.
- Avoid changing parameter names after the campaign is live, as this can fragment reporting data.
- Keep the original published landing page URL available for comparison during testing.
Before Contacting Support
- Confirm that the landing page URL is published and opens correctly.
- Verify that the UTM link contains the intended parameter names and values.
- Check that the webhook is added to the correct form or product.
- Submit a test entry using the UTM-enabled URL.
- Verify the webhook connection and Google Sheet destination.
- Check the Google Sheet for the submitted UTM values.
Expected Outcome
After setup is complete, visitors who open your UTM-enabled landing page link and submit a form or purchase a product have their associated UTM values sent to the connected Google Sheet. You can use the recorded data to analyze campaign performance and identify the channels that drive leads and sales.
Related Articles
Was this article helpful?
That’s Great!
Thank you for your feedback
Sorry! We couldn't be helpful
Thank you for your feedback
Feedback sent
We appreciate your effort and will try to fix the article