What You're About to Build (The Simple Version)
Think of a course like a book:
- Book: Has chapters, each chapter has sections, sections have paragraphs
- Course: Has modules, each module has lessons, lessons have videos + descriptions
FlexiFunnels lets you organize your teaching material into a structured course that students can access after paying.
The workflow:
- Create a course project (container for everything)
- Organize your content (modules = chapters, lessons = sections)
- Record/upload videos (the actual teaching)
- Set pricing (create a "bundle" with your content)
- Create sales & checkout pages (where customers buy)
- Configure membership settings (login, dashboard, security)
- Go live (share with students)
Key Terms Explained (Before You Start)
Don't let terminology confuse you. Here's what each word means:
| Term | What It Is | Example |
|---|---|---|
| Project | Container for your entire course | "Email Marketing Masterclass" |
| Module | Chapter-like section of your course | "Module 1: Email Basics" |
| Lesson | Individual teaching unit within a module | "Lesson 1.1: Setting Up Your Email Account" |
| Video | The actual teaching content you upload/link | YouTube video, Vimeo video, or MP4 file |
| Bundle | Pricing package (which modules/lessons are included?) | "Full Course Bundle" ($199) or "Starter Bundle" ($49) |
| Membership | Access system (who can login? For how long?) | "Lifetime access" or "30-day access" |
| Drip Feed | Releasing lessons on a schedule | "Module 2 unlocks on Day 7" |
Before You Start: What You'll Need
Your teaching content ready (or at least outlined)
Videos recorded and uploaded somewhere (or YouTube links ready)
A course name and clear outline (how many modules? lessons?)
About 30–45 minutes for initial setup
Payment gateway set up (Stripe, Razorpay, etc.) — see Payment Gateway Setup
Quick Video Walkthrough:
Steps to Create a Course:
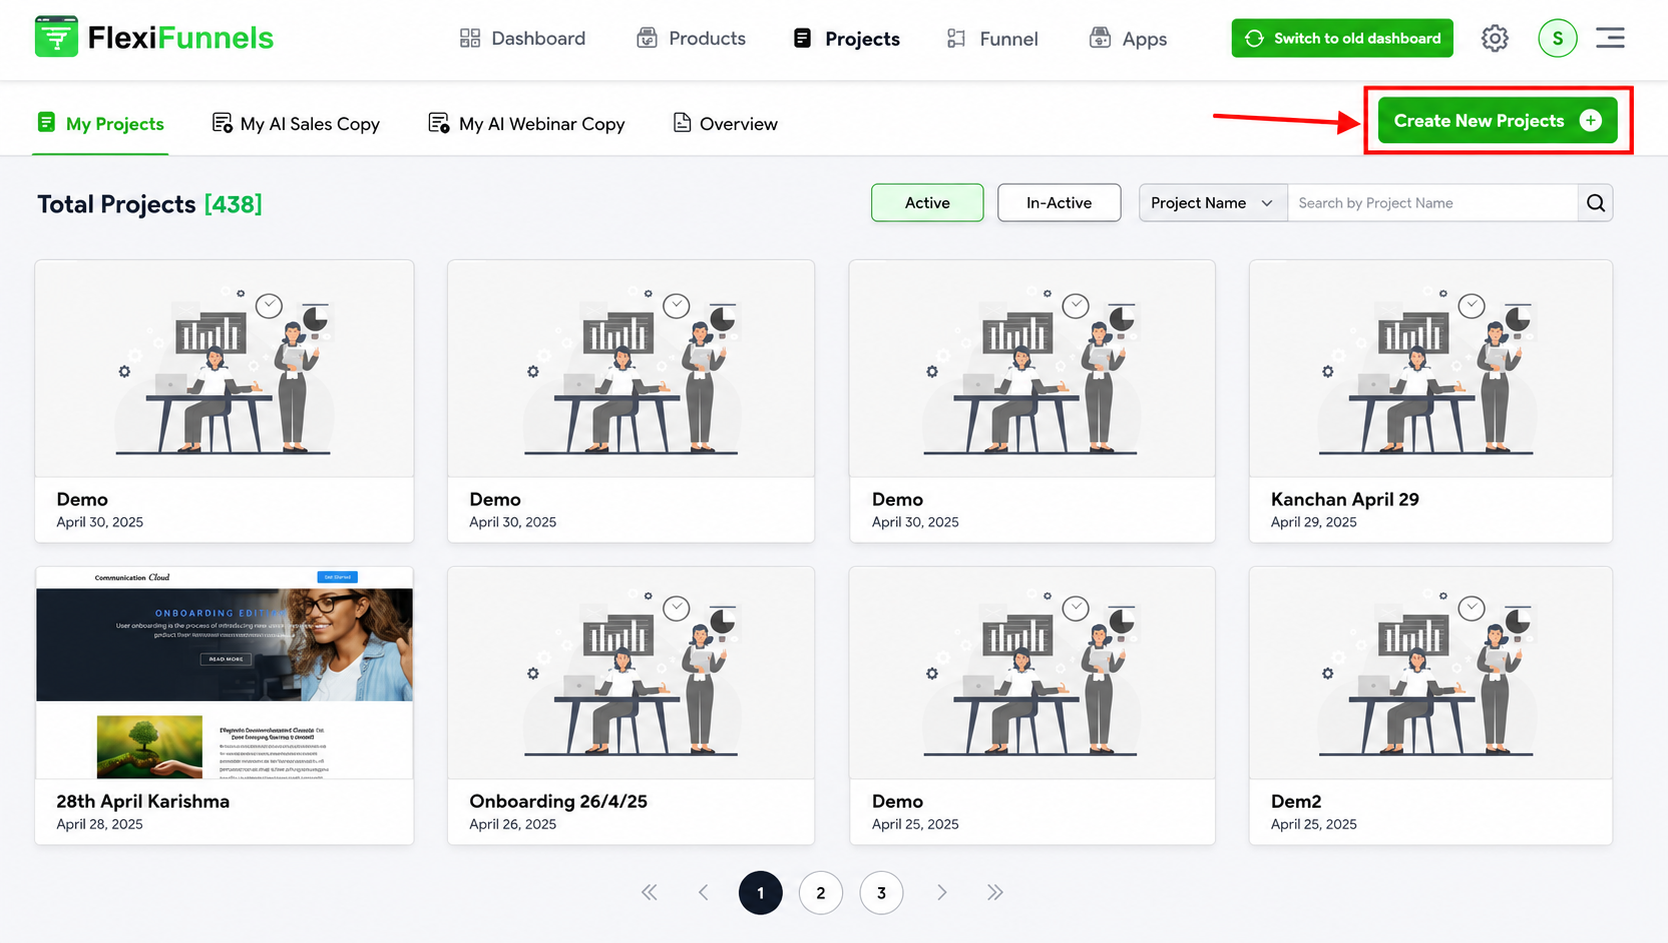
Step 1: Create a New Course Project
1.1 Go to Projects
- Log into FlexiFunnels
- Click Projects in the left sidebar
- You'll see a list of existing projects (if any)
1.2 Click "Launch a Course"
- Look for a button or section labeled "+ Launch a Course" or "Create Membership Project"
- Click it
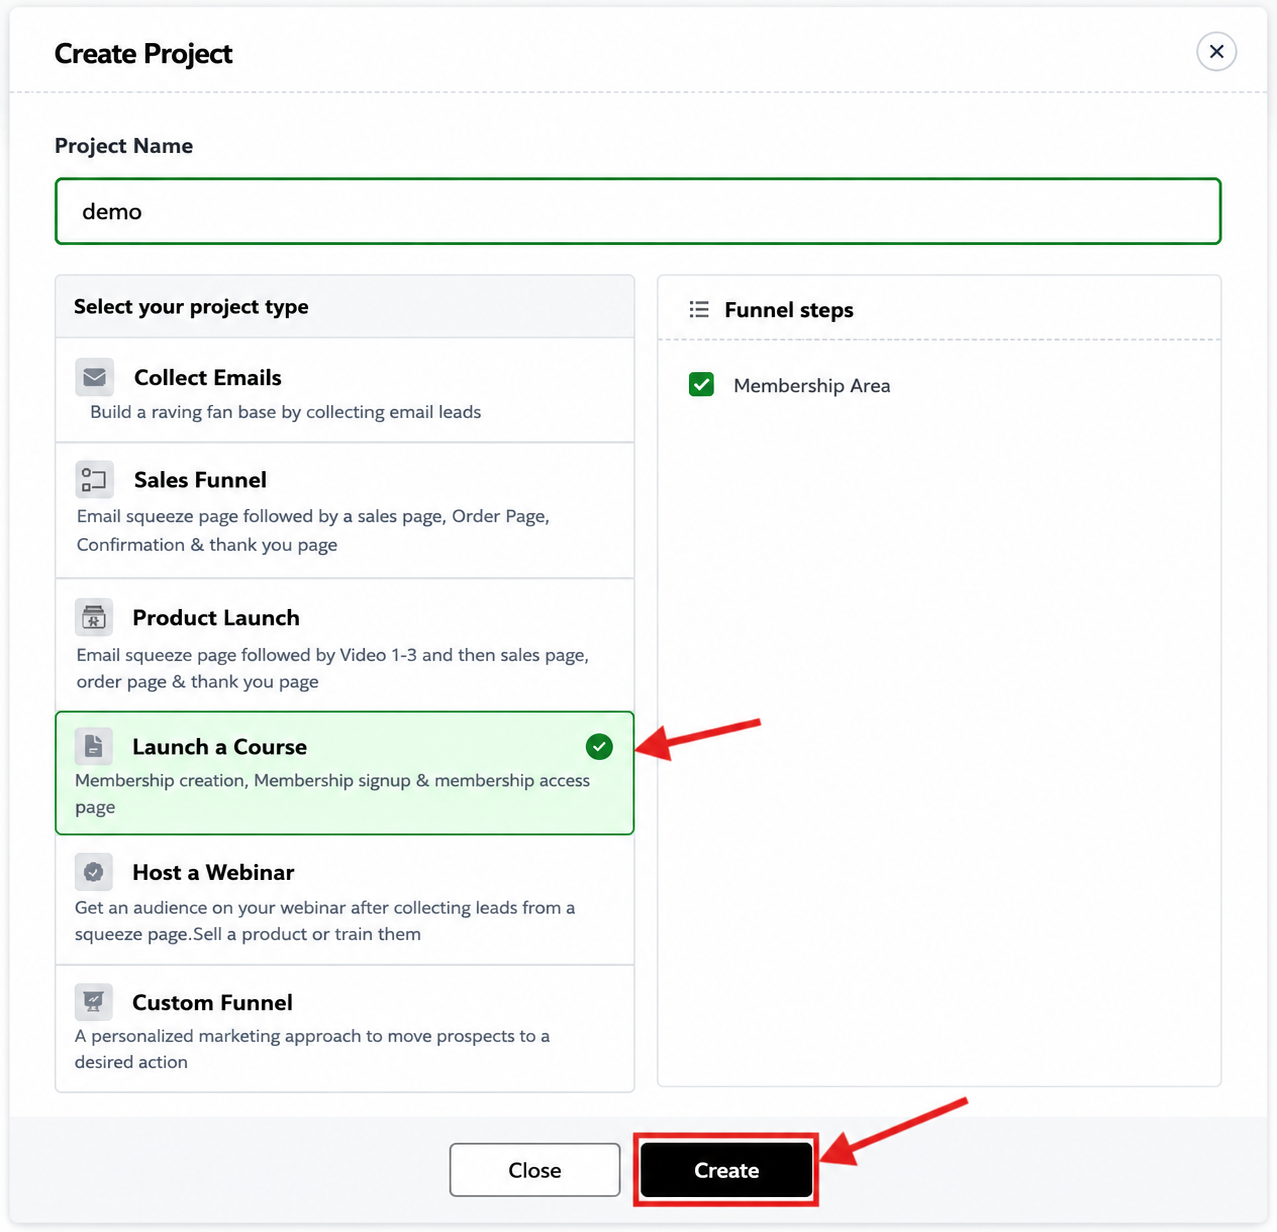
1.3 Confirm Creation
- Click Create or Launch
- FlexiFunnels automatically generates your membership system
- You're taken to your project dashboard
Your course project is created. Four pages are automatically generated for you.
Step 2: Understand Your Auto-Generated Pages
FlexiFunnels creates these pages automatically. Here's what each does:
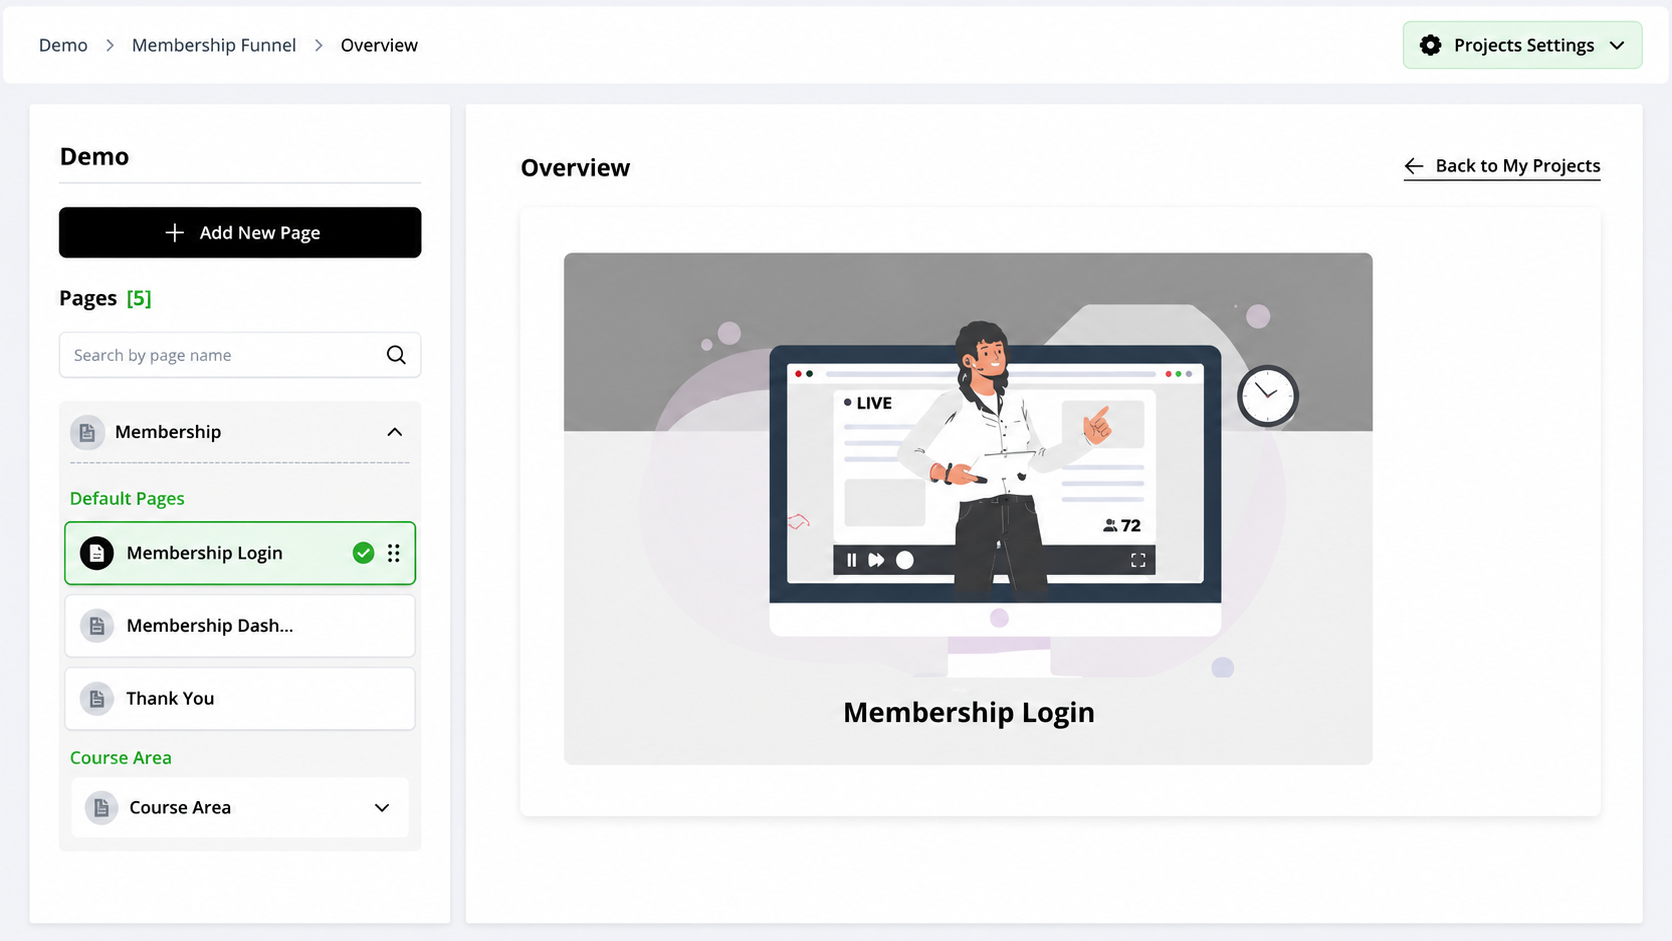
1. Membership Login Page
- What it is: The login page where students enter their email and password
- Who sees it: Students trying to access the course
- What you do: Customize the design/branding (optional), but it's mostly automatic
2. Membership Dashboard
- What it is: The main hub where students see all available courses, modules, lessons
- Who sees it: All logged-in students
- What you do: Customize branding, navigation, footer
3. Thank You Page
- What it is: Displayed after successful purchase
- Who sees it: Customers who just bought the course
- What you do: Add a welcome message, instructions for login
4. My Learning Page
- What it is: Where students go to access your actual course content
- Who sees it: Logged-in students viewing a specific course
- What you do: Add lessons, videos, and module structure here
Step 3: Organize Your Course Content (Modules & Lessons)
Before adding videos, plan your structure. Bad structure = confused students = more support tickets.
3.1 Plan Your Module Outline
Good module structure:
Course: Email Marketing Masterclass

Module 1: Email Fundamentals (4 lessons)
  ├─ Lesson 1: History of Email Marketing
  ├─ Lesson 2: Building Your Email List
  ├─ Lesson 3: Email Service Providers (ESPs)
  └─ Lesson 4: Growing From 0 to 1,000 Subscribers

Module 2: Email Copywriting (5 lessons)
  ├─ Lesson 1: Subject Lines That Get Opened
  ├─ Lesson 2: Writing Body Copy
  ├─ Lesson 3: Calls to Action (CTAs)
  ├─ Lesson 4: Segmentation Strategy
  └─ Lesson 5: Copywriting Formulas

Module 3: Email Automation (4 lessons)
  ├─ Lesson 1: Welcome Sequences
  ├─ Lesson 2: Re-engagement Sequences
  ├─ Lesson 3: Sales Sequences
  └─ Lesson 4: Post-Purchase Automation
Why structure matters:
- Students understand progression (foundational first, advanced later)
- Reduces overwhelm (organized into chunks)
- Easier to add drip feed (release Module 2 after students finish Module 1)
3.2 Go to "My Learning" Section
- In your course project dashboard, find My Learning tab
- Click it
- You'll see an empty list (no modules yet)
3.3 Create Your First Module
- Click + Create New Module (or Add Module)
- Click Create Module
Your first module is created.
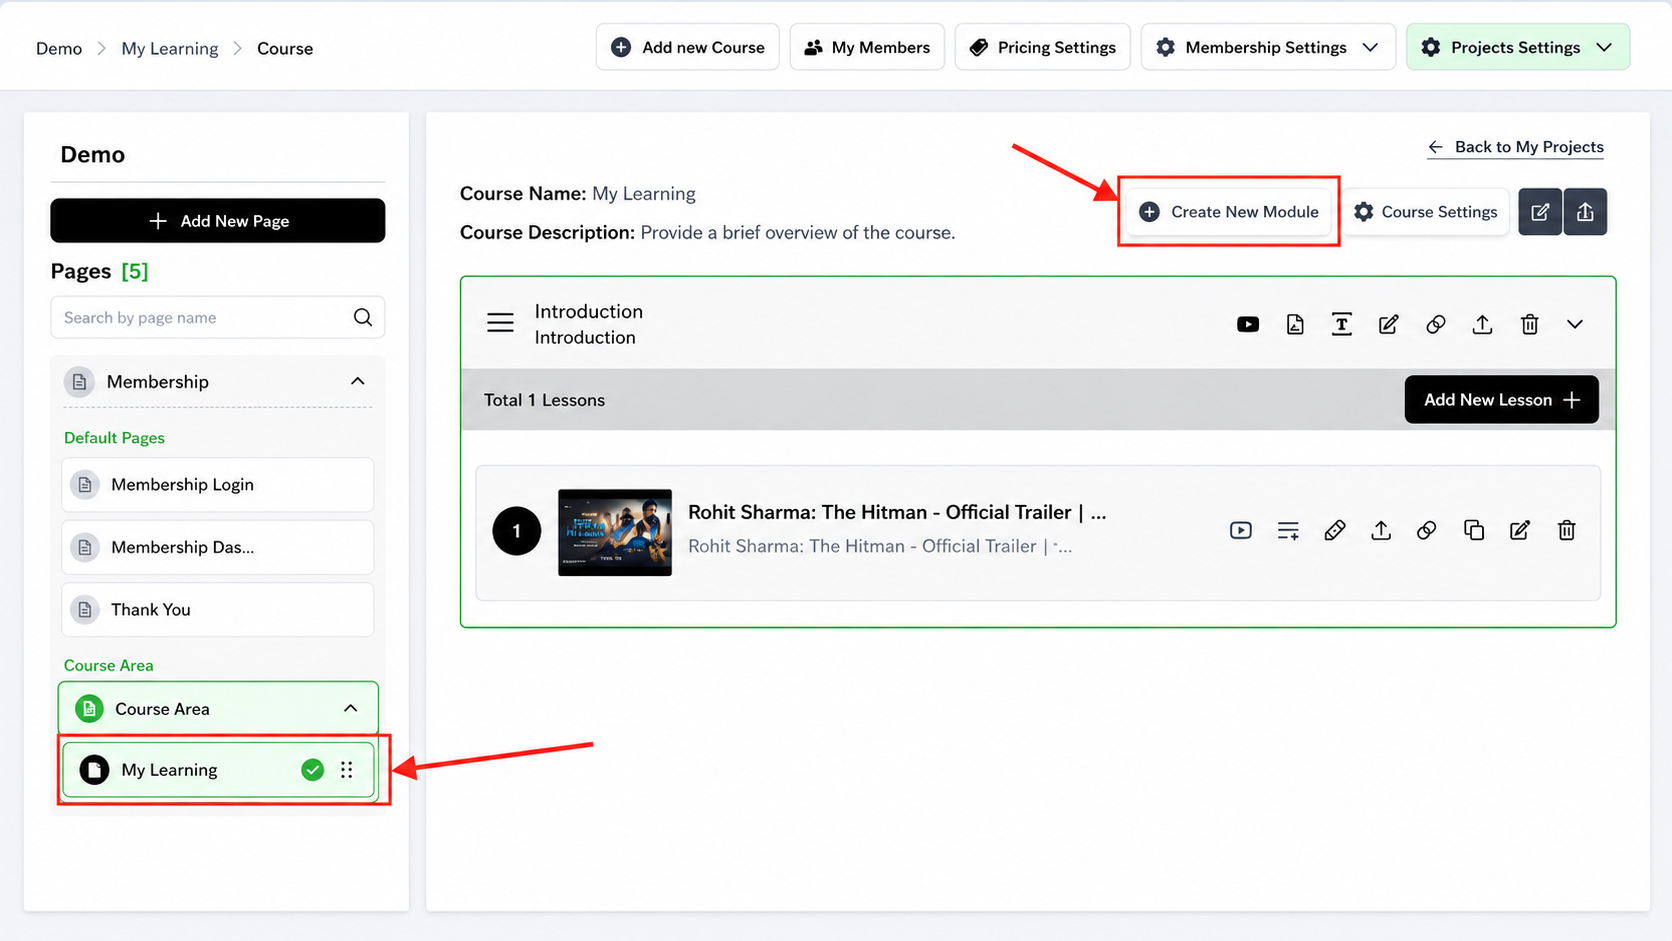
Here you’ll see these options:
Import Video
Add Content Lesson
Upload or Link a Video Lesson
Drip Feed (Schedule when the lesson is released)
Upgrade
Remove Module Permanently

3.4 Create a Lesson Within the Module
- Click on your module name to open it
- You'll see options like:
- Add Content Lesson
- Upload or Link a Video Lesson
- Add Text Lesson
- etc.
Choose "Upload or Link a Video Lesson" (most common)
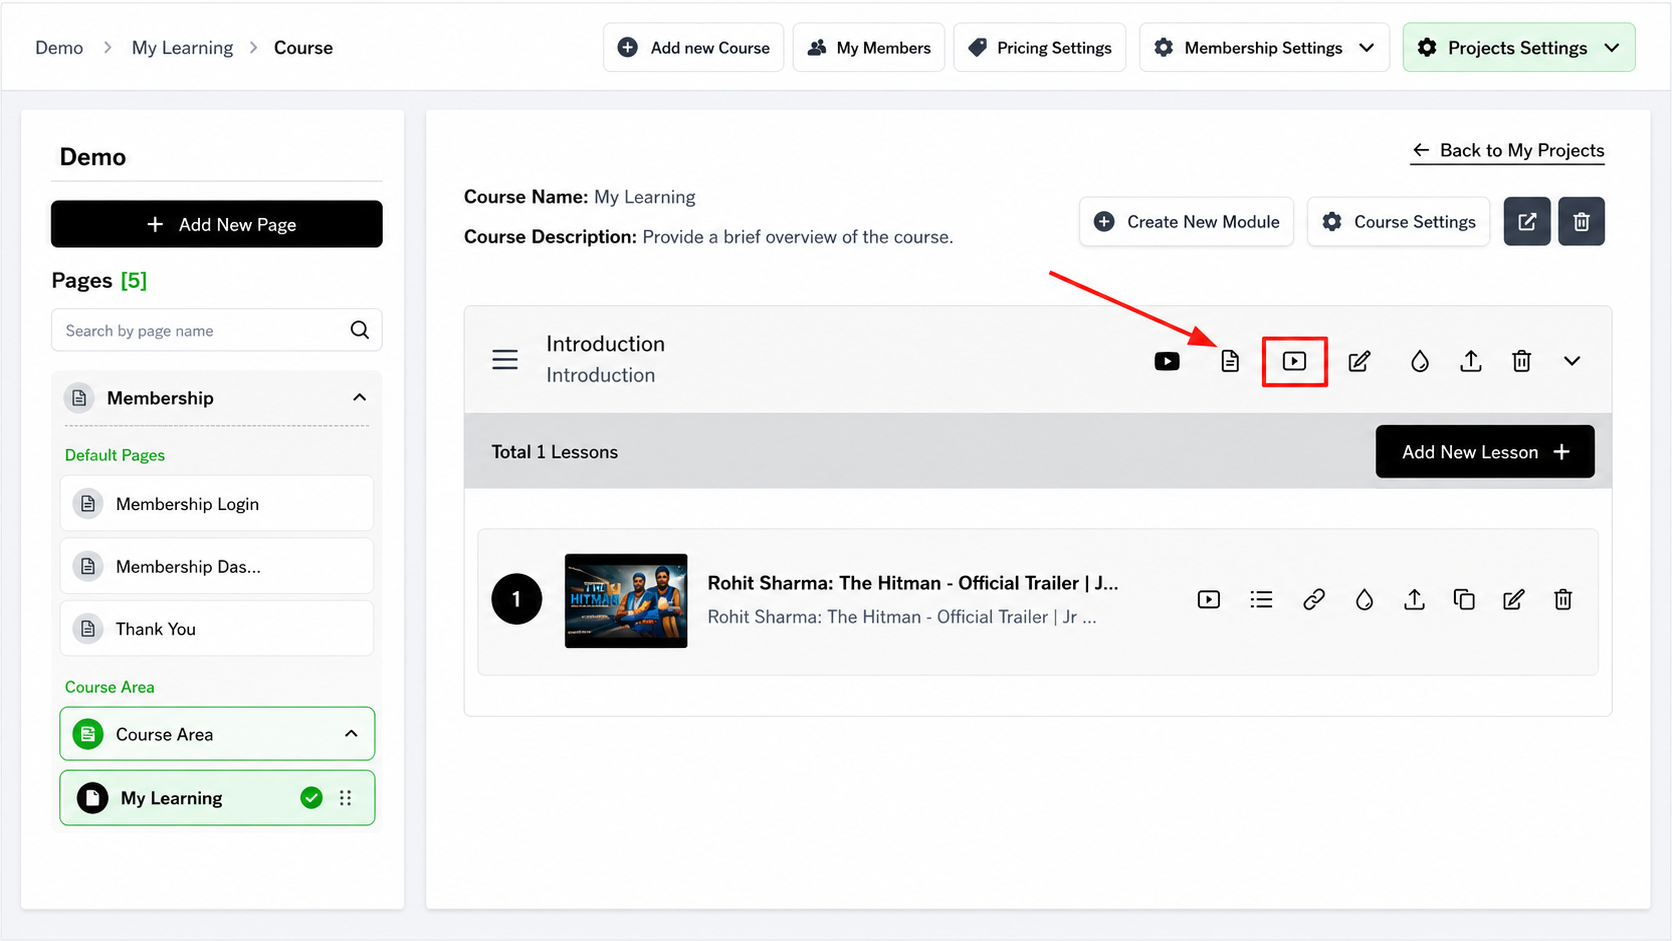
Step 3.5: Add Your Video (Multiple Options)
Now you need to add the actual video. You have several options depending on where your video is hosted.
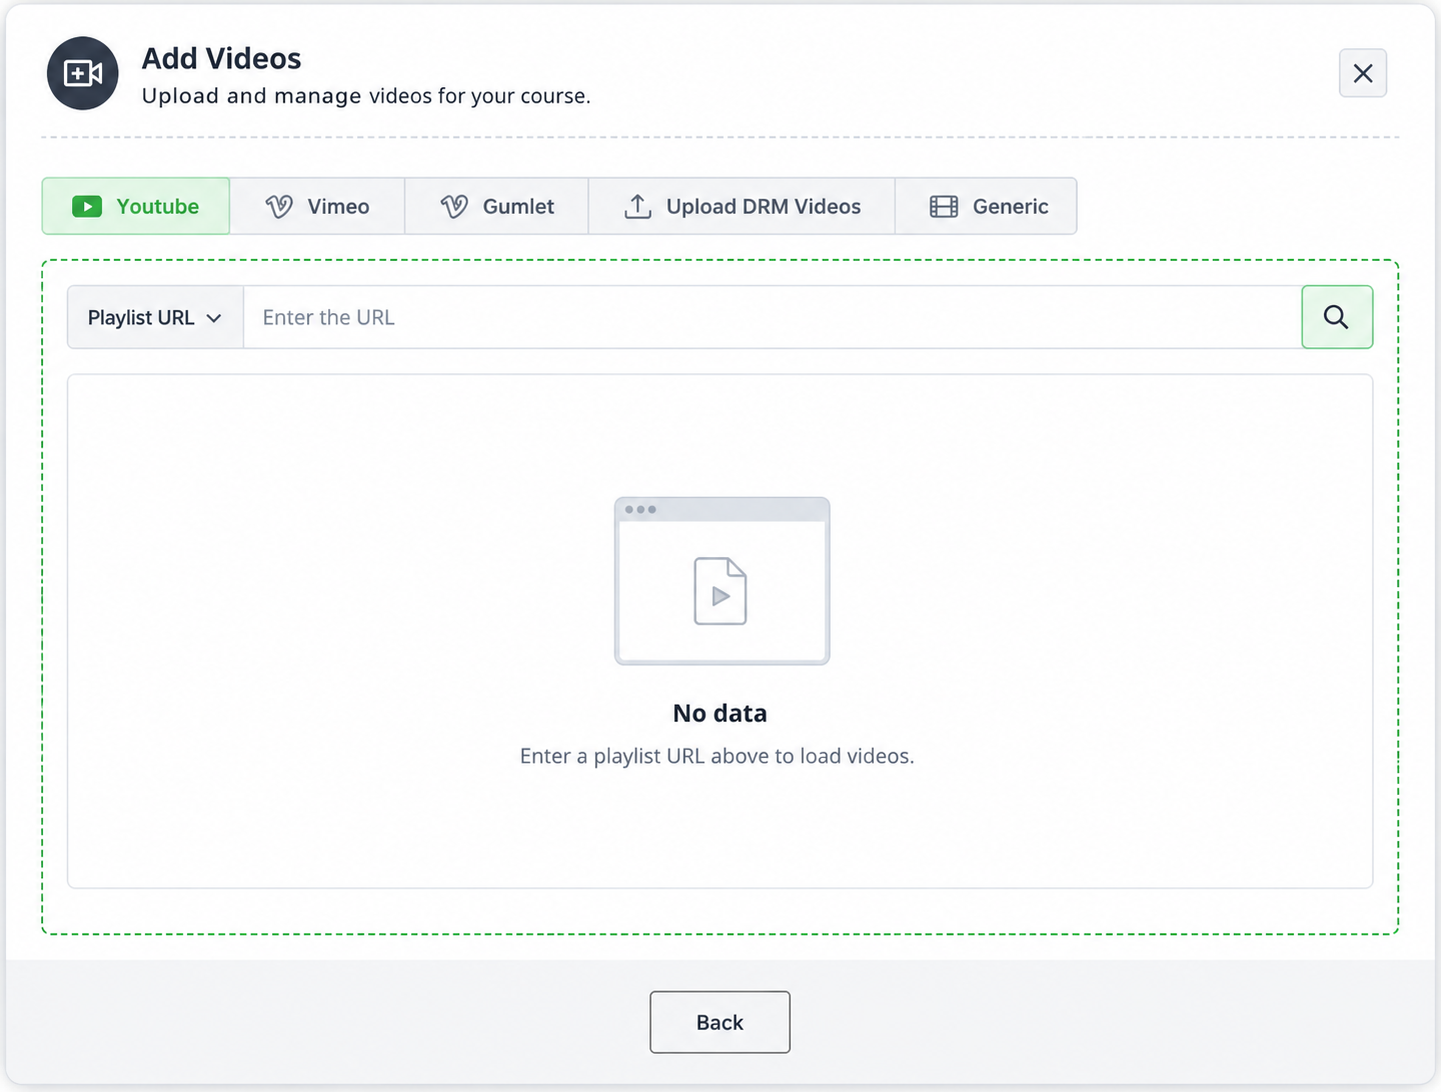
Option A: YouTube Video (Most Common & Easiest)
Best for: Public videos you've already uploaded to YouTube
How to add:
- Click + Add Video
- A popup appears — select YouTube
- Paste your YouTube URL or video ID
- URL example:
https://www.youtube.com/watch?v=abc123xyz - Video ID:
abc123xyz
- URL example:
- Click Confirm
- The video preview appears
- Click Save Lesson
Pros:
- Free hosting
- Easy to update (just replace the video on YouTube)
- YouTube handles buffering and quality
Cons:
- Video is public (anyone can find it on YouTube)
- Limited customization
Option B: Vimeo Video (Professional Option)
Best for: Private videos with customization (hide video controls, prevent downloads, etc.)
How to add:
- Make sure your video is already uploaded to Vimeo
- Click + Add Video
- Select Vimeo
- Paste your Vimeo URL
- Example:
https://vimeo.com/123456789
- Example:
- Click Confirm
- Click Save Lesson
Pros:
- Videos are private (not searchable)
- Professional player with customization
- Can hide download button
- Better analytics
Cons:
- Vimeo requires paid plan for most features ($25–200/month)
- Slightly more complex setup
Option C: Upload Your Own Video File (Maximum Control)
Best for: Videos you want complete control over (DRM protection, custom delivery)
How to add:
- Click + Add Video
- Select Upload (DRM) or Upload Video
- Click Choose File
- Select your MP4/video file from your computer
- Wait for upload to complete (may take minutes for large files)
- Click Save Lesson
Pros:
- Complete control
- DRM protection (prevents unauthorized sharing)
- Private by default
Cons:
- File size limits (usually 1–2GB max per file)
- Slower to upload and serve
- You manage storage
Option D: Generic Link (Video Hosted Elsewhere)
Best for: Videos on other platforms (Wistia, Loom, Kaltura, custom CDN, etc.)
How to add:
- Click + Add Video
- Select Generic Link or External Link
- Paste the embed URL or direct video URL
- Click Confirm
- Click Save Lesson
Pros:
- Works with any platform
- Flexible
Cons:
- May require specific URL format
- Depends on external platform uptime
Option E: Gumlet (Advanced Video Hosting)
Best for: High-volume courses with premium hosting needs
How to add:
- Make sure your video is uploaded to Gumlet
- Click + Add Video
- Select Gumlet
- Paste your Gumlet video URL/ID
- Click Confirm
Pros:
- Premium hosting with CDN
- Excellent performance
- Advanced security
Cons:
- Additional cost ($50–500/month)
- More complex setup
Which Should You Choose?
| Scenario | Best Option | Why |
|---|---|---|
| First course, budget is tight | YouTube | Free, easy, familiar |
| Professional/premium course | Vimeo | Private, customizable, professional |
| Course with sensitive content | Upload (DRM) | Complete control, protected |
| Using specialized platform | Generic Link | Flexible |
| High-volume, premium hosting | Gumlet | Best performance |
Step 4: Create a Bundle (Set Your Pricing)
What is a bundle? A pricing package that includes certain modules/lessons.
Example:
Course: Email Marketing Masterclass

Bundle 1: "Full Course" ($199)
  ├─ Module 1: Email Fundamentals
  ├─ Module 2: Email Copywriting
  └─ Module 3: Email Automation

Bundle 2: "Starter" ($79)
  └─ Module 1: Email Fundamentals only

Bundle 3: "Advanced" ($149)
  ├─ Module 2: Email Copywriting
  └─ Module 3: Email Automation
4.1 Go to Pricing Settings
- In your course project, find Pricing or Bundles section
- Click + Add New Bundle
 Step 5: Create Sales & Checkout Pages
Now customers need a place to buy your course. You'll create two pages:
- Sales Page: Sells the course (benefits, testimonials, why they should buy)
- Checkout Page: Where they enter payment info

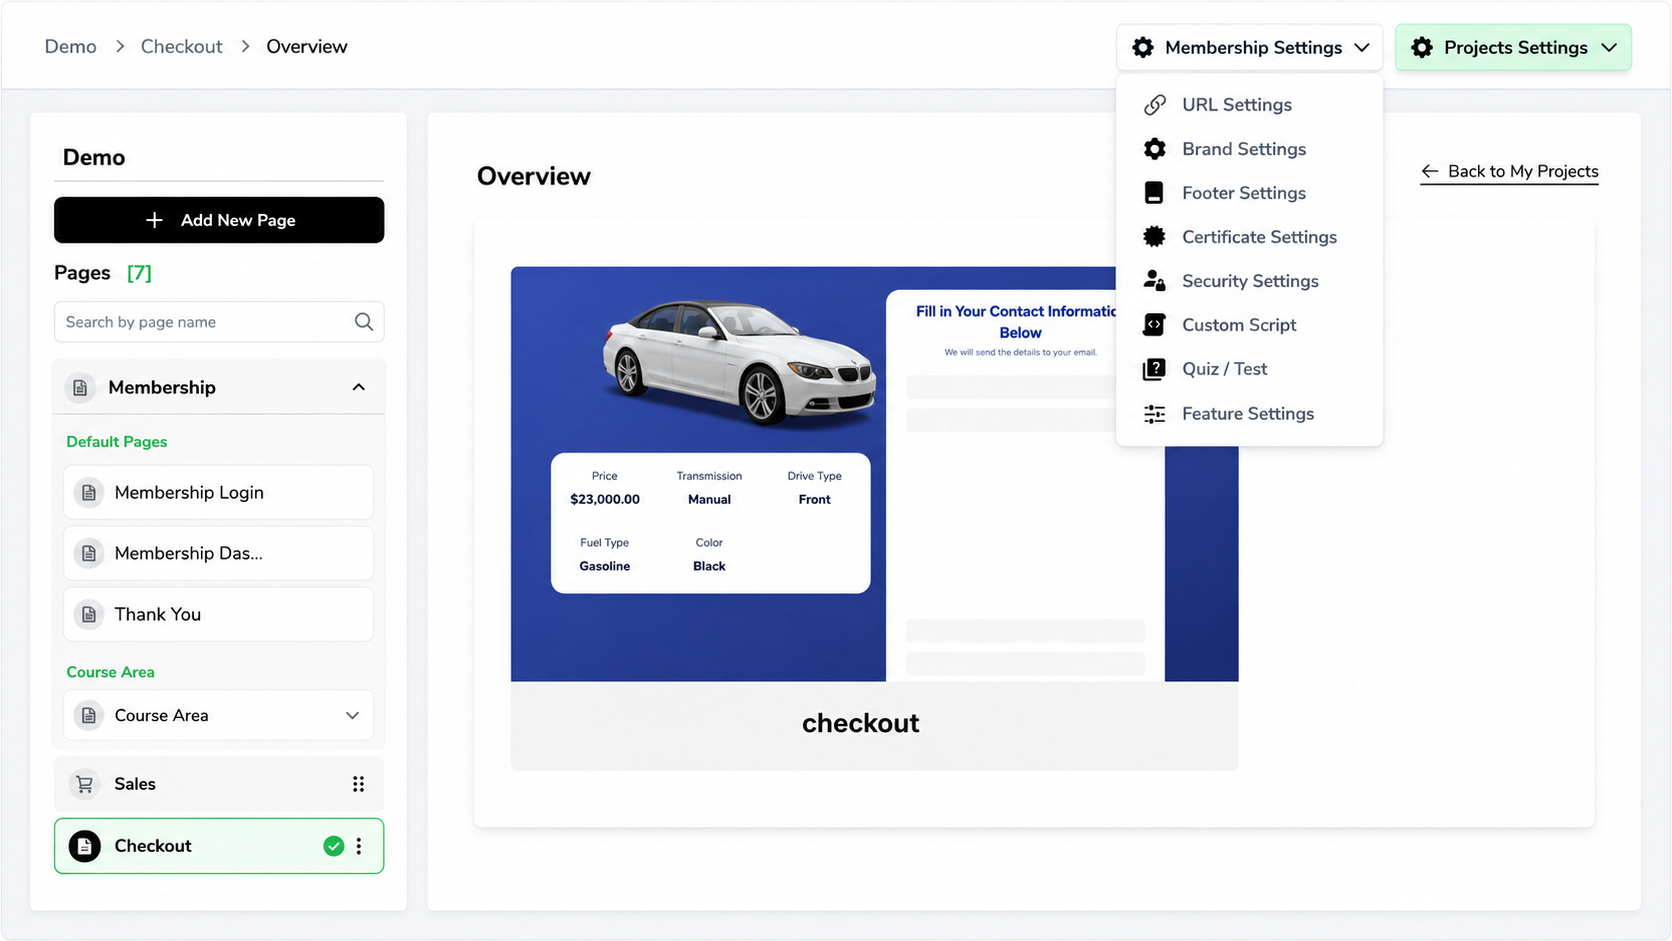
Step 6: Configure Membership Settings
Click on “Membership Settings” where you’ll find the following options:
Update these as per your course requirements.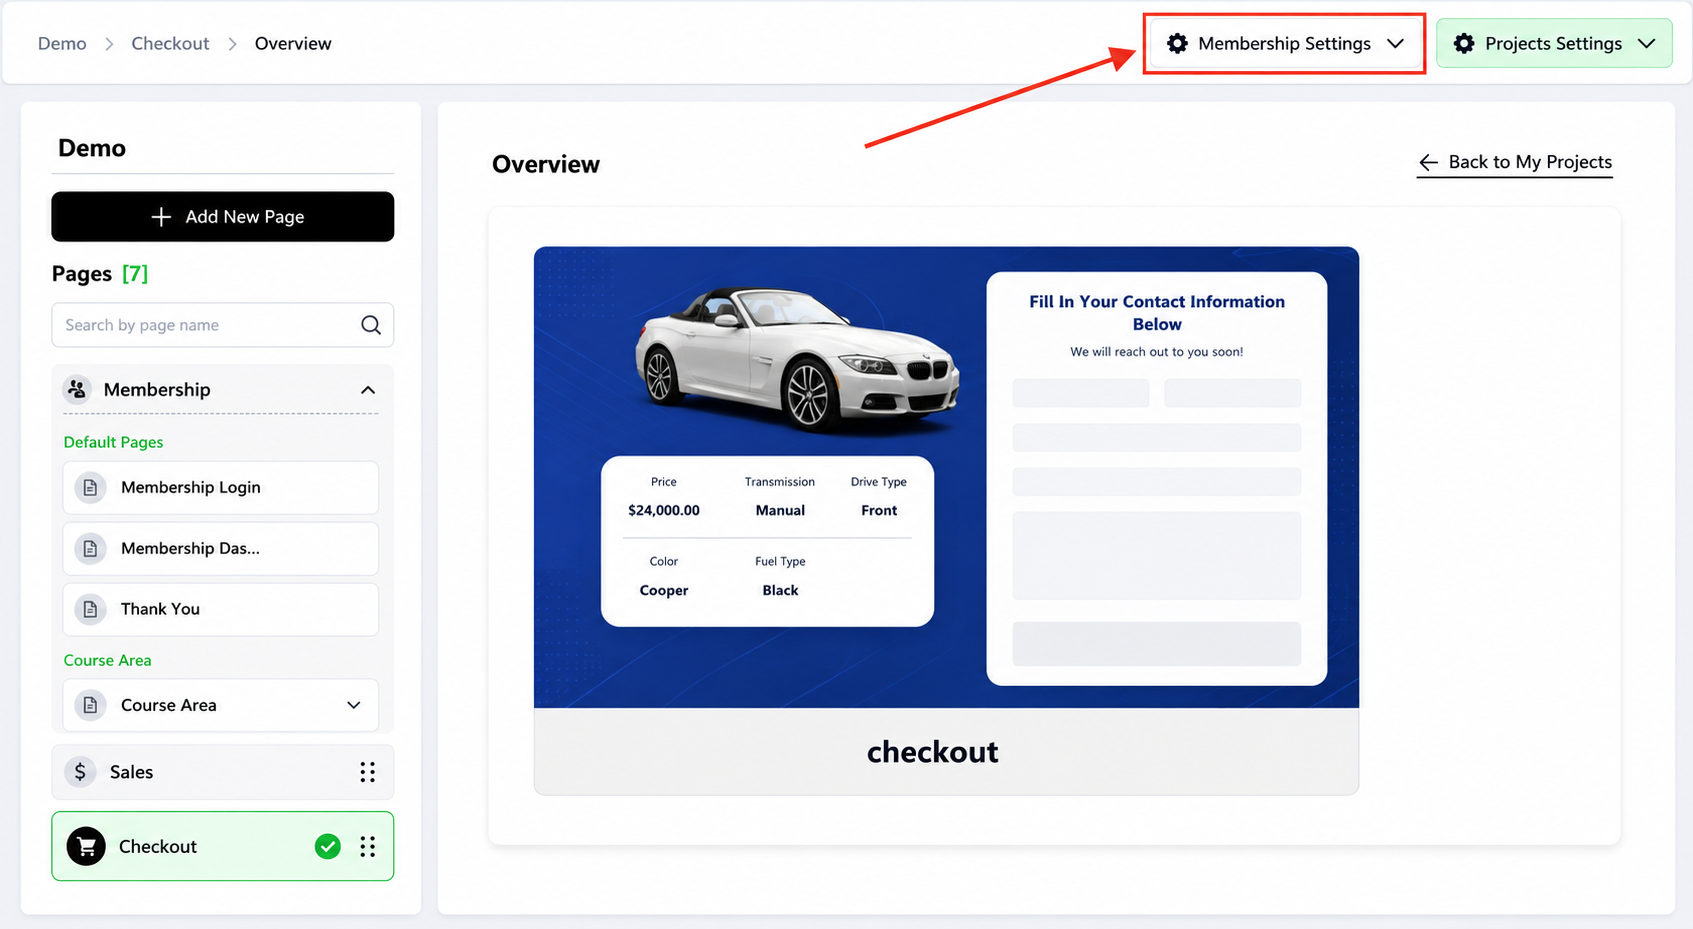
Step 7: Create a Membership Product
What is a membership product? The product that bundles your course with pricing.
7.1 Go to Products
- Click Products in the left sidebar
- Click + Create New Product
What is a membership product? The product that bundles your course with pricing.
7.2 Choose "Membership"
You'll see two options:
- Digital Product (one-time purchase, immediate delivery)
- Membership ← Choose this
Click Membership → Continue

Step 8: Link Product to Sales Page Button
Go back to the Sales Page inside your project.
Click on the CTA Button.
Go to “Advanced Settings” of the button.
Connect the Product to the button so it redirects to the Checkout Page.

Step 9: Add the Order Form on the Checkout Page
Edit your Checkout Page.
Add the Order Form element.
Publish the page.

Step 10: Share Your Course
Your course is now ready to sell!
Share the Sales Page URL with your audience to start getting sales.
Step 11: Manually Add a Member (Optional)
If you want to give someone manual access:
Go to the My Members tab.
Click on “Create Member.”
Enter their details and assign the bundle/course access.

Step 12: Share Your Course & Start Enrolling Students
Now market your course to your audience.
Where to Share:
Email List:
- Send announcement: "My new course is live! [Sales Page URL]"
- Include in your weekly newsletter
- Auto-responder sequences
Social Media:
- Post on Facebook, LinkedIn, Instagram
- Share to relevant groups
- Tag influencers or partners
Website/Blog:
- Link from your homepage
- Create a blog post about the course
- Add "Take My Course" button to bio
Paid Ads:
- Facebook Ads
- Google Ads
- LinkedIn Ads
Partnerships:
- Ask affiliates to promote (give them a commission)
- Cross-promote with complementary courses
- Guest post on partner blogs
Common Situations & Quick Fixes
❌ "My video isn't playing"
Diagnostic steps:
Step 1: Check the video source
- If YouTube: Is it public? (not unlisted or private)
- If Vimeo: Is it private to FlexiFunnels? (check Vimeo privacy settings)
- If uploaded: Is the file fully uploaded? (check progress)
Step 2: Try a different video source
- Instead of YouTube, try uploading to Vimeo
- Instead of Vimeo, try a YouTube video
- This isolates the issue to the source or FlexiFunnels
Step 3: Check the video URL
- Copy the URL from the lesson
- Paste it into a browser directly
- Does it work outside FlexiFunnels? (if not, issue is with the source)
Step 4: Clear browser cache
- Old cached data might prevent playback
- Clear cache and refresh
❌ "Students can't login to the course"
Diagnostic steps:
Step 1: Verify login is enabled
- Go to Membership Settings → Security Settings
- Make sure login is enabled (not disabled)
Step 2: Check access dates
- Go to My Members
- Find the student
- Check their Access Start and Access End dates
- If "Access End" has passed, their access is expired
- Extend it if needed
Step 3: Verify they received login email
- Ask the student to check their email (including spam)
- Did they receive login credentials?
- If not, resend invite from My Members
Step 4: Reset their password
- Go to My Members
- Find the student
- Click Reset Password or Send Reset Link
- Ask them to check email for reset link
❌ "Drip feed isn't working (lessons showing when they shouldn't)"
Diagnostic steps:
Step 1: Verify drip feed is enabled
- Go to your module/lesson
- Find Drip Feed Settings
- Is it toggled ON? (not off)
- If off, toggle on and set release date
Step 2: Check the release date
- When is the lesson supposed to unlock?
- Is today's date before or after the unlock date?
- If the date is wrong, update it
Step 3: Verify they haven't already purchased before setting drip feed
- If a student purchased before you enabled drip feed, they already have access
- They won't lose access by enabling drip feed
- Drip feed only applies to new purchases
❌ "Students say they paid but don't have access"
Diagnostic steps:
Step 1: Check payment gateway
- Log into your payment gateway (Stripe, Razorpay, etc.)
- Look for the student's email
- Is there a successful transaction?
- If payment failed, ask them to retry
Step 2: Check order in FlexiFunnels
- Go to Products → [Your Product] → Orders or Sales
- Look for the student's email
- Is there an order showing?
- Check Status — is it "completed" or "pending"?
Step 3: Check access dates
- Go to My Members
- Find the student
- Check their Access Start date
- If it's in the future, access hasn't begun yet
- Update the date to today if needed
Step 4: Manually grant access
- If payment succeeded but they don't have access, manually add them:
- Go to My Members
- Click + Add Member
- Enter their details
- Assign the bundle
- Click Add Member
❌ "The "Enroll Now" button doesn't go to checkout"
The problem: The button isn't linked to your membership product.
How to fix:
- Go to edit your Sales Page
- Click the "Enroll Now" button
- In the button properties, find Button Action
- Select "Go to Checkout" or "Proceed to Checkout"
- From the dropdown, select your membership product
- Save
- Republish your Sales Page
❌ "Certificate isn't auto-issuing"
Diagnostic steps:
Step 1: Check if certificates are enabled
- Go to Membership Settings → Certificate Settings
- Is the toggle ON?
- If off, toggle on
Step 2: Check auto-issue setting
- Find Auto-Issue Certificate
- Is it set to "On Completion" or similar?
- If set to "Manual," you need to issue it by hand
- Change to Auto-Issue if desired
Step 3: Check completion tracking
- Has the student completed the course?
- (Some courses require all lessons viewed, some are automatic)
- Go to Member Progress
- Check their completion %
Best Practices for Course Success
Course Structure (Lessons Per Module)
Good structure:
Module 1: 3–5 lessons (foundational concepts)
Module 2: 4–6 lessons (build on foundation)
Module 3: 4–6 lessons (advanced / optional)

Total: 11–17 lessons for a complete course
Why this matters:
- 1–2 lessons per module = feels incomplete
- 10+ lessons per module = overwhelming
- 3–6 is the sweet spot
Video Length (Per Lesson)
Ideal lesson length: 5–15 minutes
Why?
- < 5 minutes = feels rushed, not enough value
- 5–15 minutes = digestible, completion rates high
- 15–30 minutes = students lose focus
- 30+ minutes = students abandon (except for live workshops)
Module Release Strategy (Drip Feed)
Option A: Immediate Release (All at once)
- All modules available on Day 1
- Students move at their own pace
- Best for: Self-paced courses
Option B: Phased Release (Drip feed)
- Module 1 available on purchase
- Module 2 available 7 days later
- Module 3 available 14 days later
- Best for: Accountability-based courses, cohorts
Option C: Hybrid
- Modules 1–2 available immediately
- Module 3 available after 2 weeks
- Best for: Feeling of progress + self-paced
Content Delivery Strategy
What to include:
- ✅ Video lessons (primary teaching)
- ✅ Lesson transcripts (accessibility + SEO)
- ✅ Downloadable resources (worksheets, templates, PDFs)
- ✅ Discussion forums (community, Q&A)
- ✅ Email reminders (keep students engaged)
What NOT to include:
- ❌ Too many options (choice paralysis)
- ❌ Incomplete lessons (finalize before launch)
- ❌ Outdated information (refresh regularly)
Was this article helpful?
That’s Great!
Thank you for your feedback
Sorry! We couldn't be helpful
Thank you for your feedback
Feedback sent
We appreciate your effort and will try to fix the article