Members are the users who have access to your membership products, courses, groups, and other resources. The Members section allows administrators to invite new members, manage existing members, track their activity, and control access from a centralized dashboard.
This guide explains how to add, manage, search, import, export, and organize members in Flexi Membership.
Accessing the Members Section
To manage your members:
- Open the Flexi Membership app.
- Navigate to your membership project.
- Click Members from the navigation menu.
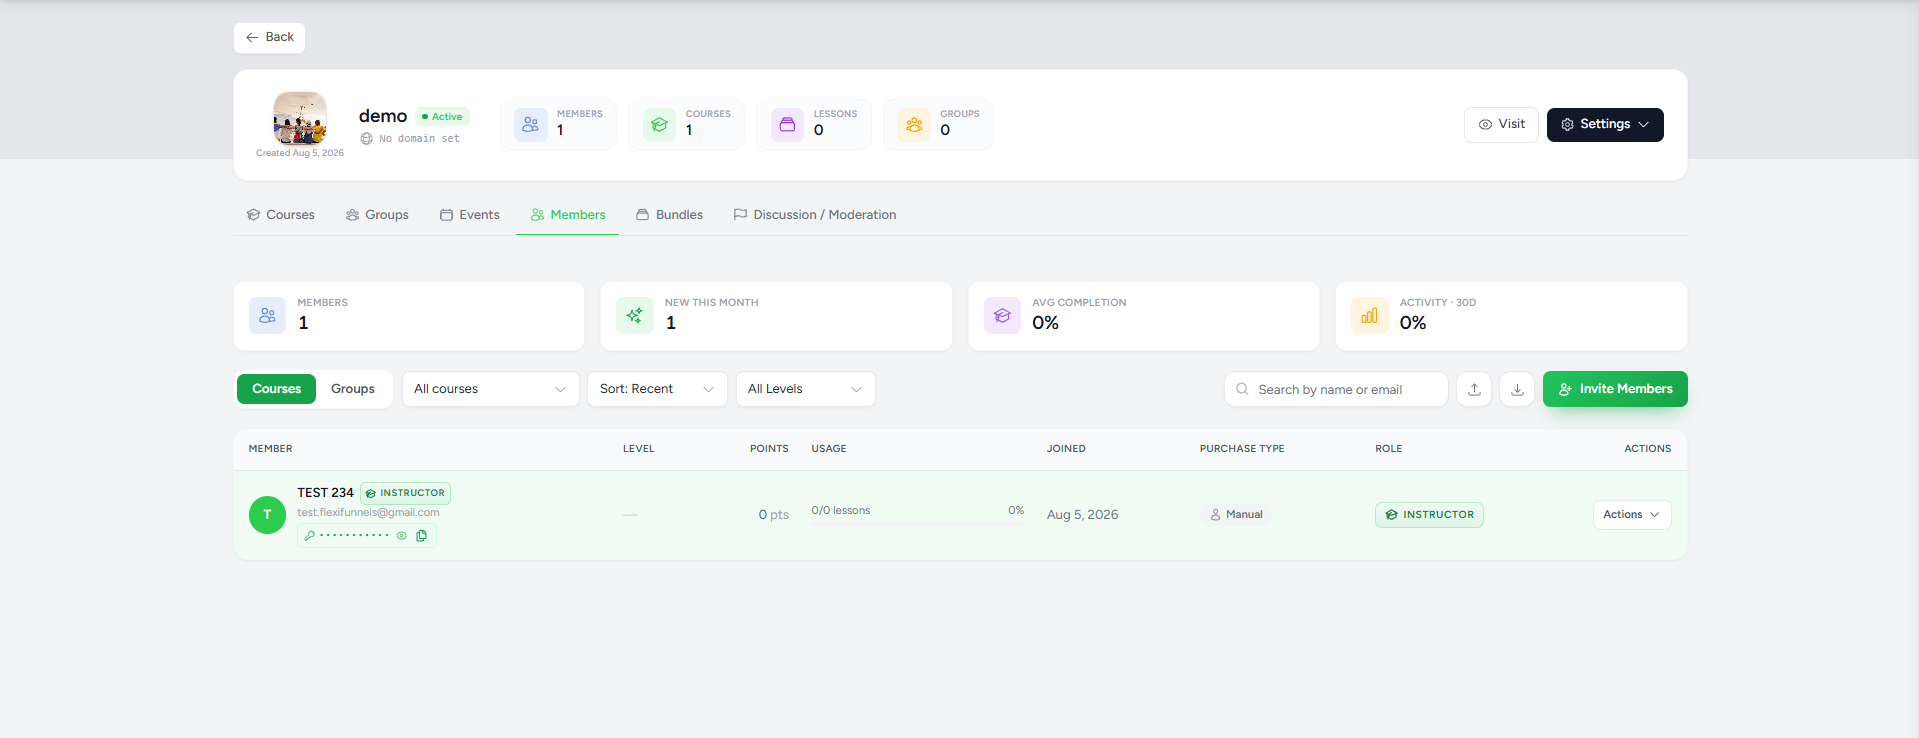
The Members dashboard displays an overview of your membership along with the complete list of enrolled members.
Understanding the Members Dashboard
The Members dashboard provides a quick overview of your membership performance and enrolled users.
The dashboard includes:
Member Statistics
The summary cards display key membership metrics, including:
- Members – Total number of enrolled members.
- New This Month – Members added during the current month.
- Average Completion – Average course completion percentage across all members.
- 30-Day Activity – Member activity over the last 30 days.
These metrics help administrators monitor engagement and membership growth.
Understanding the Member List
The member list displays detailed information about every enrolled member.
Each row includes:
- Member name
- Email address
- Membership level
- Points earned
- Course usage or lesson progress
- Join date
- Purchase type
- Member role
- Available actions
This overview allows administrators to monitor member activity without opening individual profiles.

Inviting New Members
Administrators can manually invite new members to the membership.
To add a member:
- Open the Members section.
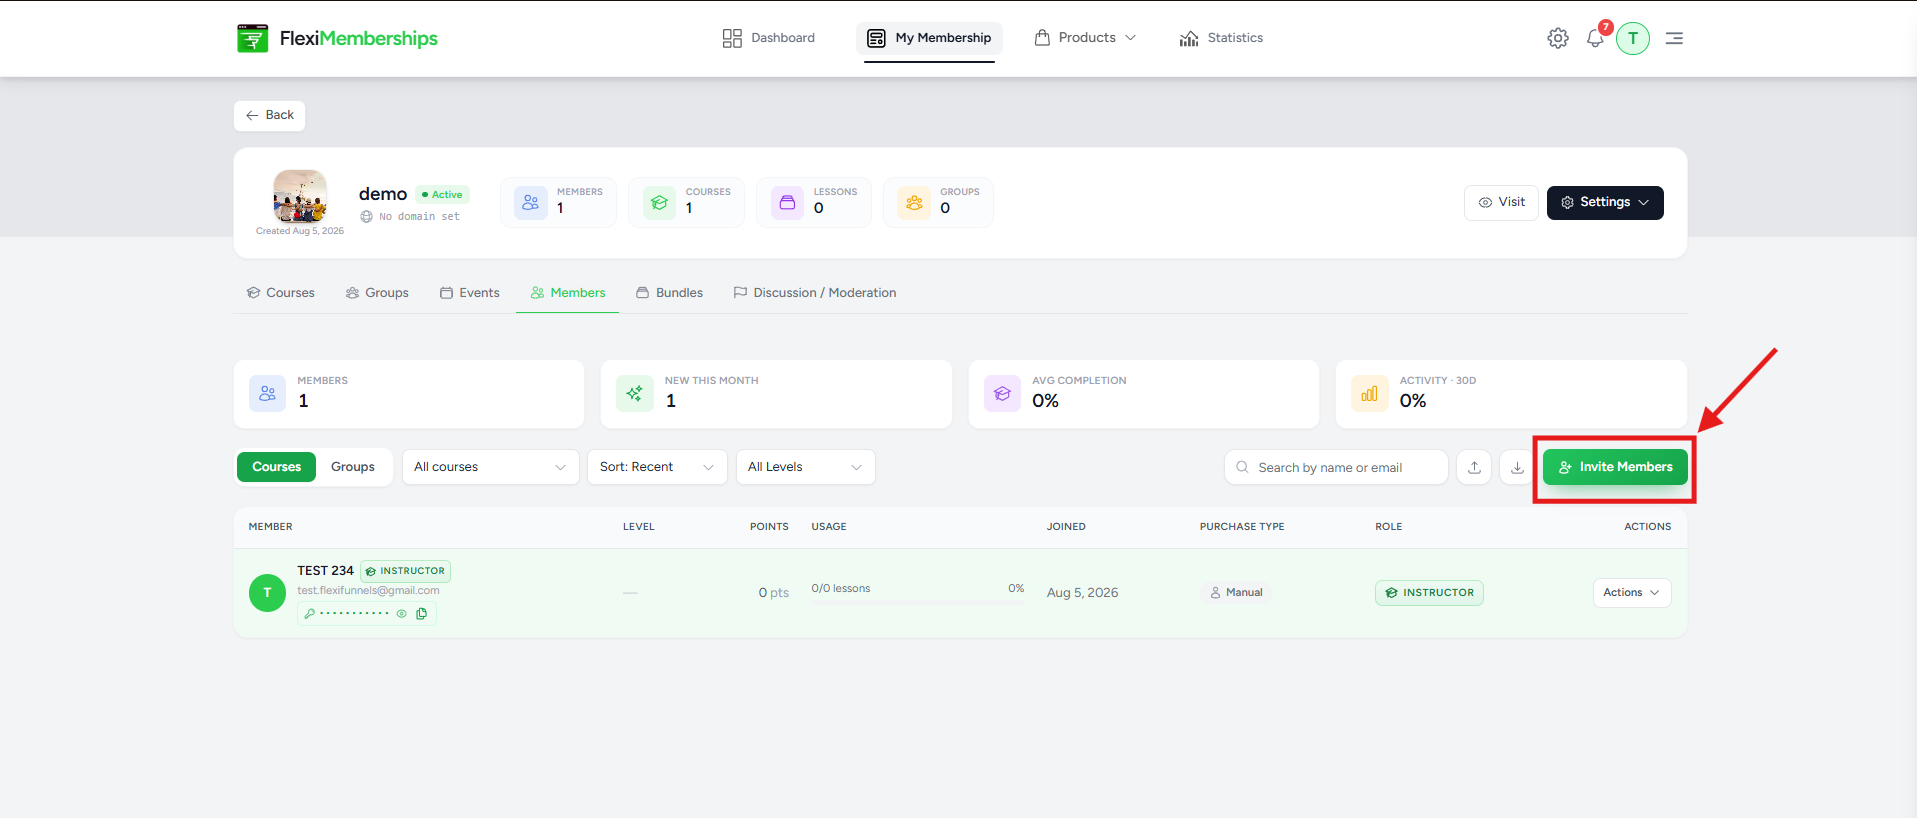
- Click Invite Members.
- Complete the member information.
- Select the products the member should receive access to.
- Click Add Member.
The new member is immediately added to your membership.
Configuring Member Details
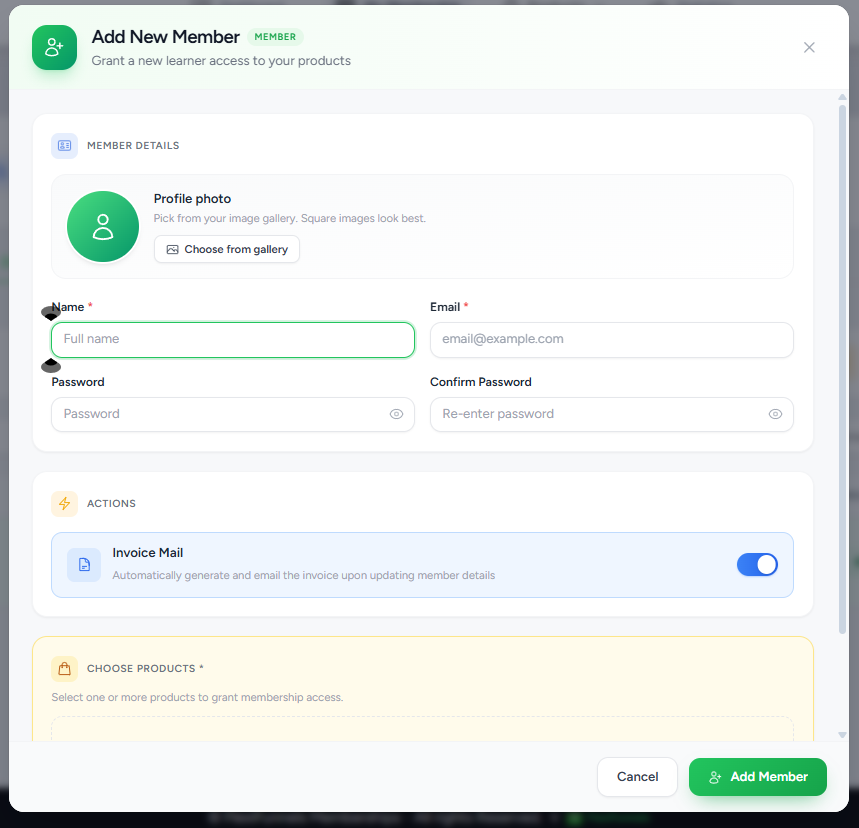
When inviting a member, complete the following information.
Profile Photo
Upload an optional profile picture for the member.
Click Choose from Gallery to select an image.
Square profile images are recommended for the best display.
Name
Enter the member's full name.
This name is displayed throughout the membership platform.
Email Address
Enter a valid email address.
The email serves as the member's login identity and is used for membership-related communication.
Password
Create a password for the member account.
The password should meet your organization's security requirements.
Confirm Password
Re-enter the password to confirm it before creating the account.
Invoice Email
The Invoice Mail option automatically generates and sends an invoice email after the member's details are updated.
Use the toggle to:
- Enable automatic invoice emails.
- Disable invoice emails when they are not required.
Choosing Membership Products
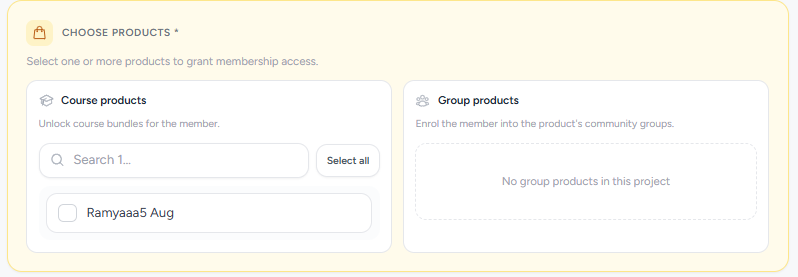
Under Choose Products, select one or more products the member should have access to.
Assigning products determines which membership resources the member can access immediately after joining.
A member can be assigned multiple products(Groups and Courses), depending on your membership configuration.
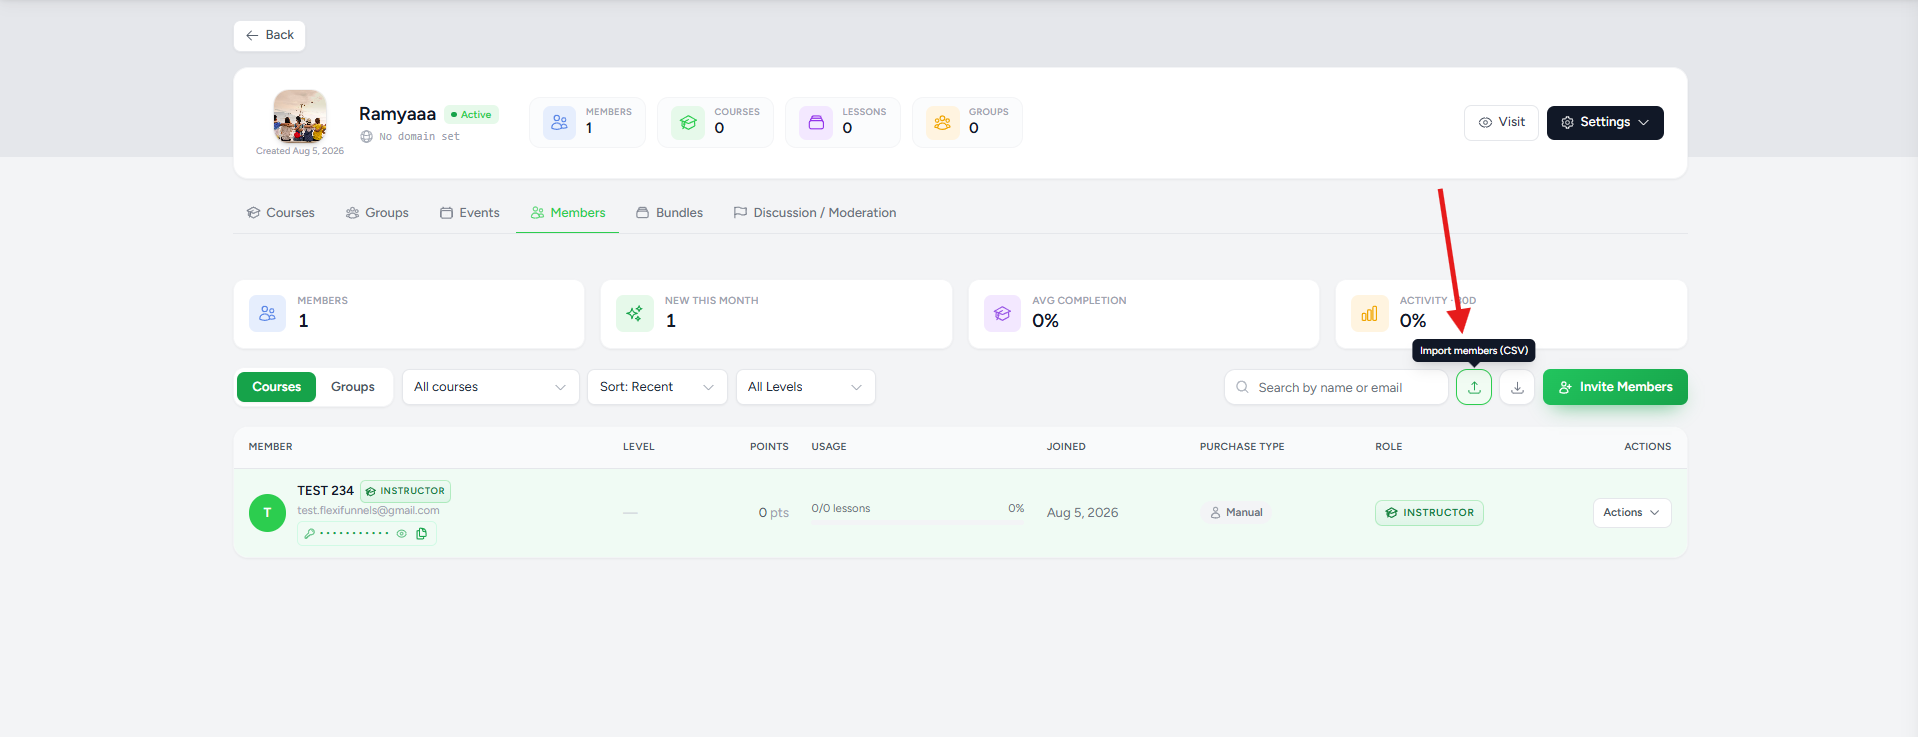
Importing Members
If you already have an existing member database, you can import members in bulk.
To import members:
- Open the Members page.
- Click the Import Members (CSV) button.
- Upload a CSV file containing member information.
- Complete the import process.
Bulk import is useful when migrating members from another platform or onboarding large groups of users.
Exporting Members
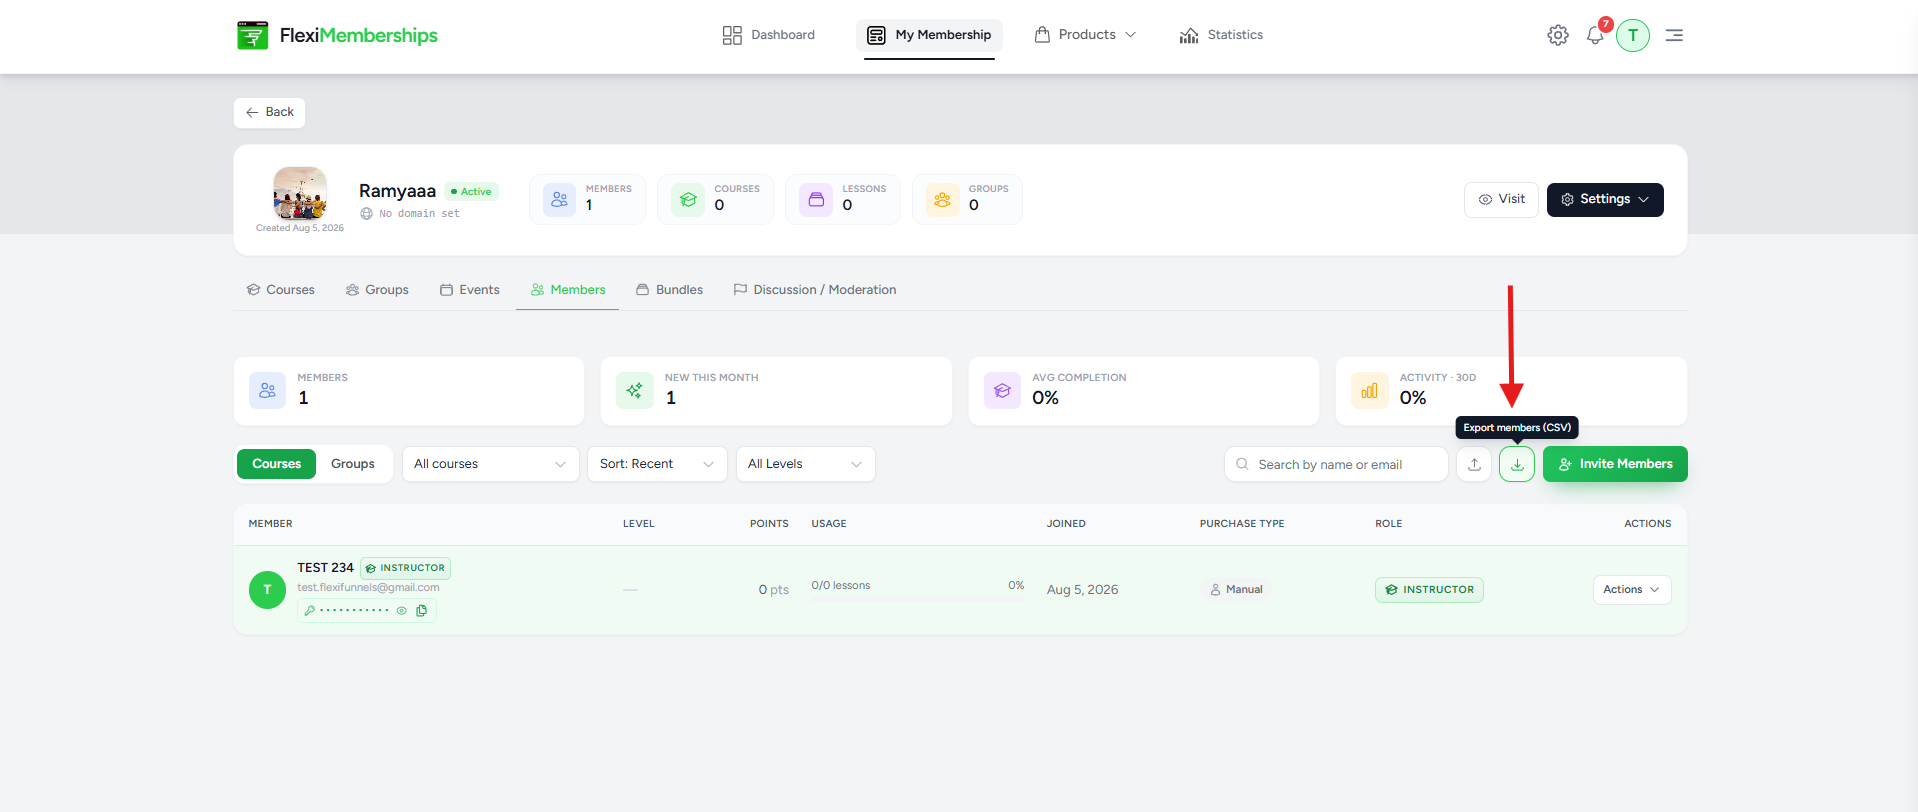
You can export your member data at any time.
To export members:
- Open the Members page.
- Click Export Members (CSV).
- Download the generated CSV file.
Exporting member data is useful for reporting, backups, or external analysis.
Managing Existing Members
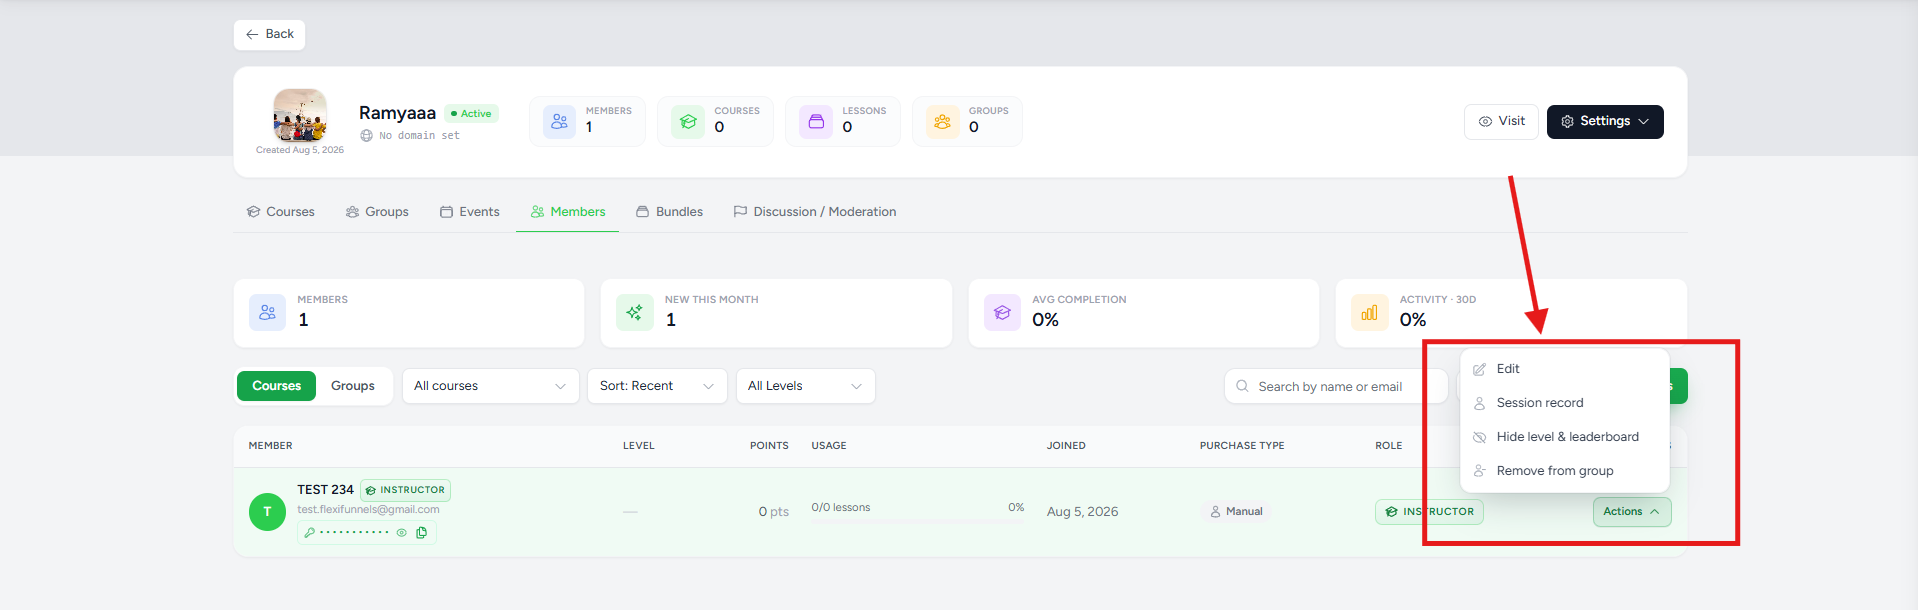
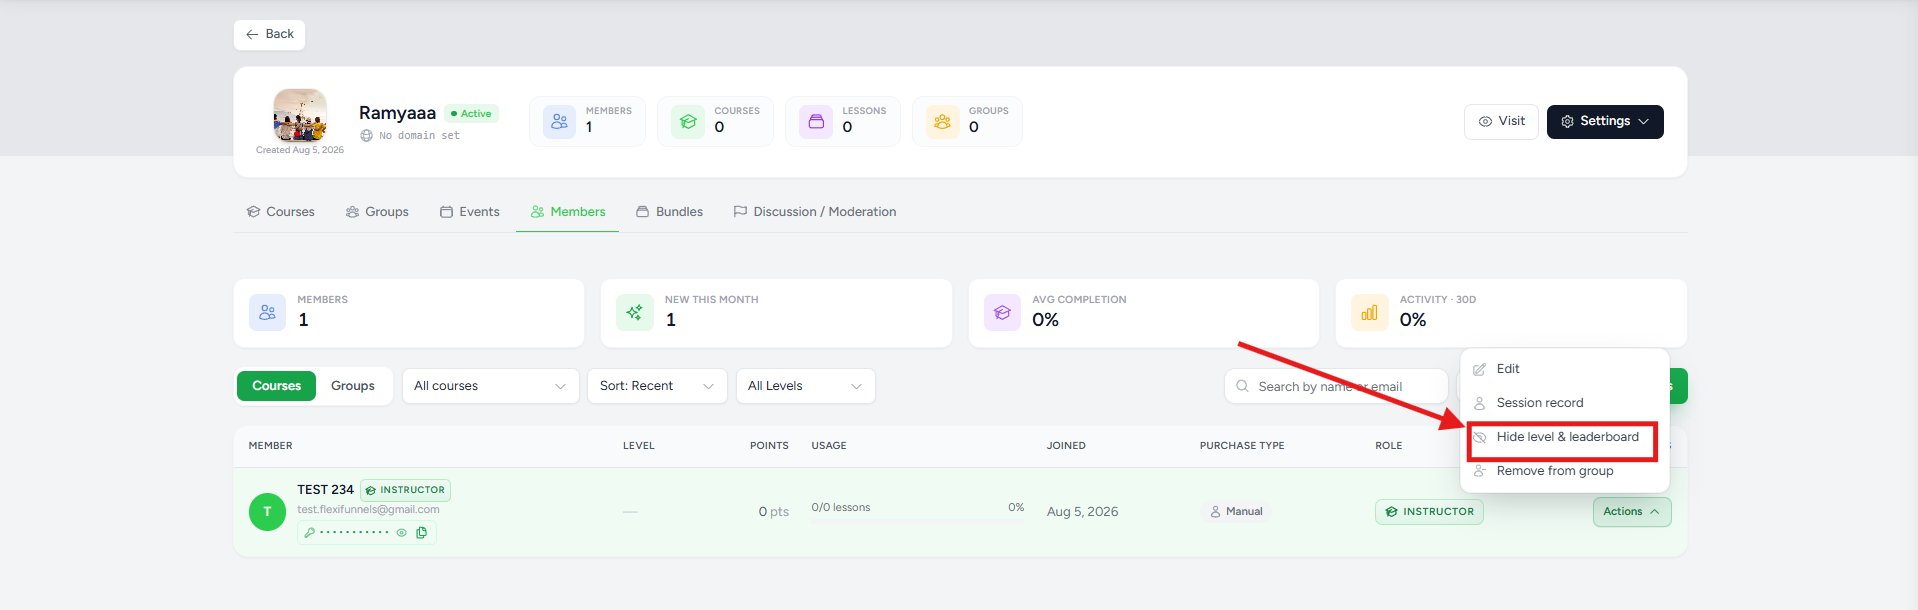
Every member includes an Actions menu that provides additional management options.
Available actions include:
- Edit
- Session Record
- Hide Level & Leaderboard
- Remove from Group
These options allow administrators to manage individual member accounts without affecting other members.
Editing a Member
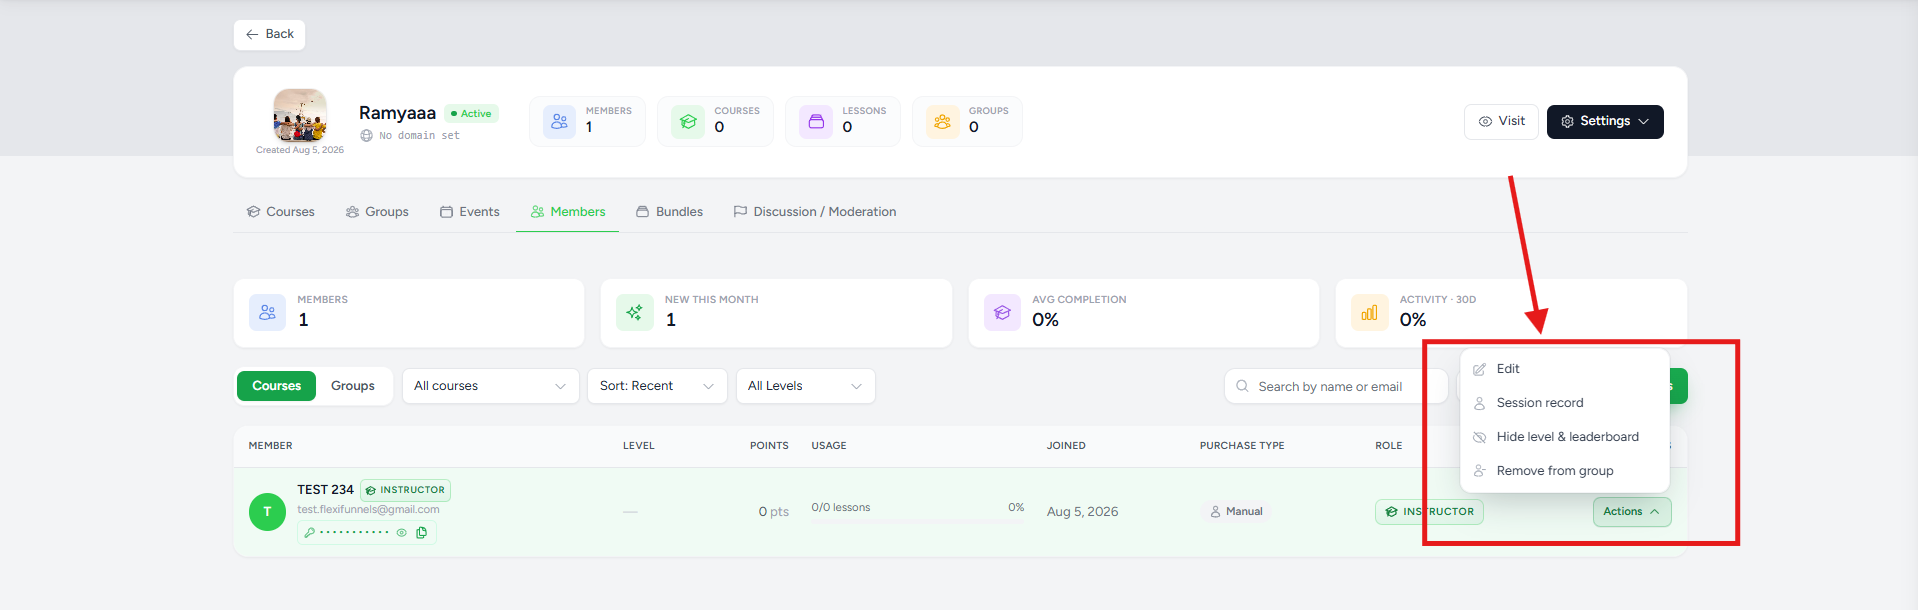
To modify a member's information:
- Locate the member in the list.
- Click Actions.
- Select Edit.
- Update the required information.
- Save your changes.
Changes are applied immediately.
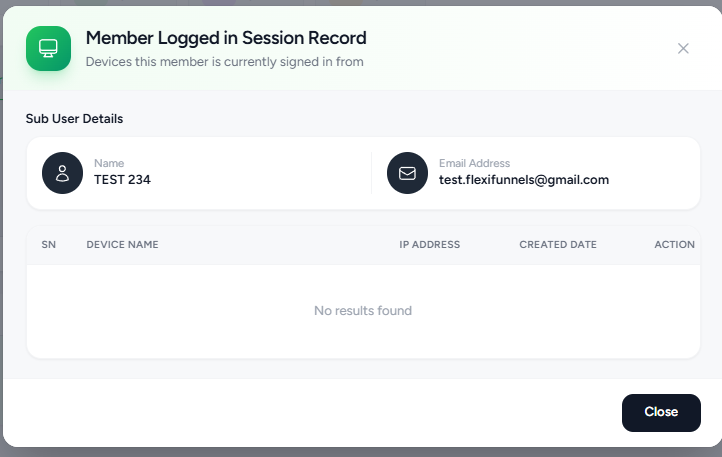
Viewing Session Records
The Session Record option allows administrators to review a member's session history.
This can be useful for monitoring member activity and troubleshooting access-related issues.
Hide Level & Leaderboard
Use Hide Level & Leaderboard to prevent a member's level or leaderboard ranking from being displayed.
This is useful when you want specific members to remain excluded from gamification features.
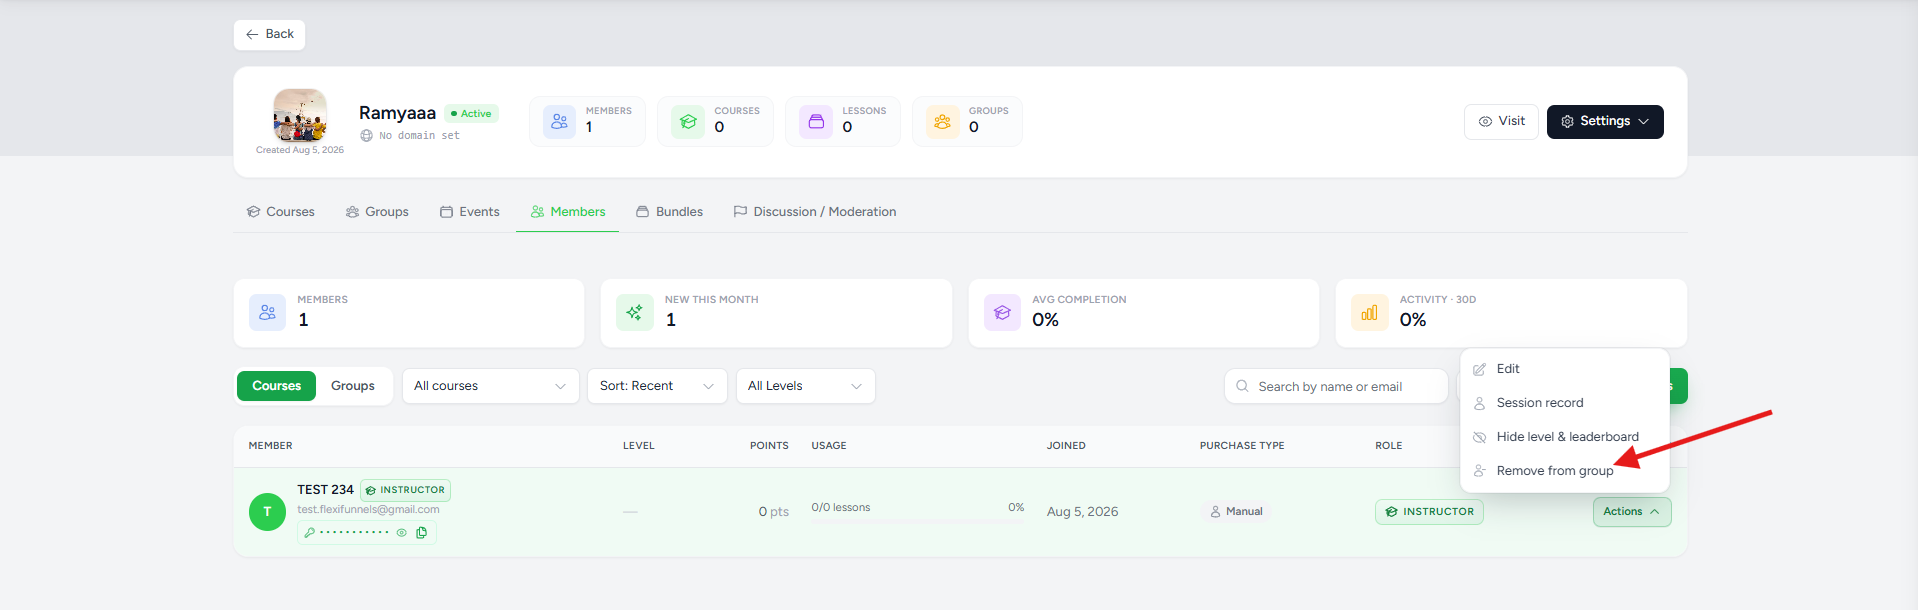
Removing a Member from a Group
If a member no longer requires access to a particular group:
- Open the Actions menu.
- Select Remove from Group.
- Confirm the action.
The member is removed from the selected group while retaining access to any remaining assigned products or groups, depending on your membership configuration.
Best Practices
To manage members efficiently:
- Use descriptive member names for easier identification.
- Verify email addresses before adding members.
- Assign only the products members should access.
- Regularly review member activity and completion metrics.
- Use CSV import when onboarding large groups.
- Export member data periodically as a backup.
- Review member permissions and group assignments regularly.
Frequently Asked Questions
Can I manually add a new member?
Yes. Click Invite Members, complete the member details, assign the required products, and click Add Member.
Can I assign multiple products to a member?
Yes. During member creation, you can select one or more membership products.
Can I import members in bulk?
Yes. Flexi Membership supports importing members using a CSV file.
Can I export my member list?
Yes. Use the Export Members (CSV) option to download your member data.
Can I edit an existing member?
Yes. Select Edit from the member's Actions menu to update their information.
Can I remove a member from a group?
Yes. Use the Remove from Group option available in the Actions menu.
Was this article helpful?
That’s Great!
Thank you for your feedback
Sorry! We couldn't be helpful
Thank you for your feedback
Feedback sent
We appreciate your effort and will try to fix the article