A full, detailed walkthrough with real screenshots from a live account — from a blank dashboard to your first paying, logged-in member, plus branding, gamification, quizzes, marketing, security, groups, and events.
Think of Flexi Membership as building your own private school inside FlexiFunnels. The membership project is the school building itself — one login, one set of branding, everything under one roof. Each course you create inside it is a subject, like Maths or Guitar. Inside a subject, modules are the chapters, and lessons are the individual classes. The product is the admission ticket sold at the front gate — it decides who's allowed in and how much they pay. The bundle is the paperwork that actually links that ticket to a specific classroom — skip it, and a student can pay at the gate but never find their way to the right room. Once your students (members) are inside, groups are the common rooms where they hang out together, and events are the live assemblies or webinars you schedule for them.
This guide follows the exact order you'll work through in practice: opening the app, creating the project, building a course with every field explained, building the actual lesson content, branding the panel end-to-end (URL, logo, colors, footer, tracking scripts, dashboard style), turning on certificates/gamification/quizzes, adding marketing banners, locking down security and menu visibility, wiring up pricing and pages, publishing and testing a real purchase, and finally setting up groups, events, and day-to-day member management.
Before you begin
- You have a FlexiFunnels plan that includes course/membership access.
- Your course video(s) are ready — a YouTube or Vimeo link, or a file you can upload (Gumlet/DRM/HTML5 are also supported).
- You've decided how the course will be sold: Free or Paid.
- If you're charging money, a payment gateway (Razorpay, Stripe, PayPal, etc.) is already connected to your account.
- You have (or plan to add) an instructor photo and short bio — it's shown on both the sales page and inside the course dashboard.
What's in this guide
- Open Flexi Membership
- Create your membership project
- Create your first course — every field explained
- Build your modules & lessons
- Brand your membership panel (Settings > General)
- Certificates, gamification & quizzes (Settings > Engagement)
- Marketing banners & popups (Settings > Marketing)
- Security, menus & scripts (Settings > Access & Advanced)
- Set up your product: pricing & pages
- Publish & test a real purchase
- Set up groups (your members' community)
- Set up events (webinars & live sessions)
- Members, bundles & moderation — day-to-day upkeep
- Dashboard & Statistics — tracking performance
- Common situations & quick fixes
Part 1 — Open Flexi Membership
- From your FlexiFunnels dashboard, click Launch Panel.
- Go to the App area — you'll see a grid of every FlexiFunnels app (FlexiProof, Flexi AI Marketing Agent, Flexi Split Test, and so on).
- Find the Flexi Membership tile and click Launch.
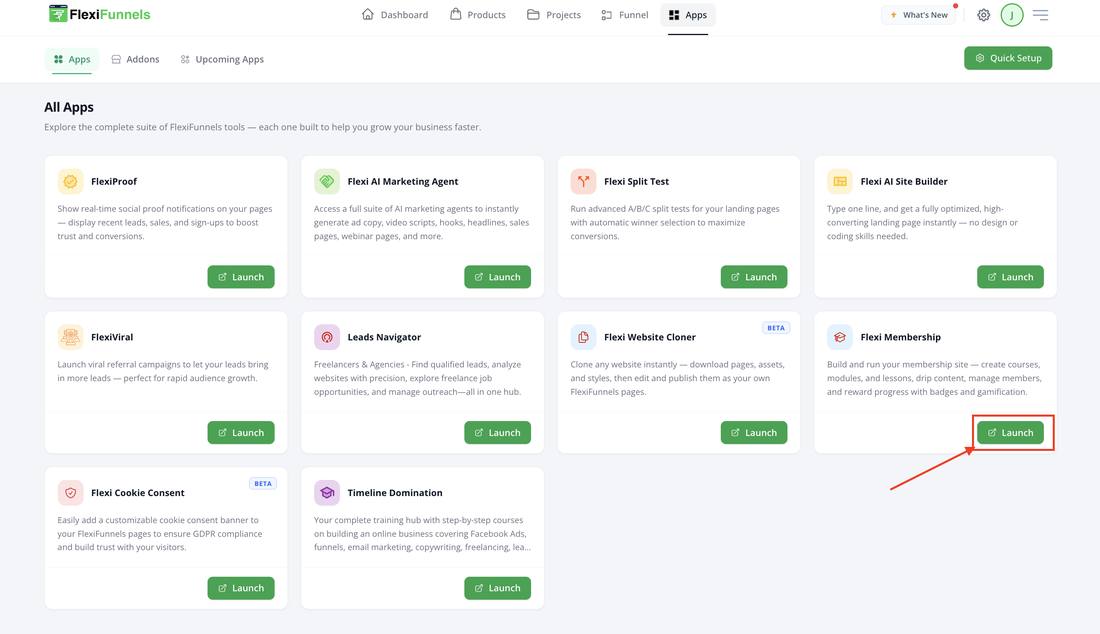
The App grid inside FlexiFunnels — the Flexi Membership tile's Launch button is circled here for clarity.
You'll land on the Membership Panel, with four tabs across the top:
| Tab | What it's for |
|---|---|
| Dashboard | A performance overview of your membership(s) — revenue, traffic, members, activation rate, and quick-action shortcuts. |
| My Membership | Where you create and manage courses, groups, events, members, bundles and discussion/moderation — this is where you'll spend most of your setup time. |
| Products | The pricing, checkout, and sales/checkout/thank-you page side of what you sell. |
| Statistics | Engagement numbers — members, posts, comments, likes, course/module/lesson counts, and a leaderboard. |
Part 2 — Create your membership project
- From My Membership, click New Membership.
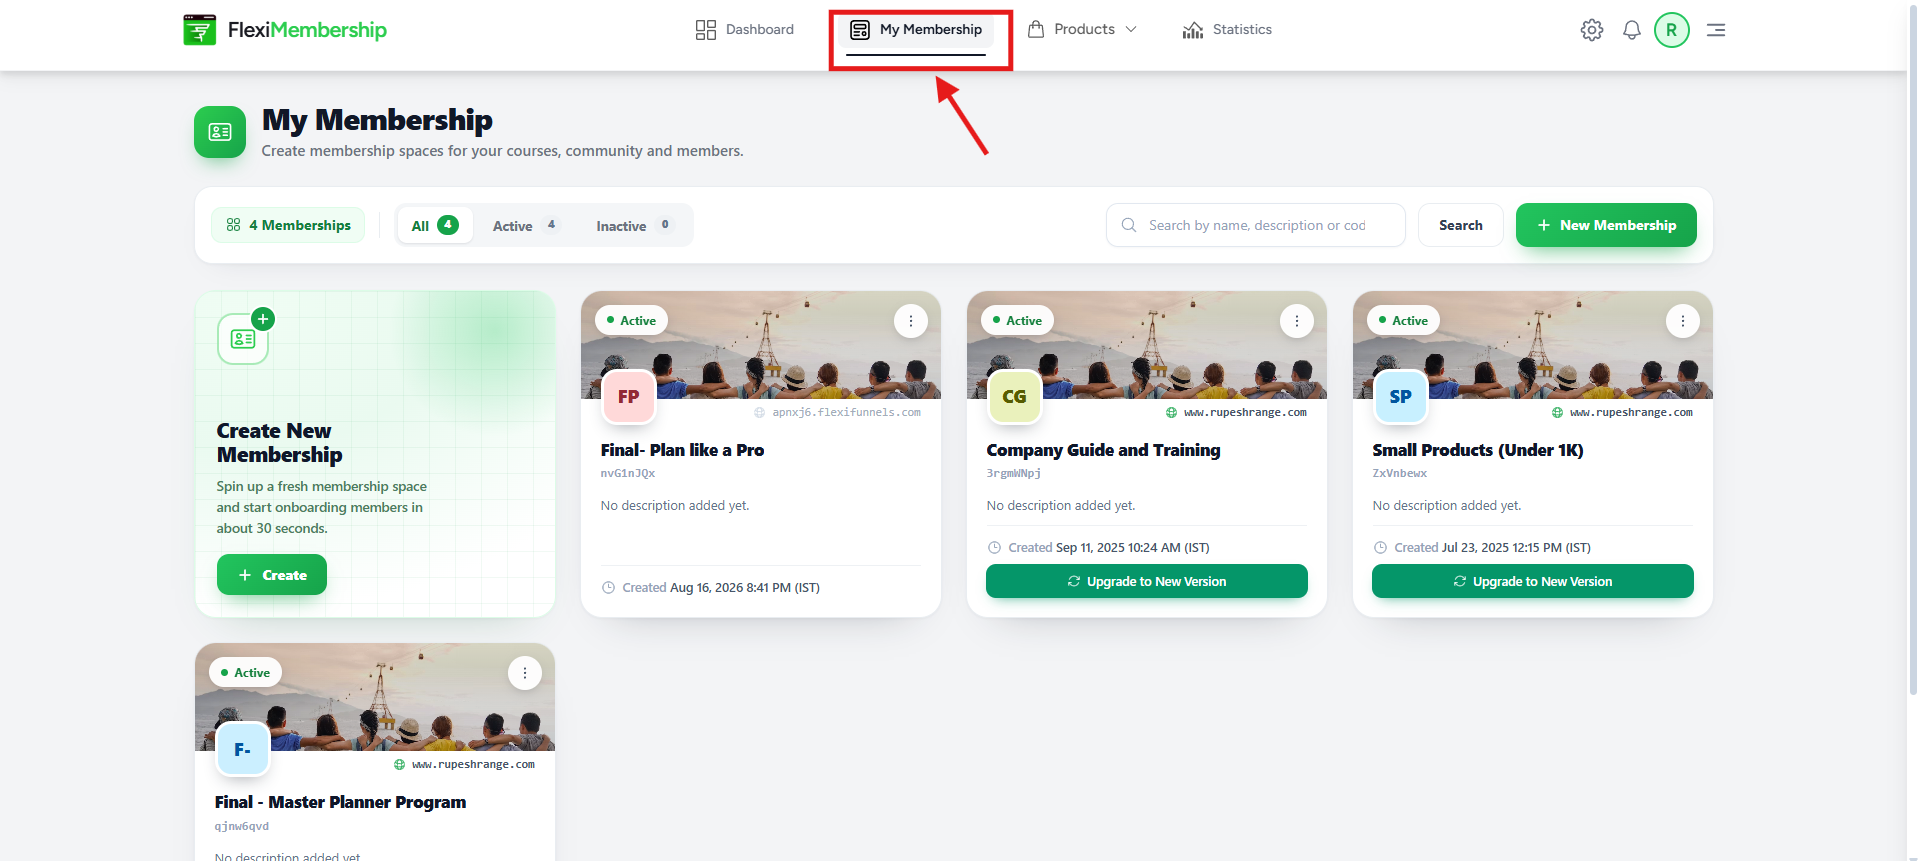
- Enter a Membership Name — this becomes the project name you'll see everywhere in your dashboard from now on (for example, "FlexiFunnels Academy").
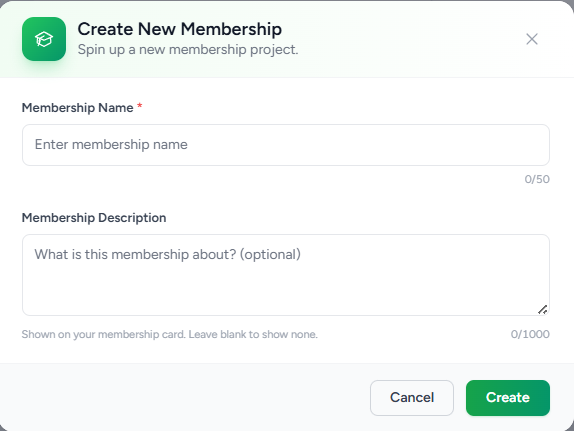
- Add a Short Description if you'd like one — this is optional at project level.
- Click Create.
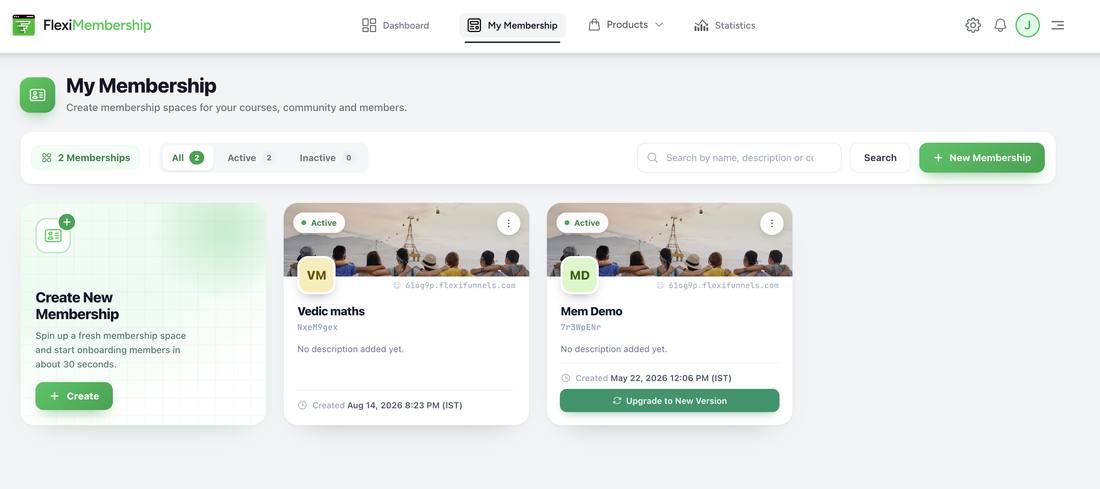
The "My Membership" list — every membership project you've created lives here, each with its own slug, status, and creation date.
Once created, you land on the project's own dashboard, with stat tiles (Members, Courses, Lessons, Groups) and sub-tabs for Courses, Groups, Events, Members, Bundles, and Discussion / Moderation. This guide covers Groups, Events, and the Members/Bundles/Moderation tabs later (Parts 11–13); the rest of this section focuses on the course flow.
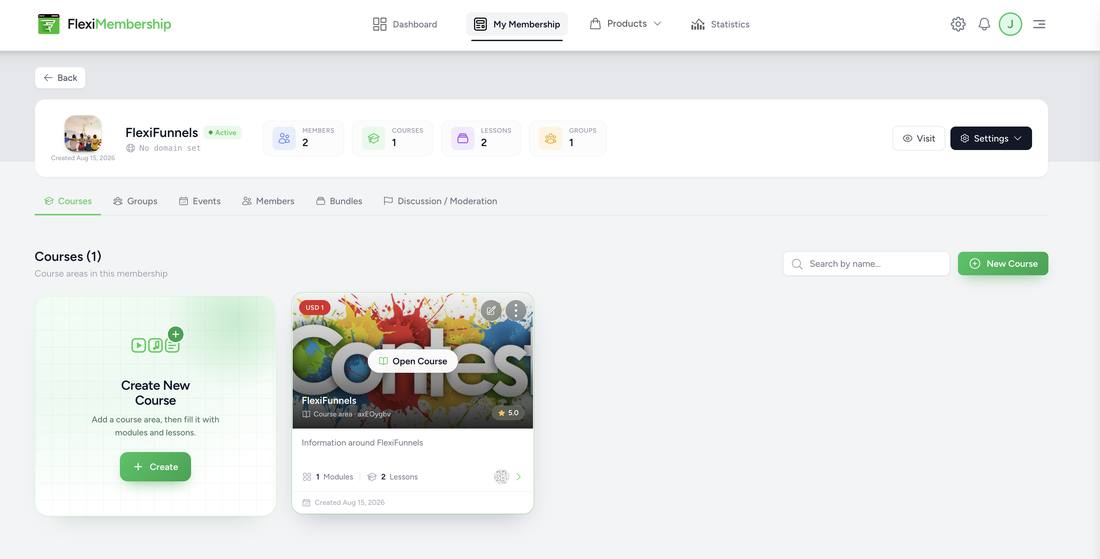
Inside a membership project — stat tiles across the top, course cards below. This is where you'll spend most of your time.
Part 3 — Create your first course — every field explained
Inside a membership project, click Courses, then New Course (or the Create New Course tile). This opens the biggest form in the whole product — here's exactly what each section does and why it matters.
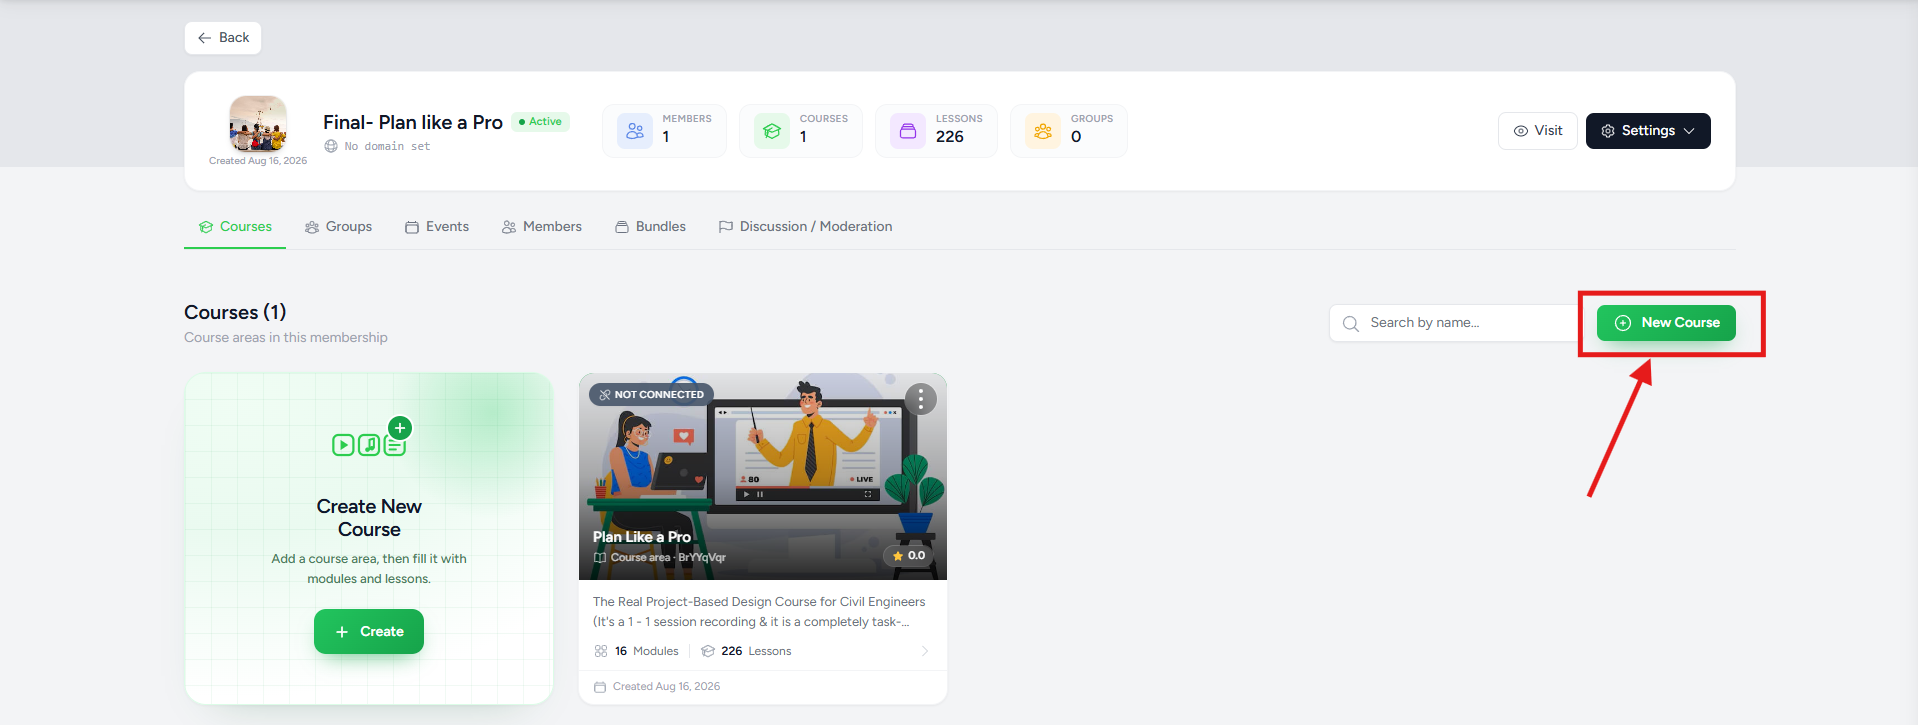
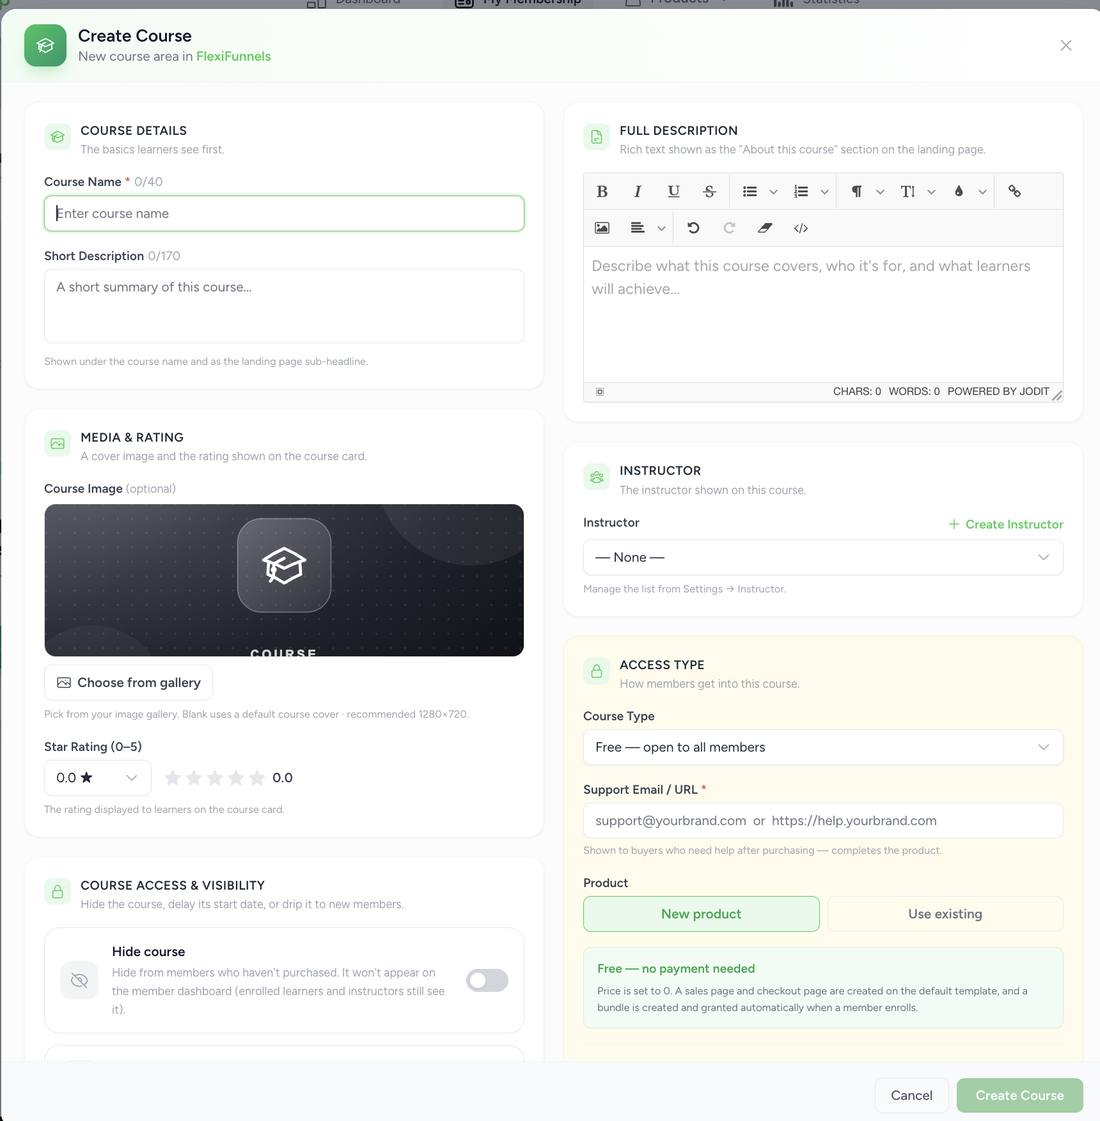
The full Create Course form — left column covers the course itself, right column covers its instructor and how it's sold.
3.1 — Course details & media
| Field | What it does | Why it matters |
|---|---|---|
| Course Name (0/40) | The subject's title — shown on the sales page, the member dashboard, and browser tab. | 40 characters is tight — write the short, punchy version, not the full marketing headline. |
| Short Description (0/170) | A one-line summary shown under the course name and as the landing-page sub-headline. | This is often the only thing a scrolling visitor reads before deciding to click — make it benefit-driven, not just descriptive. |
| Course Image | The cover image on the course card and sales page (recommended 1280×720). | Leave it blank and FlexiFunnels shows a generic dark placeholder — fine for testing, but hurts trust on a real sales page. |
| Star Rating (0–5) | A manually-set rating shown on the course card. | This is not calculated from real reviews — it's a number you type in yourself. Use it honestly, or leave it at 0 until you have real testimonials elsewhere on the page. |
3.2 — Course access & visibility
| Toggle | What it does |
|---|---|
| Hide course | Hides it from members who haven't purchased it. It won't appear on the member dashboard at all (enrolled learners and instructors still see it). |
| Begin access at a specific date | Withholds the course until a date you choose — useful for a cohort that starts on a fixed date regardless of when someone buys. |
| Restrict access to specific days | Access lasts for a number of days you set, counted from the member's own purchase date. |
⚠️ Make-or-break: "Restrict access to specific days" counts per-member, not by calendar date
3.3 — Full description & instructor
The Full Description box is a rich-text editor (bold, lists, links, images) shown as the "About this course" section on the public sales page — this is your real sales copy, not just a summary.
Under Instructor, pick an existing instructor or click + Create Instructor to add a new one right from this form.
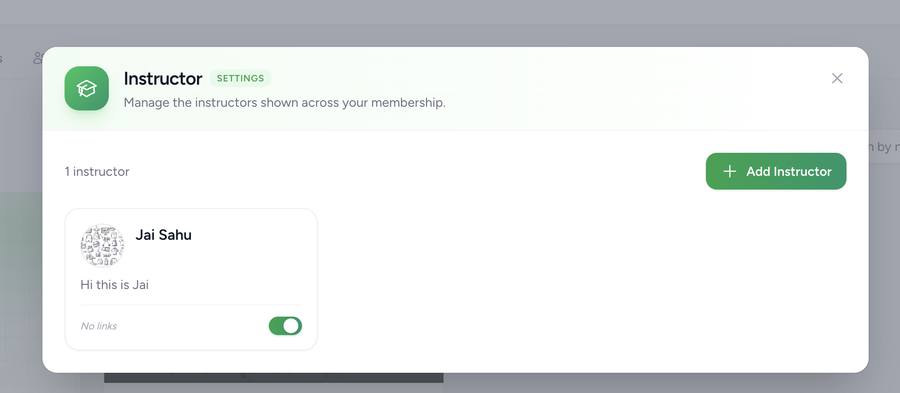
Instructors are managed centrally (Settings > Engagement > Instructor) and then simply picked from a dropdown on each course — set up the person once, reuse them on every course they teach.
3.4 — Access type: free, paid, product & bundle
| Field | What it does |
|---|---|
| Course Type | Free — open to all members, Paid — requires a purchase (price + payment gateway are chosen right here in this form once you pick Paid), or Unlock at a Level — granted automatically once a member reaches a gamification level (Part 6.2) instead of paying. |
| Support Email / URL (required) | Shown to buyers who need help after purchasing — this is mandatory because it "completes" the product record. |
| Product — New product / Use existing | The product is the sellable "ticket" — its own price, currency, and checkout page. |
| Bundle — New bundle / Use existing | The bundle is what actually grants access to this course's content once someone owns the product. |
? Tip
Click Create Course. FlexiFunnels then builds the course, product, and bundle in the background — you can click Continue in background and keep working on branding (Part 5) while it finishes.
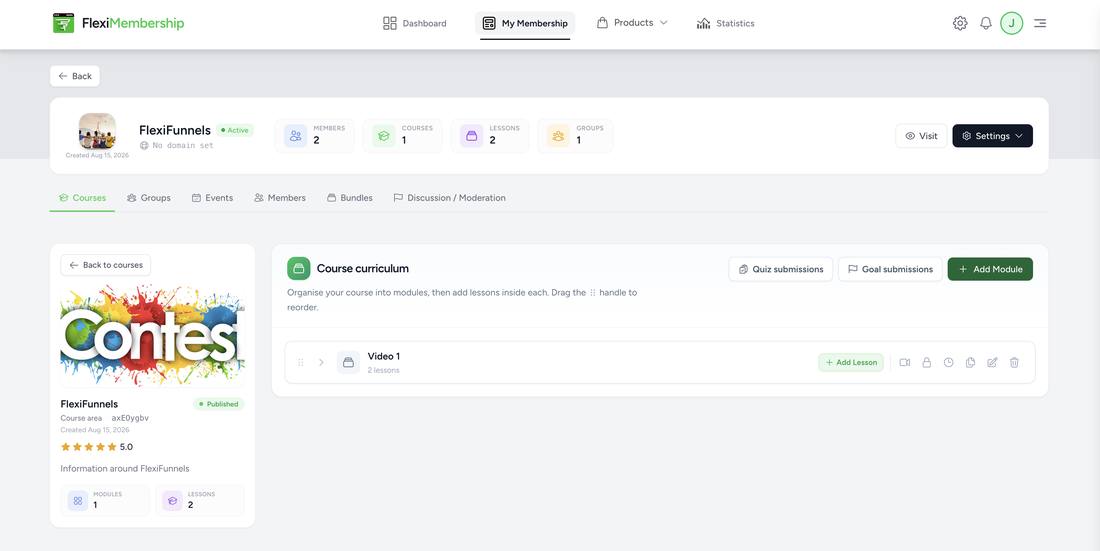
Once the course exists, opening it takes you to its curriculum view — this is where Part 4 picks up.
Part 4 — Build your modules & lessons
Open your course to reach the Course curriculum screen. A module groups related lessons (like a chapter); a lesson is the individual class inside it.
4.1 — Add a module
- Click + Add Module.
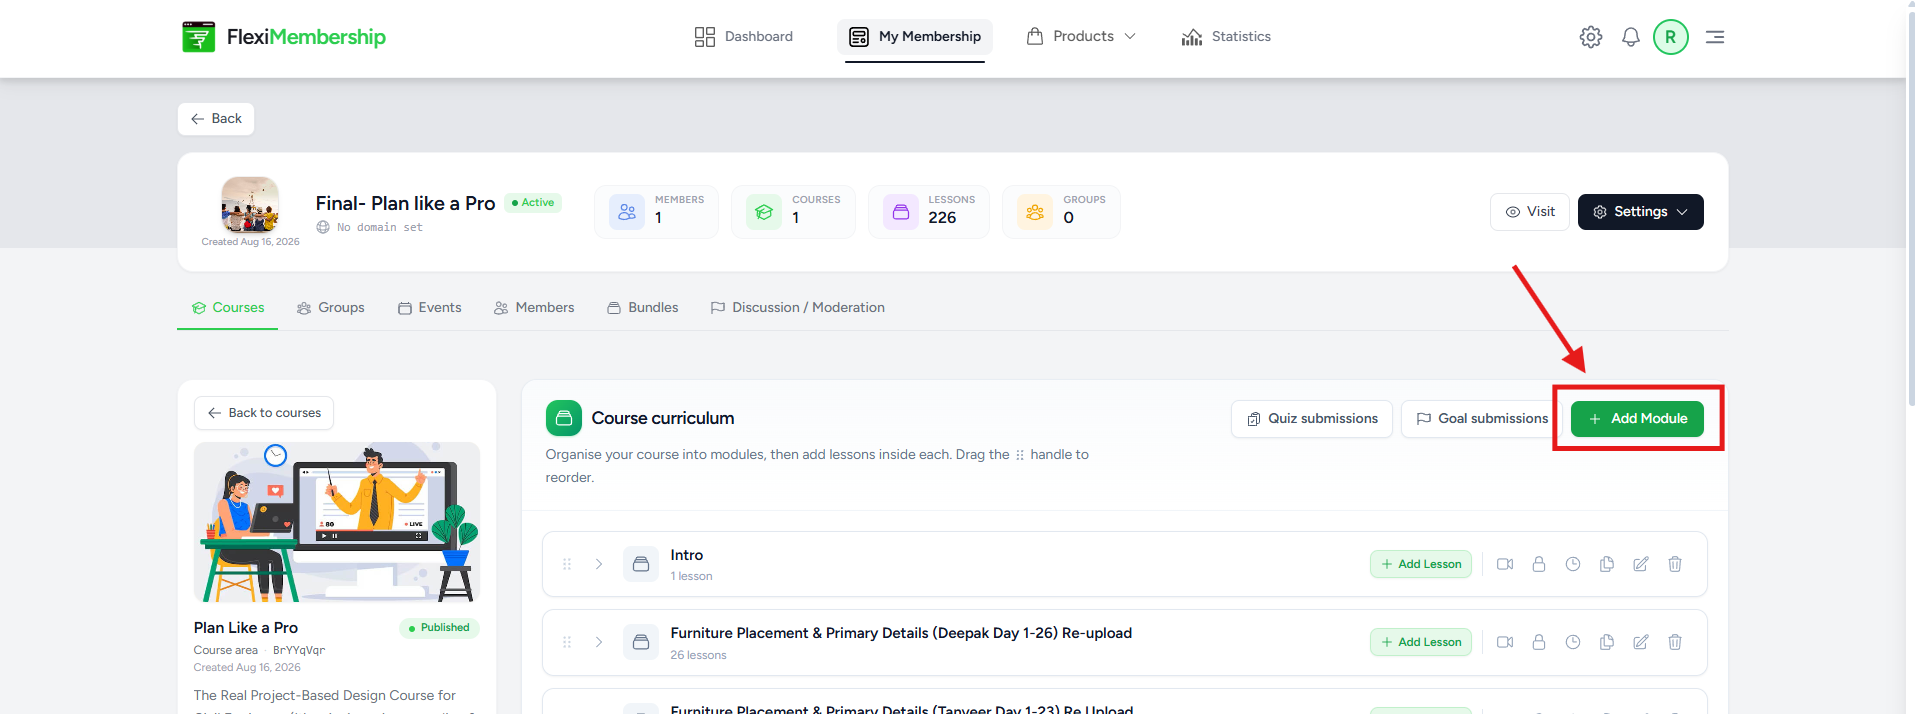
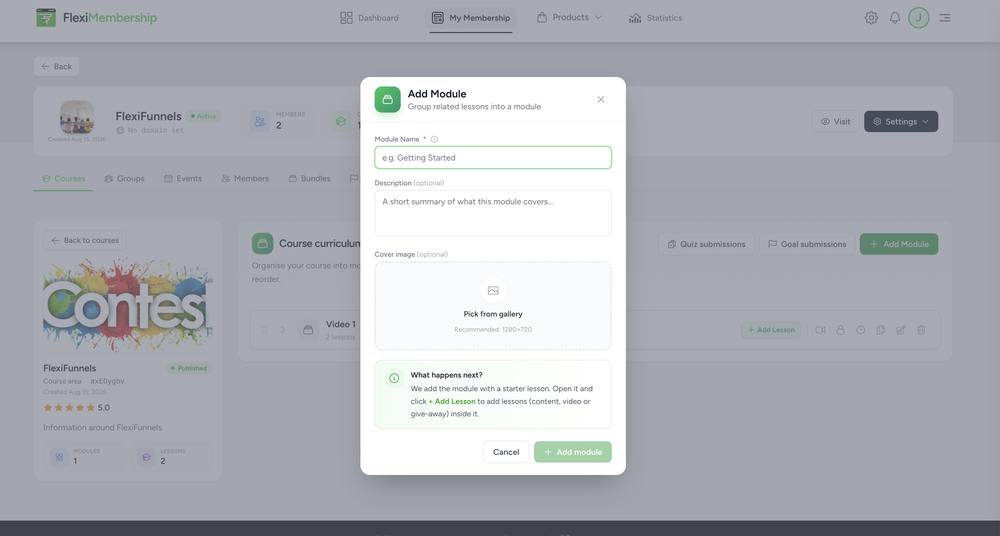
- Give it a Module Name (for example, "Getting Started").
- Add an optional Description and cover image.
- Click + Add module.
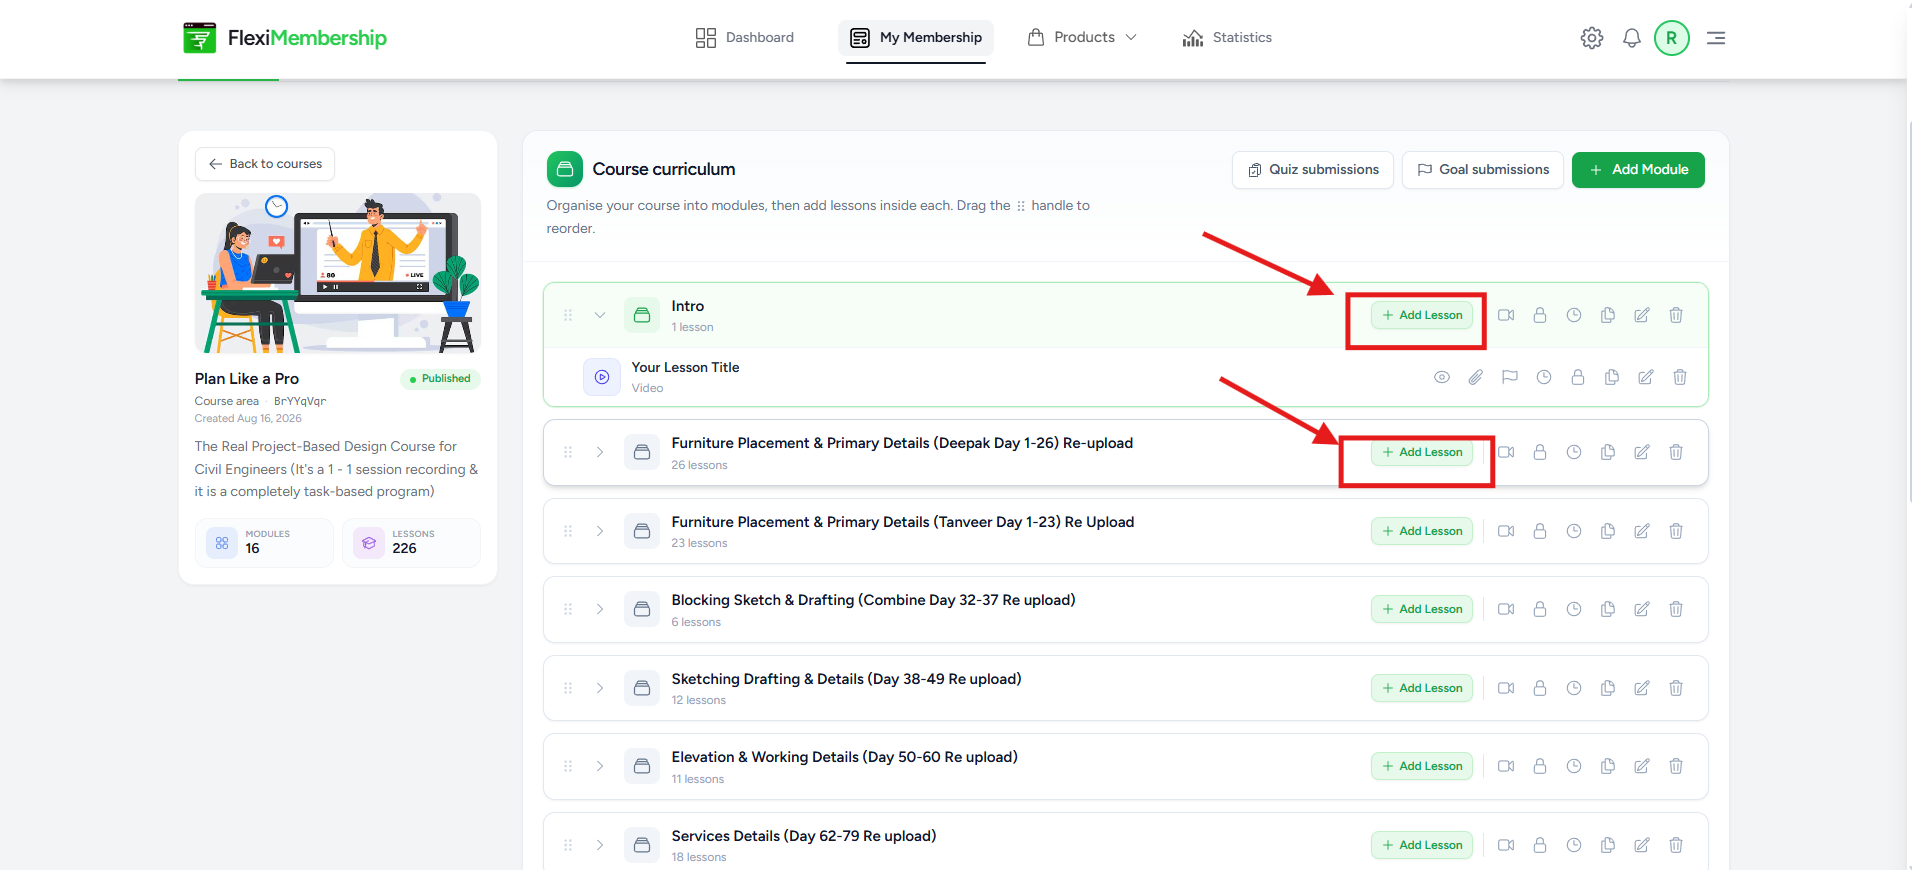
FlexiFunnels automatically adds a starter lesson inside every new module — open the module and click + Add Lesson to add real content into it.
4.2 — Add a lesson
Inside a module, click Add Lesson. Two lesson types are available from the Lesson Type dropdown:
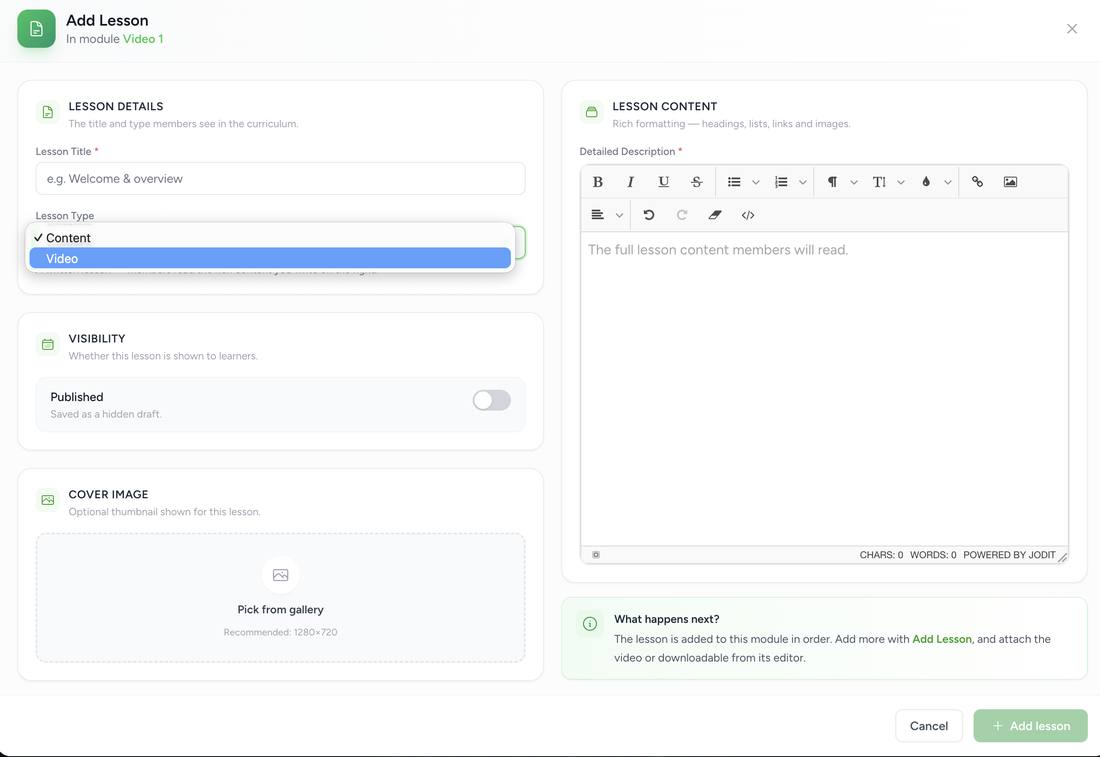
Lesson Type dropdown — Content (text/rich-media only) or Video.
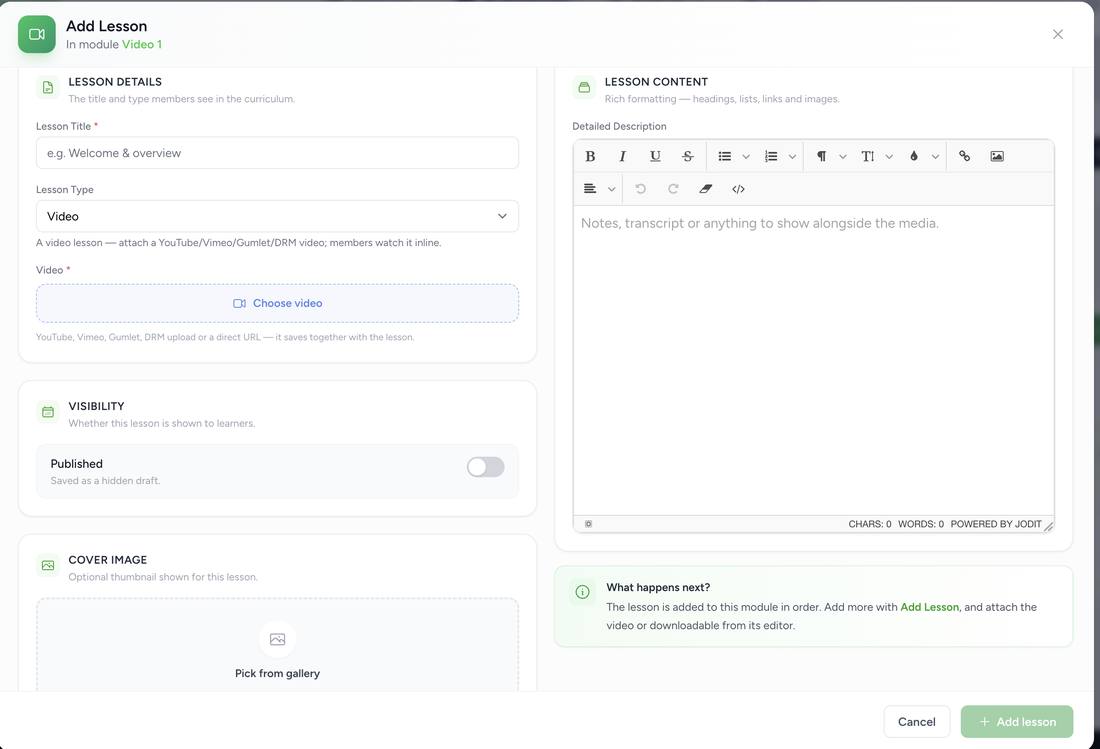
Video lesson type — the "Add lesson" button stays disabled until you actually attach a video.
| Field | What it does |
|---|---|
| Lesson Title | Shown in the module's lesson list and on the lesson page itself. |
| Lesson Type | Content = rich-text/description only. Video = requires a video source (YouTube, Vimeo, Gumlet, DRM upload, or generic/HTML5 URL). |
| Visibility — Published | Off by default — the lesson saves as a hidden draft until you switch this on. |
| Cover Image | Recommended 1280×720 — shown in the lesson list thumbnail. |
| Lesson Content | A full rich-text editor (Jodit-powered) for the written lesson body, description, or transcript. |
4.3 — Attach a video
If you picked Video, click Choose video to open the video picker — it has tabs for Chosen Video, YouTube, Vimeo, Gumlet, DRM Upload, and Generic/HTML5. For a YouTube video, switch to the YouTube tab, paste the URL or 11-character video ID, click Search, then Save video.
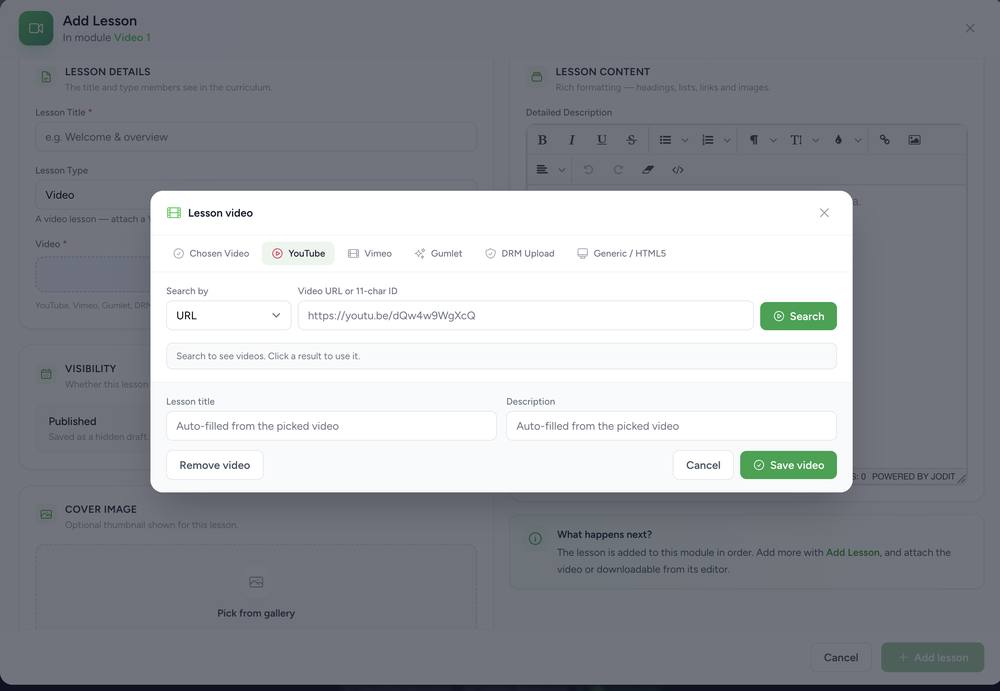
Attaching a YouTube video by URL from the lesson video picker.
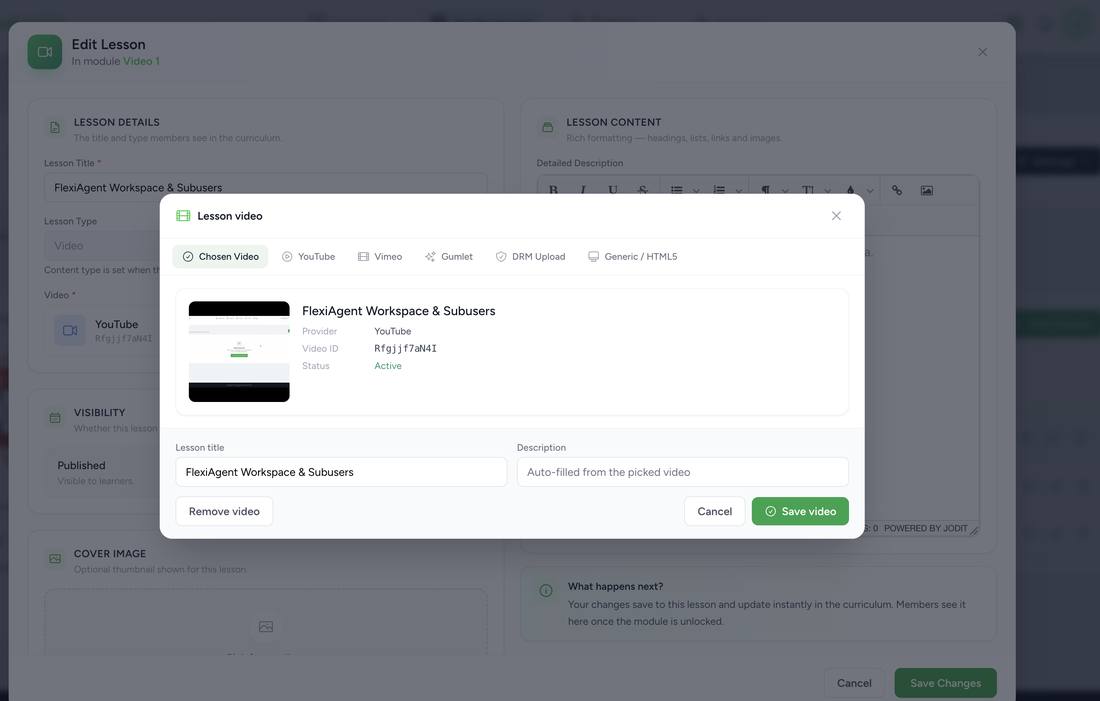
Once attached, the lesson shows the chosen video's provider, ID, and an Active status — you can swap or remove it any time.
Repeat Add Lesson for every class inside the module, and Add Module for every chapter in the course. Each module also has quick icon actions for reordering, duplicating, locking, and viewing lesson history.
Part 5 — Brand your membership panel (Settings > General)
From inside your membership project, click Settings (top right) to open a dropdown with four categories: General (identity, links & layout), Engagement (certificates, points & quizzes), Marketing (banners & popups), and Access & Advanced (security, menus, features & scripts). This Part covers General.
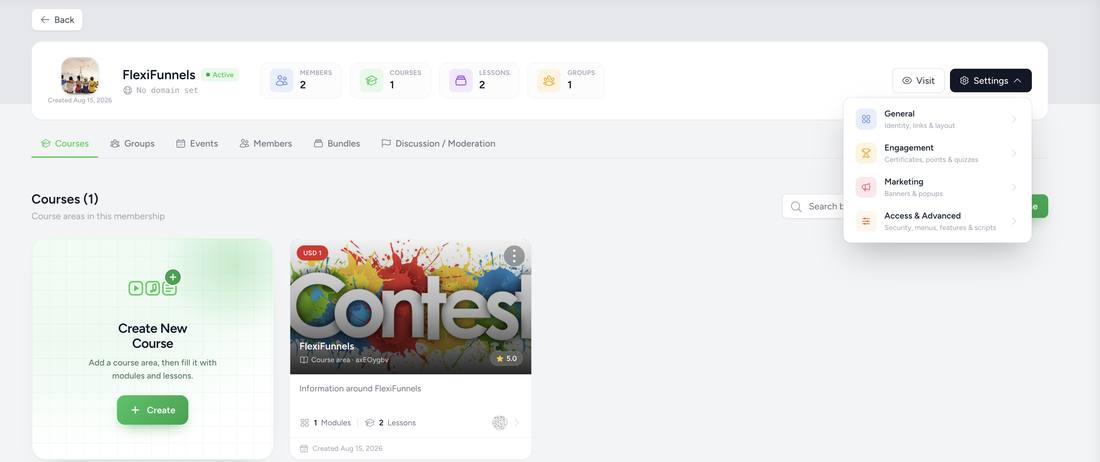
The Settings menu — everything in Parts 5–8 starts from here.
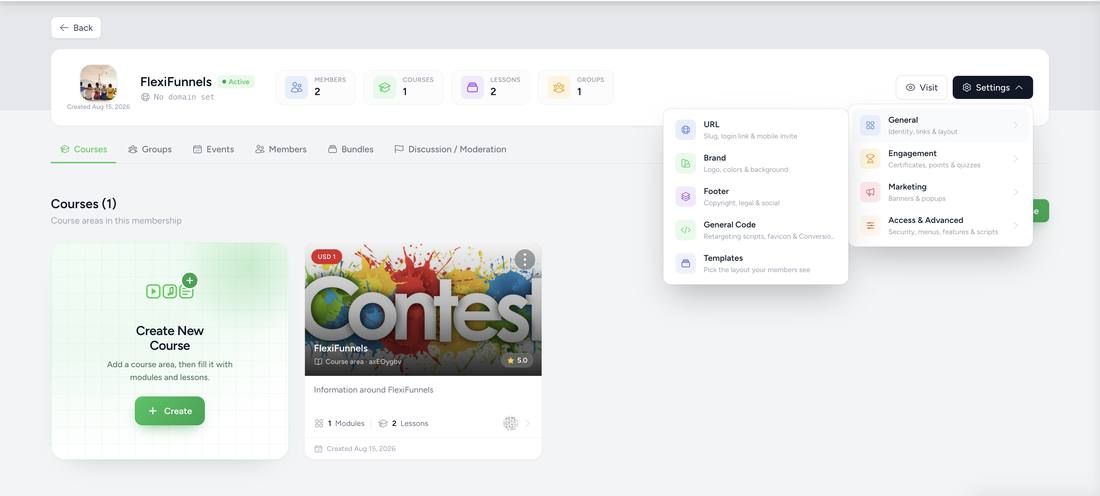
General expands into: URL, Brand, Footer, General Code, and Templates.
5.1 — URL
Shows your Membership Slug, the full Login URL members use, and a Mobile Access Invite Code for the FlexiFunnels mobile app.
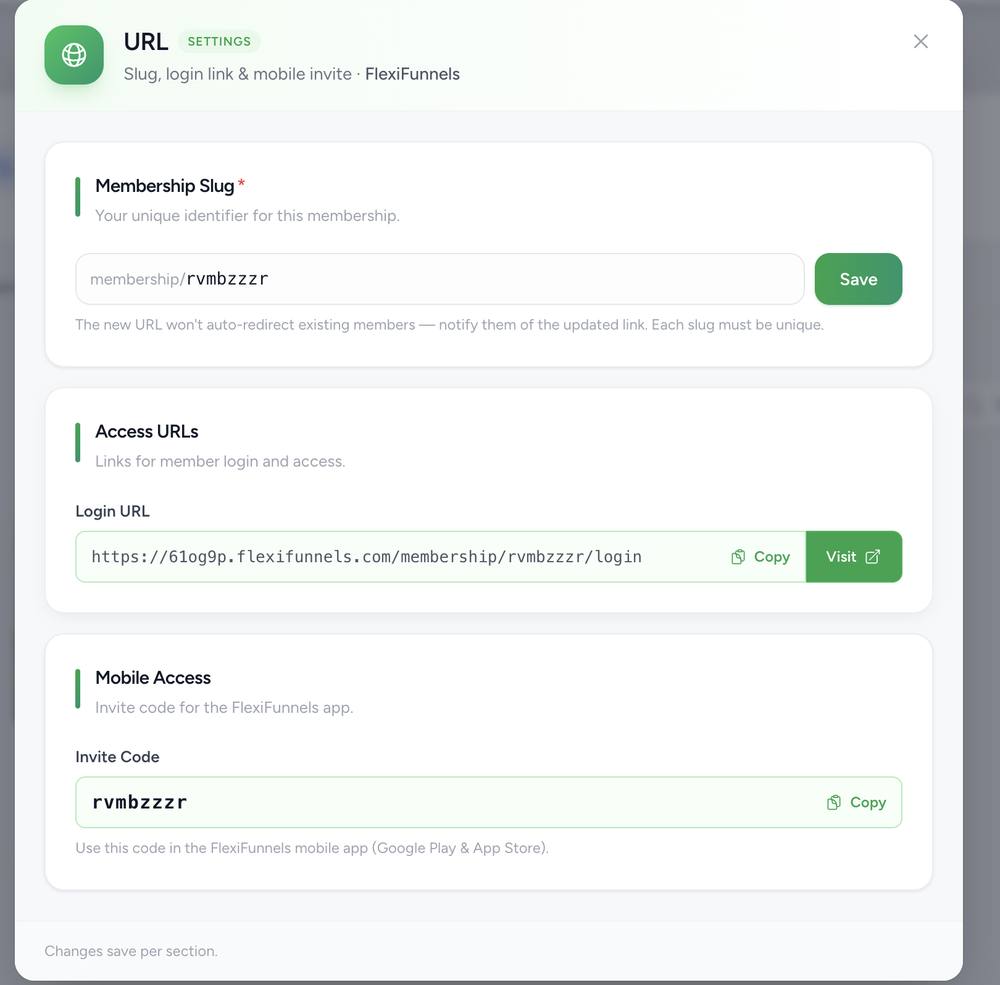
The URL modal — your membership's slug, login link, and mobile invite code all in one place.
5.2 — Brand
The Brand modal has five tabs: Theme, Logo & Banner, Background, Options, and Localization.
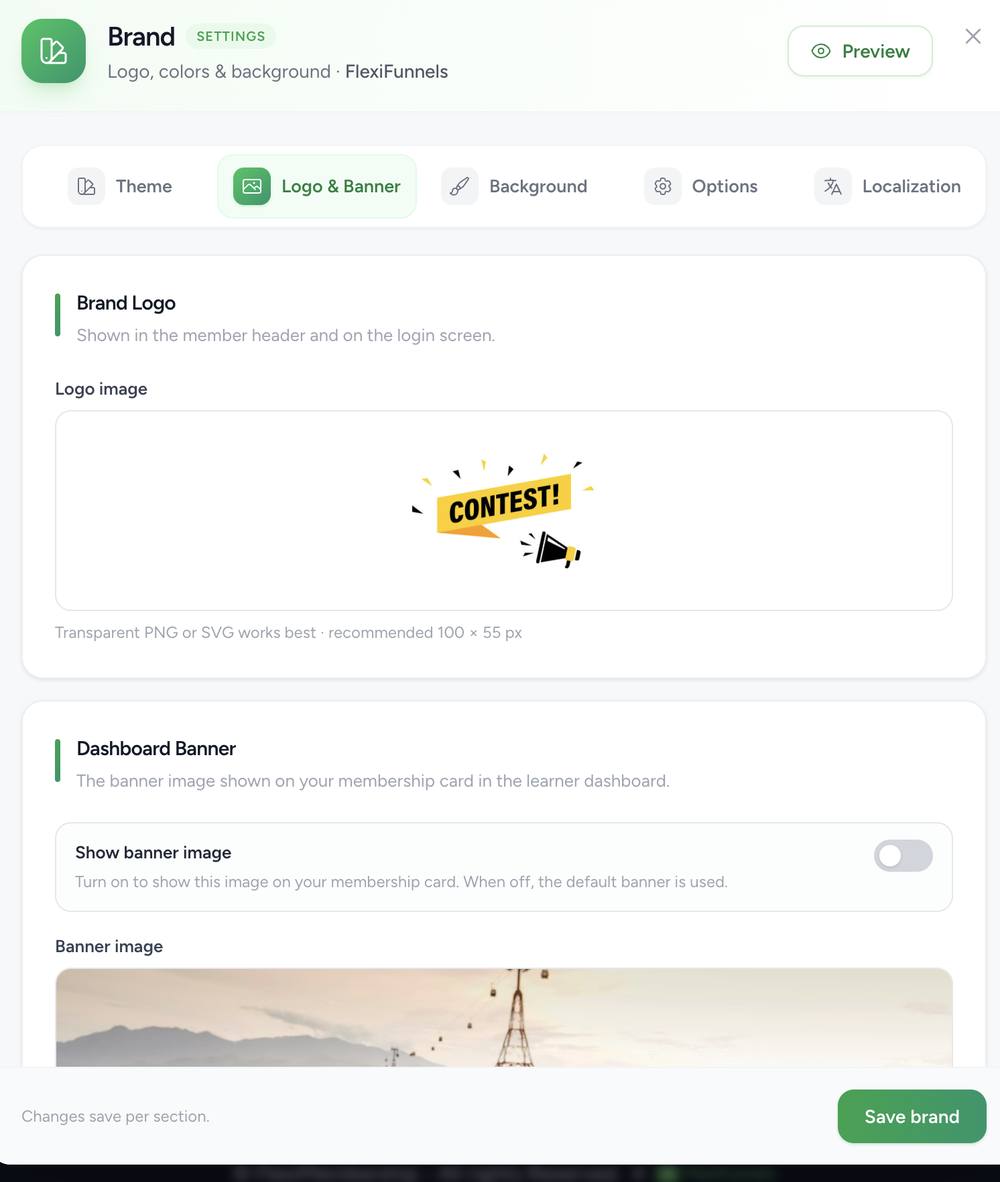
Logo & Banner — your logo (shown on the login screen and member header) and an optional dashboard banner image.
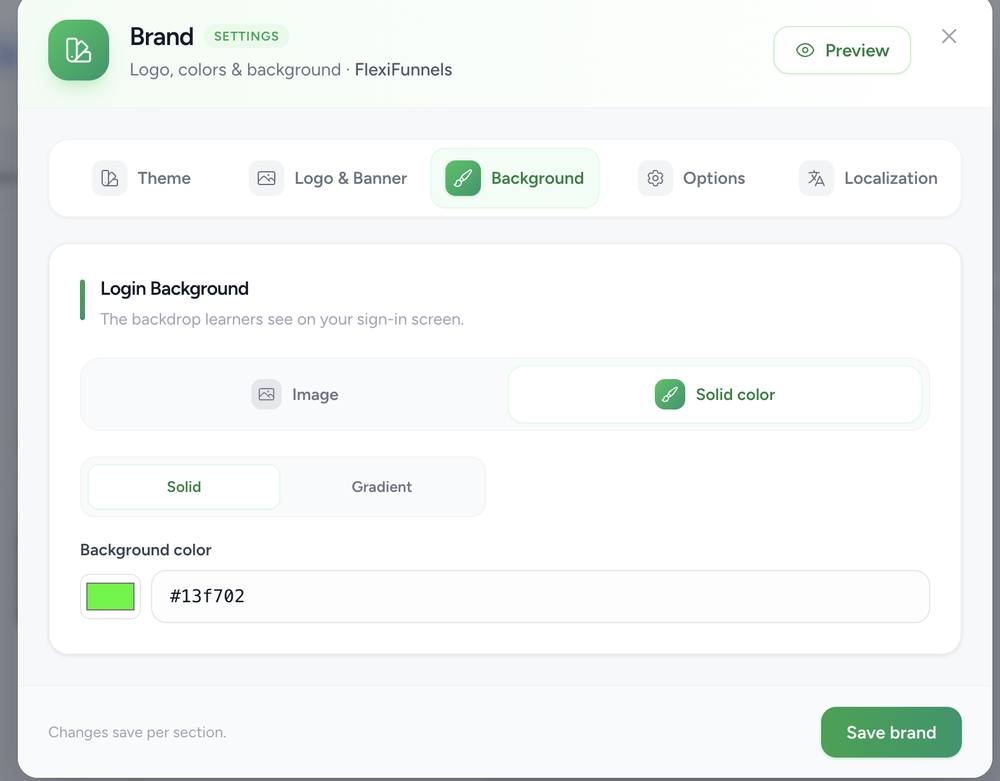
Background — set the login screen's backdrop to an image or a solid/gradient color.
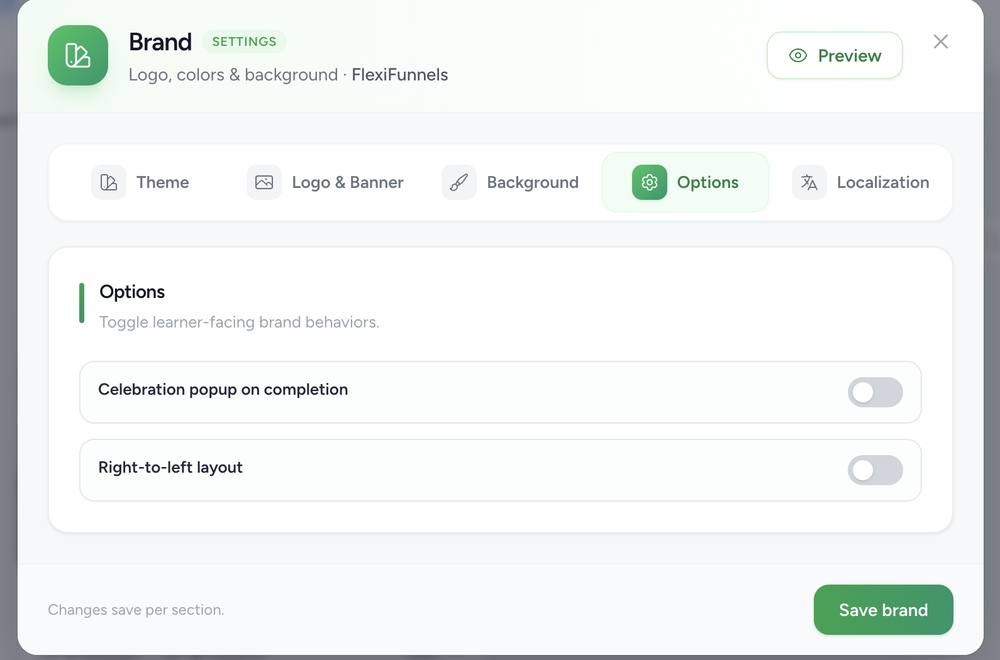
Options — toggle a completion celebration popup and right-to-left layout support.
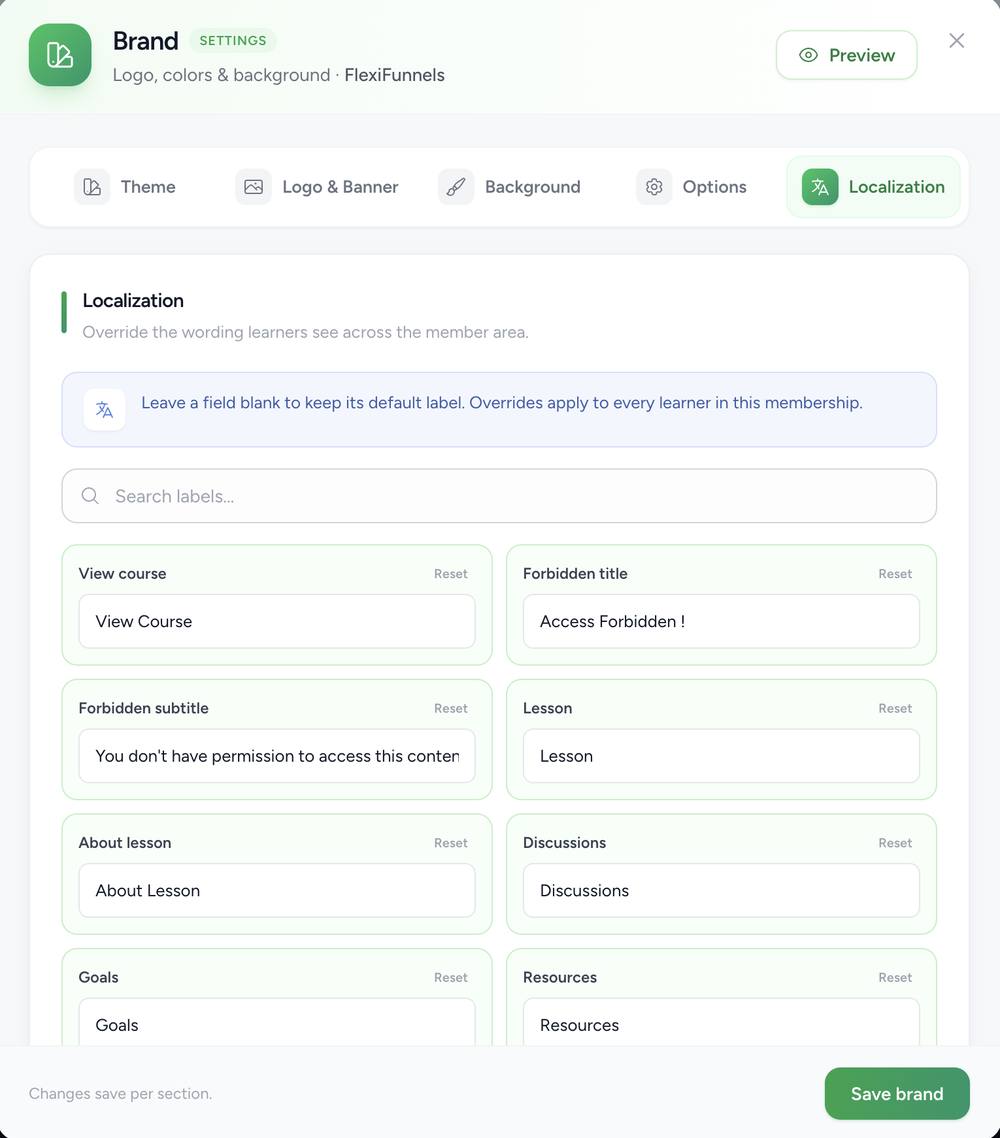
Localization — rename member-facing labels (Lesson, Discussions, Goals, Resources, and more) without touching code.
5.3 — Footer, General Code & Templates
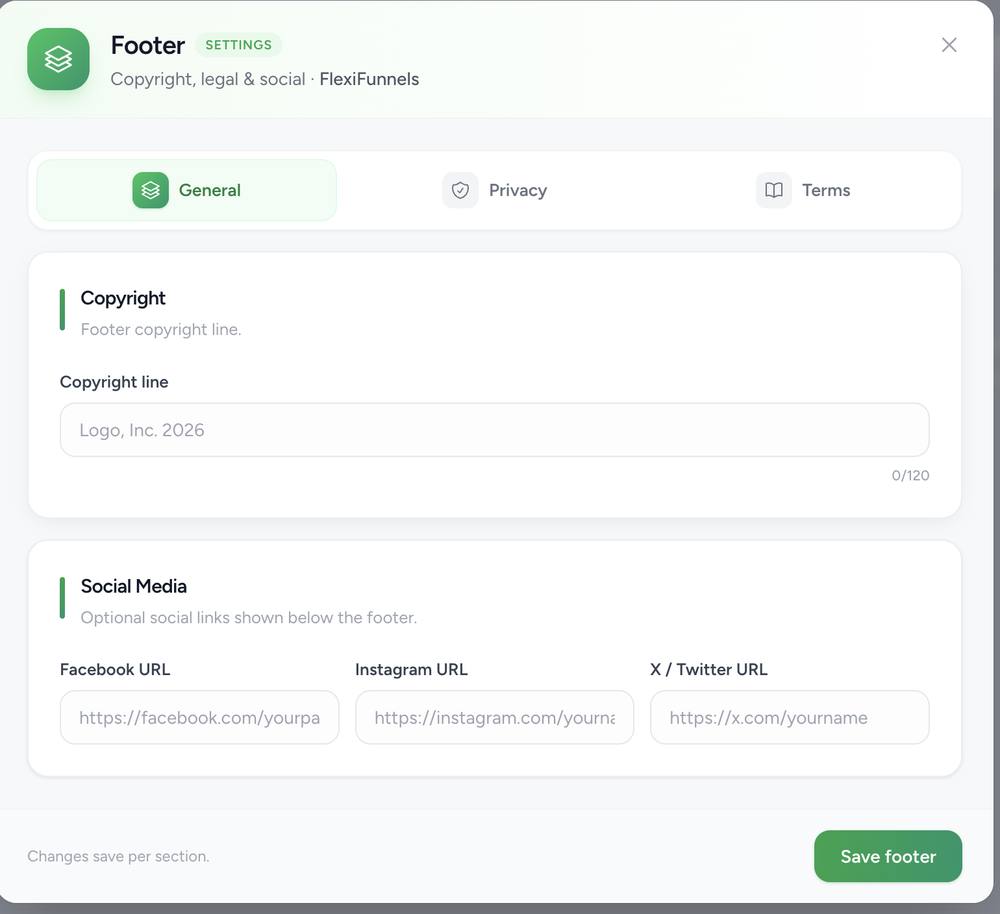
Footer — copyright line, optional privacy/terms links, and social links (Facebook, Instagram, X/Twitter) shown below the footer on every membership page.
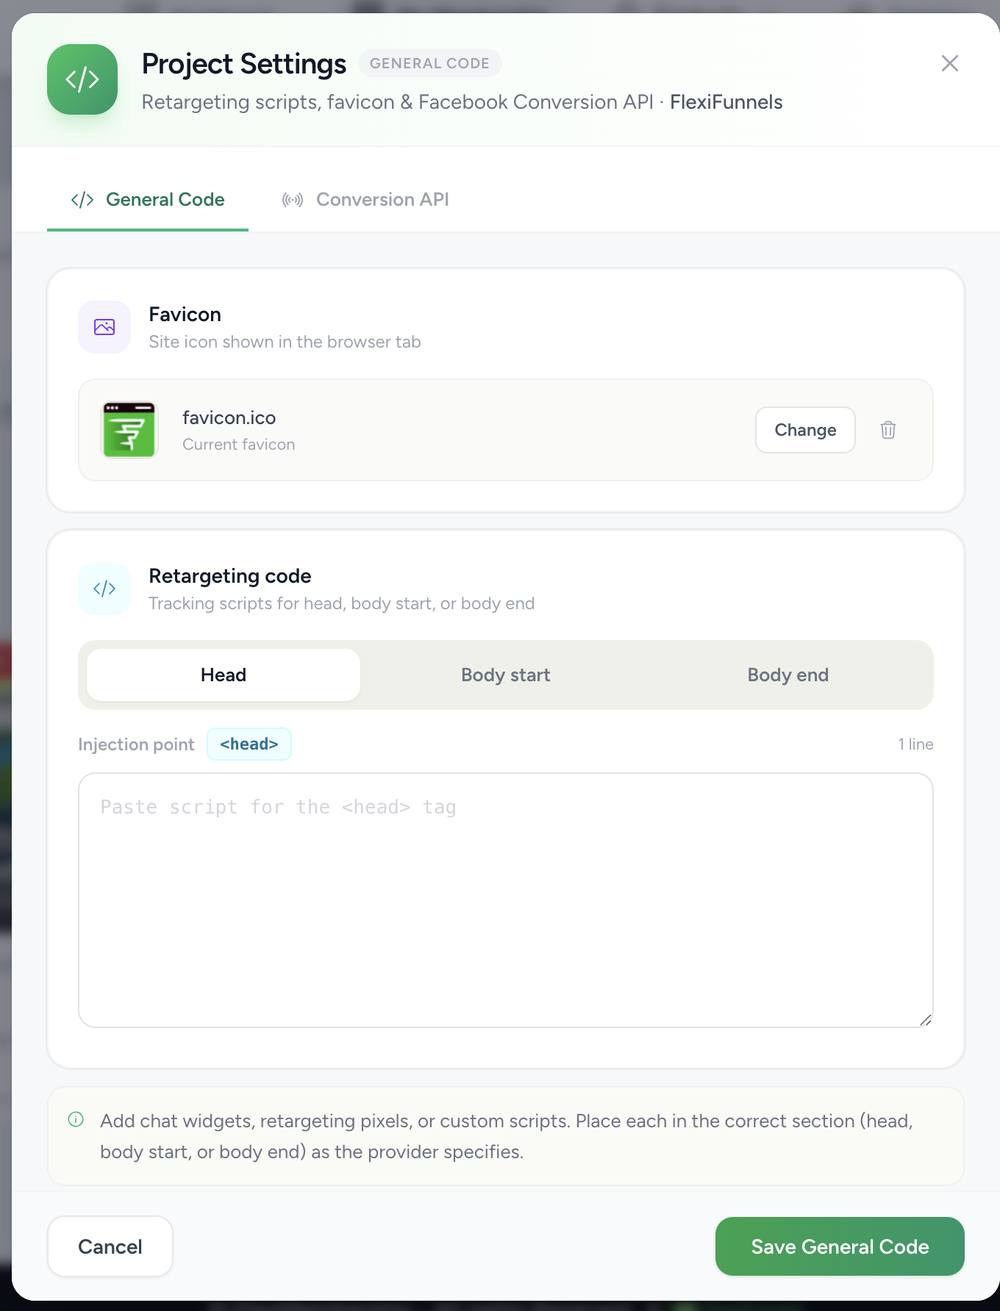
General Code — set your favicon and inject tracking/retargeting scripts into the <head>, body-start, or body-end of every membership page.
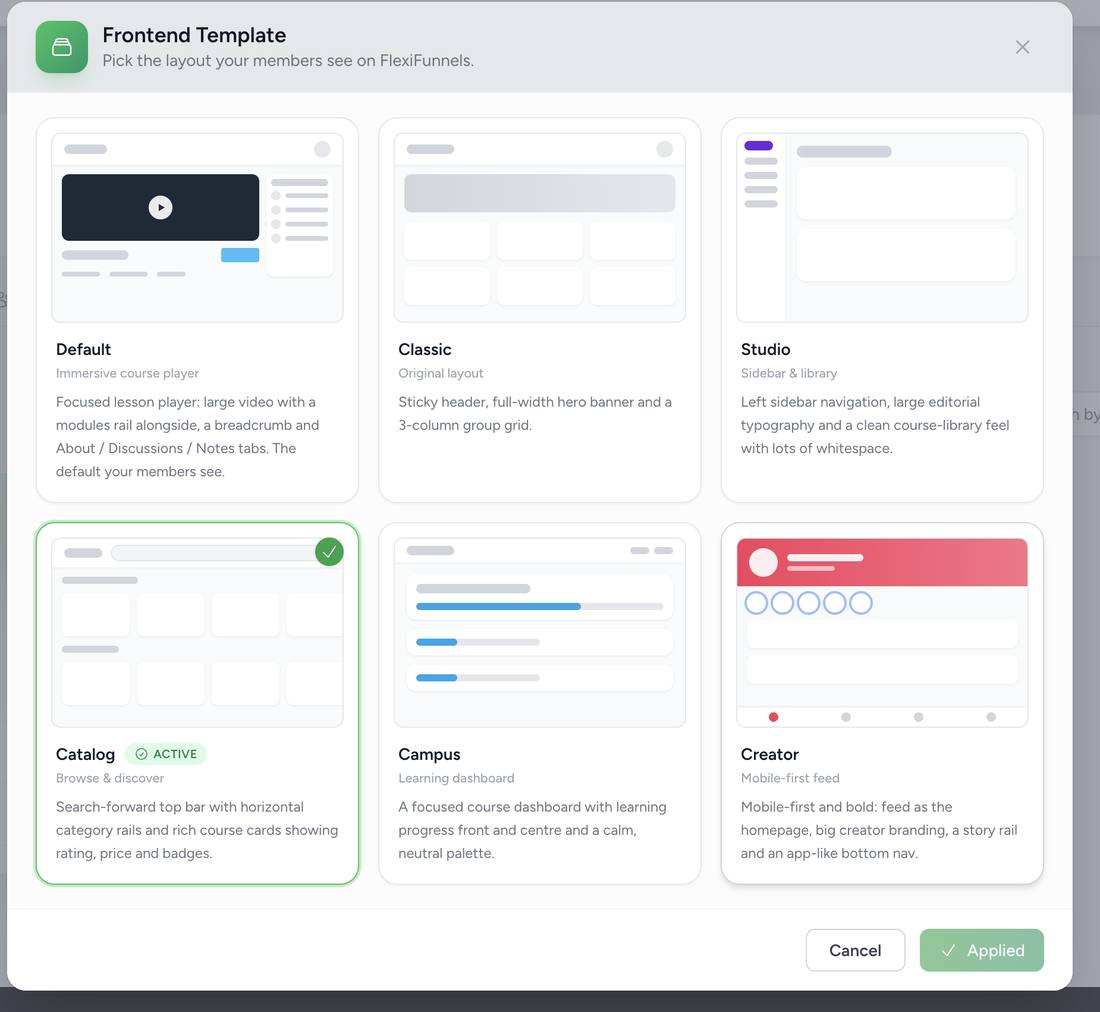
Templates — the overall member-dashboard layout. Six options exist: Default (immersive player), Classic (original layout), Studio (sidebar & library), Catalog (browse & discover — shown active/selected here), Campus (learning dashboard), and Creator (mobile-first feed). Click a card, then Apply Template to make it live — the button reads "Applied" once it's the active choice.
Part 6 — Certificates, gamification & quizzes (Settings > Engagement)
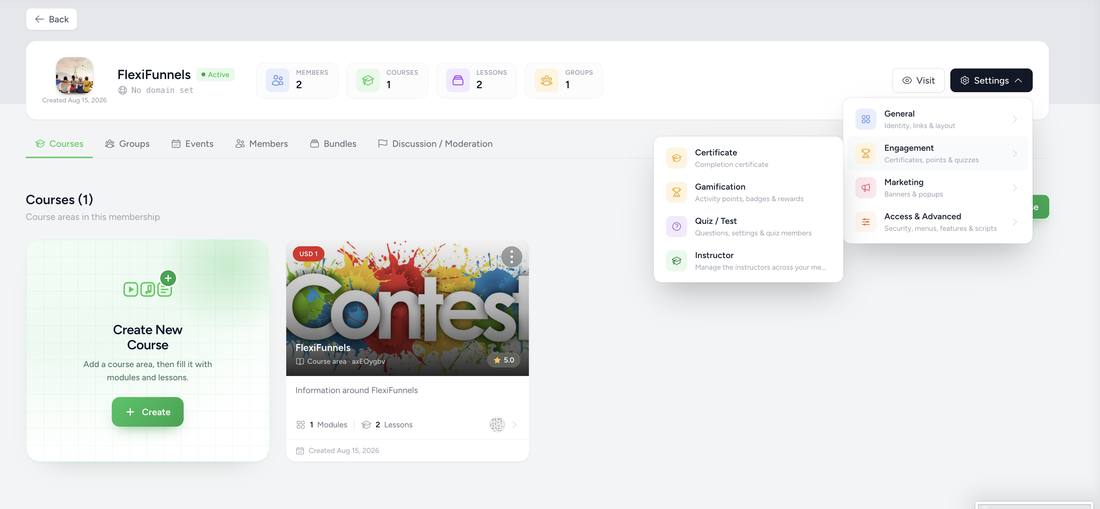
Engagement expands into: Certificate, Gamification, Quiz / Test, and Instructor.
6.1 — Certificate
Turn on Enable certificate, then set the headline (default: "Certificate of Course Completion"), two lines of body text, a signature label/name, logo & badge position, and text color. A separate tab handles the completion email.
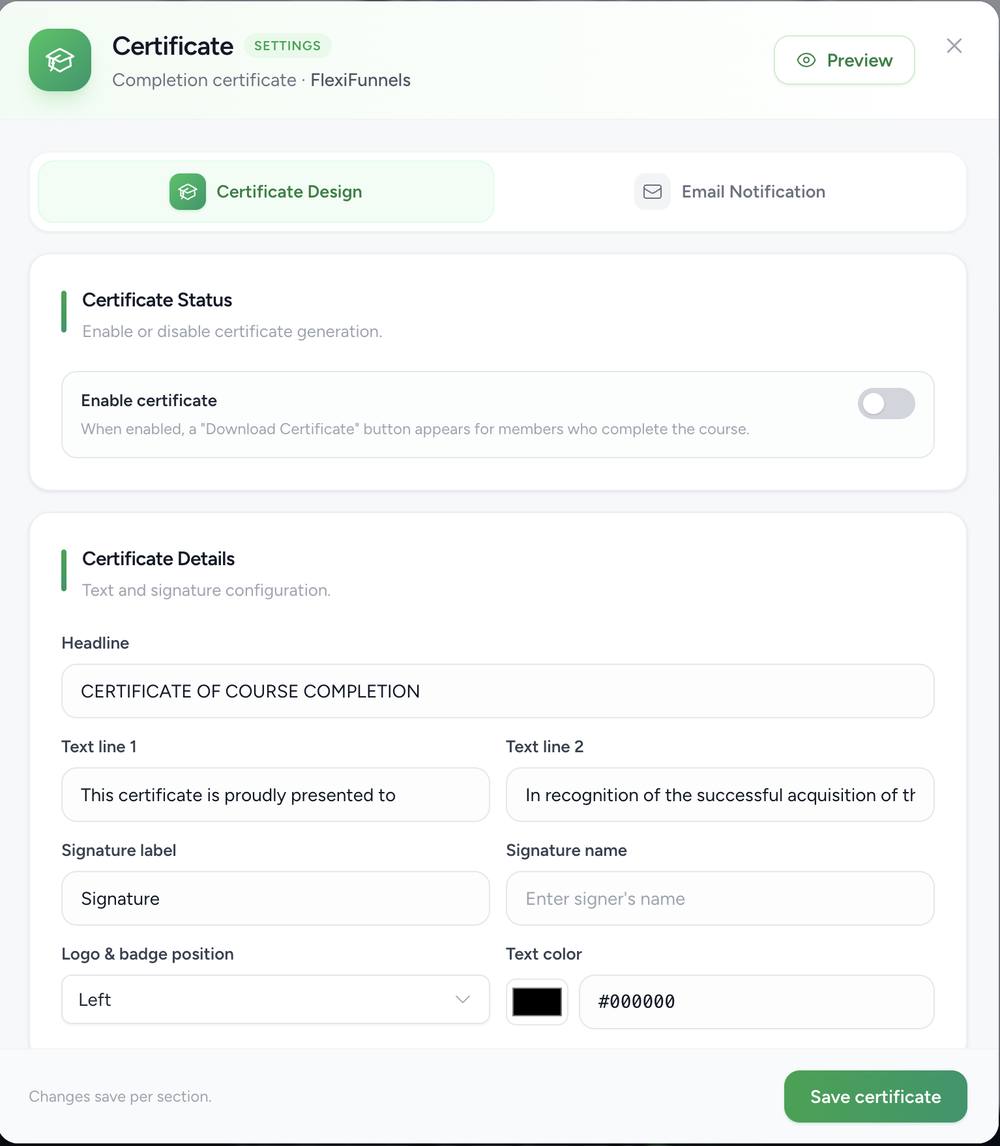
The Certificate modal — off by default, so remember to switch "Enable certificate" on if you want one issued automatically.
6.2 — Gamification
Gamification has four tabs: Set Activity Points, Levels, Badges, and Rewards.
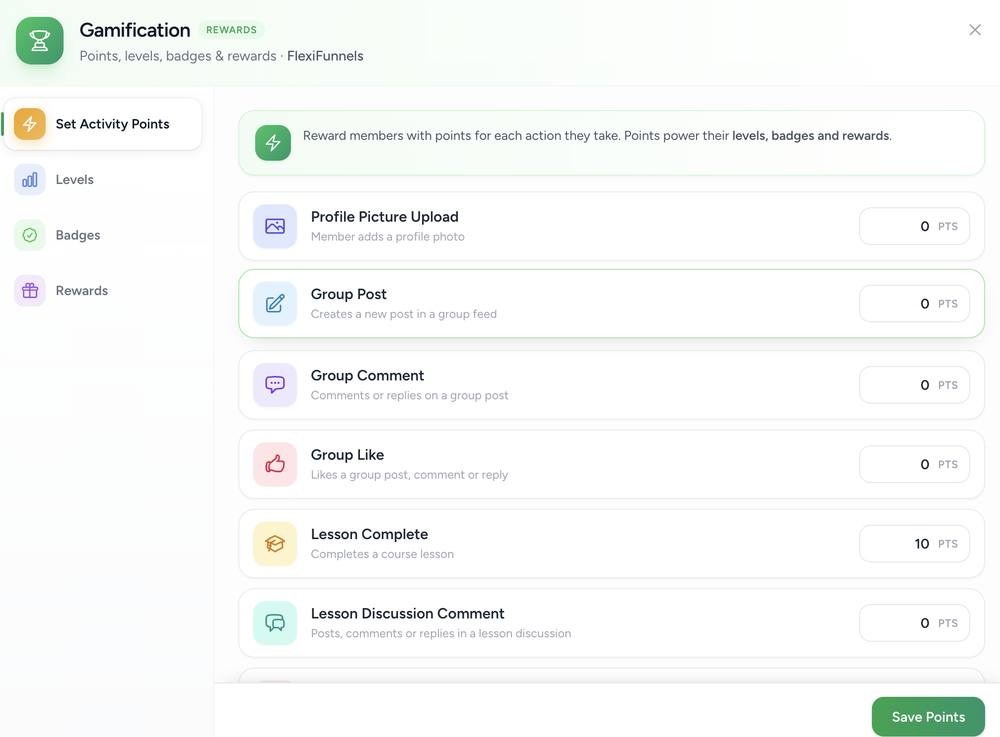
Set Activity Points — assign points per action (profile picture upload, group post/comment/like, lesson complete, discussion comment).
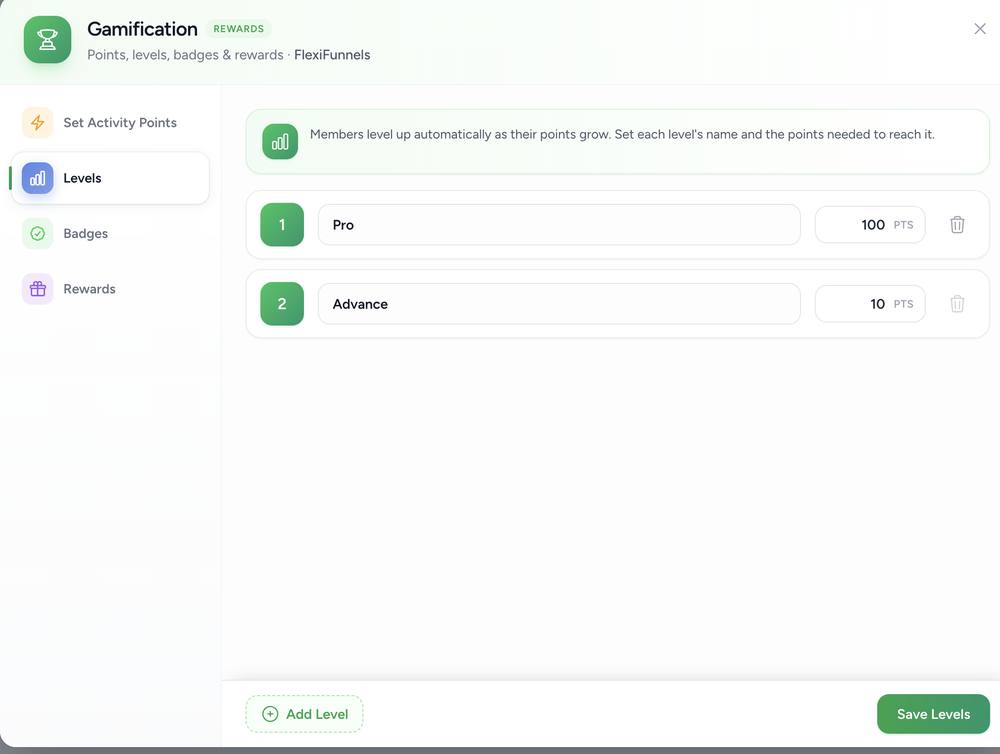
Levels — named tiers unlocked at a points threshold you set.
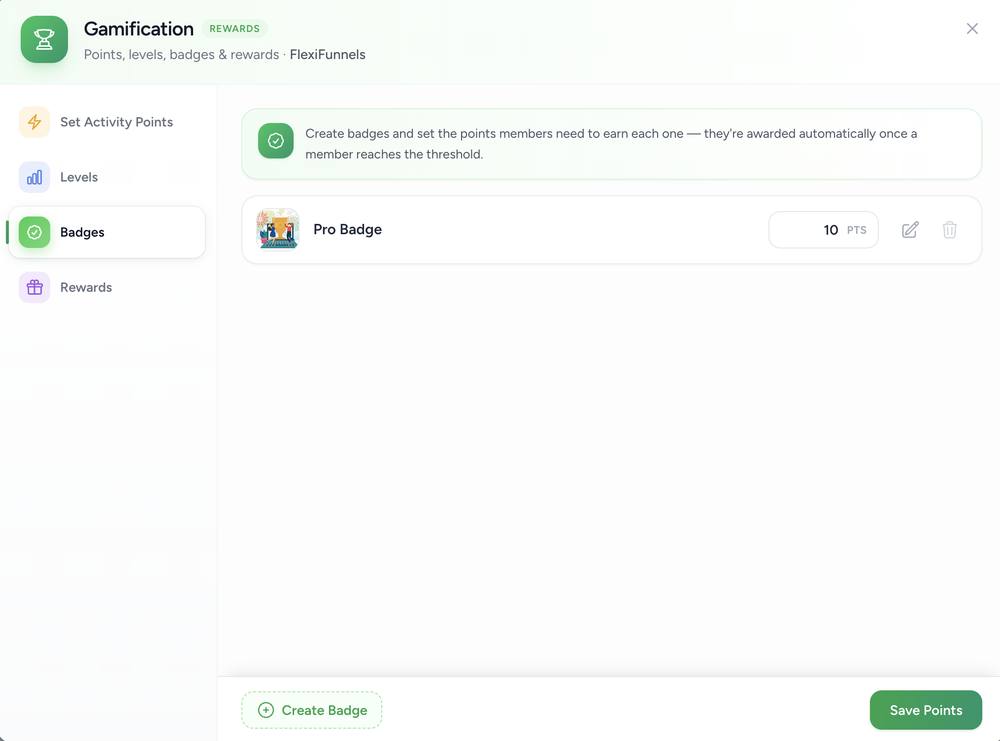
Badges — a separate, image-based reward unlocked at its own points threshold.
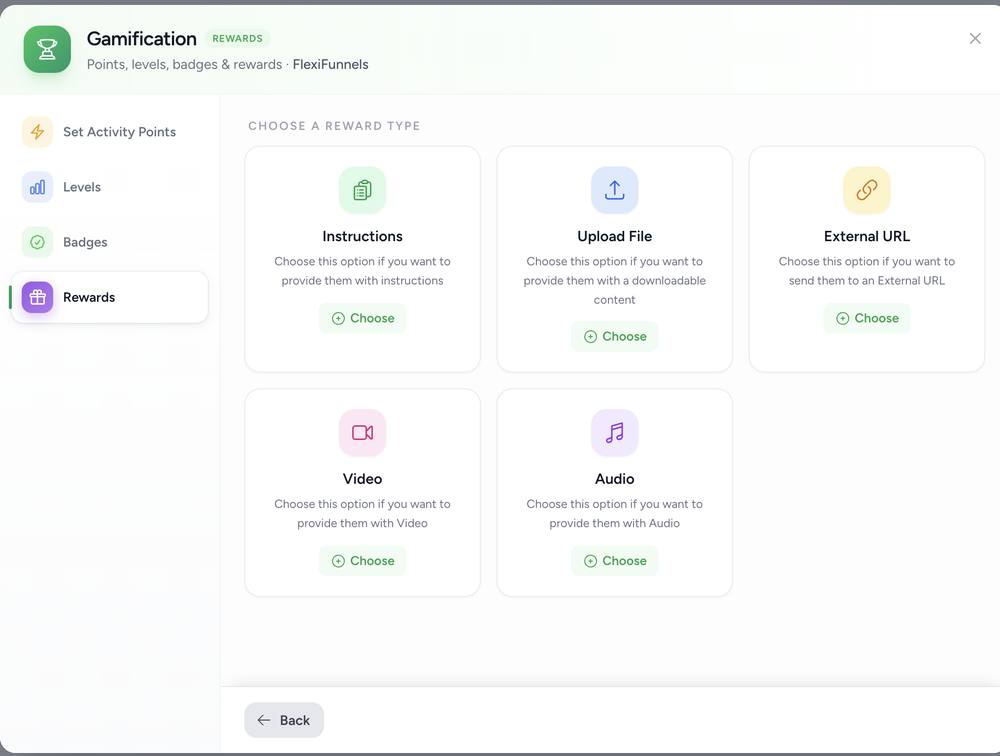
Rewards — pick a reward type (Instructions, Upload File, External URL, Video, or Audio) to hand out at a points threshold.
6.3 — Quiz / Test
Select a course, then a lesson, to attach quiz questions to it. Configure question settings under the Settings tab and see who's taken it under Members.
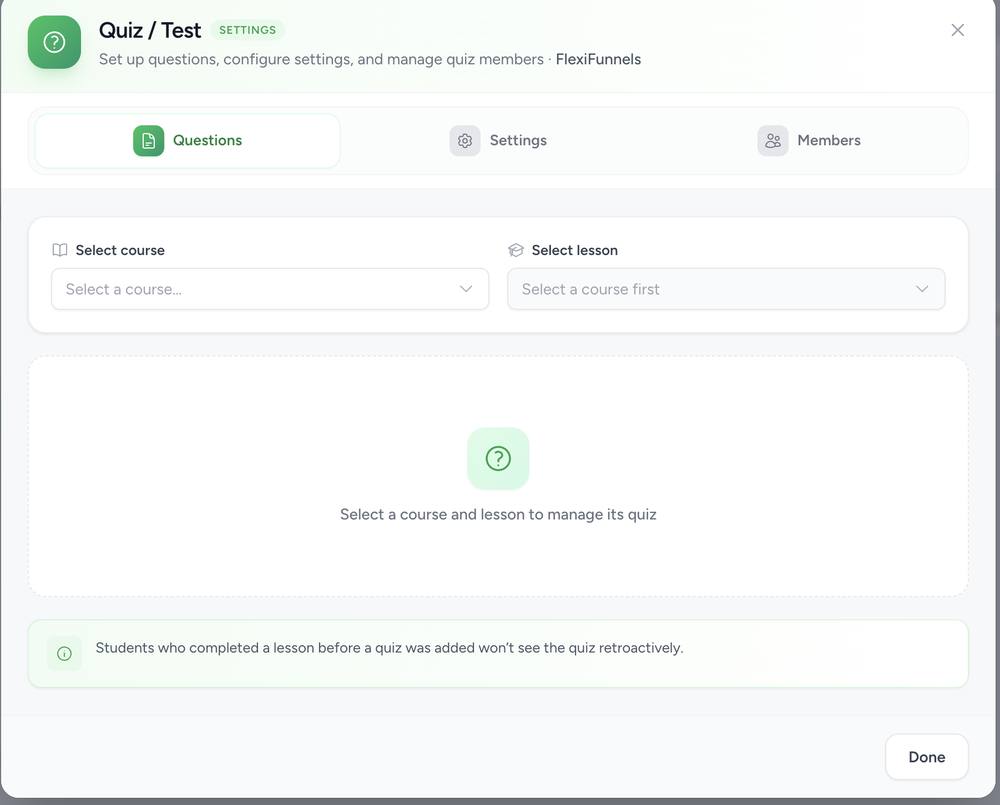
Quiz / Test — attach graded questions to any specific lesson.
Part 7 — Marketing banners & popups (Settings > Marketing)
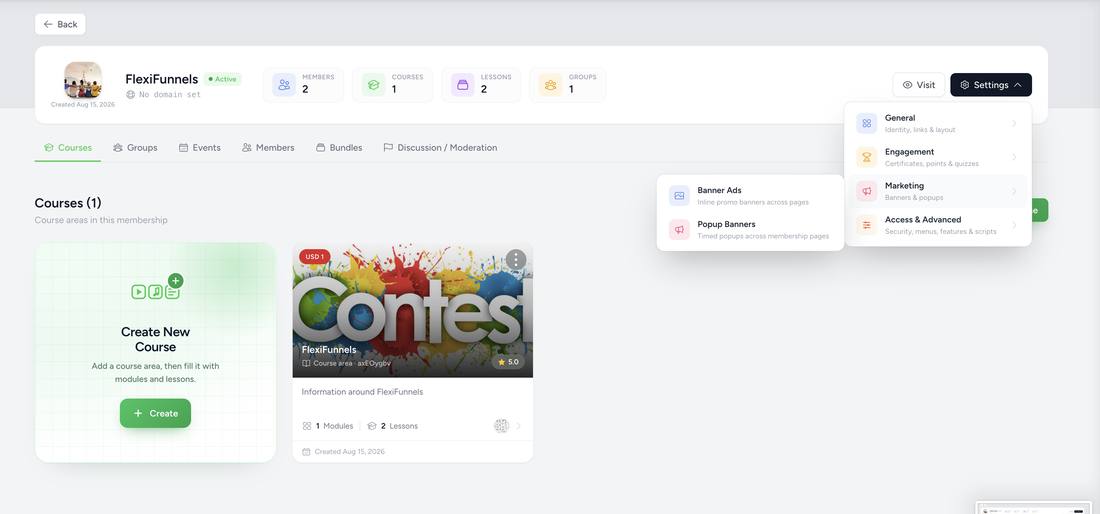
Marketing expands into: Banner Ads (inline, always-visible banners) and Popup Banners (timed popups).
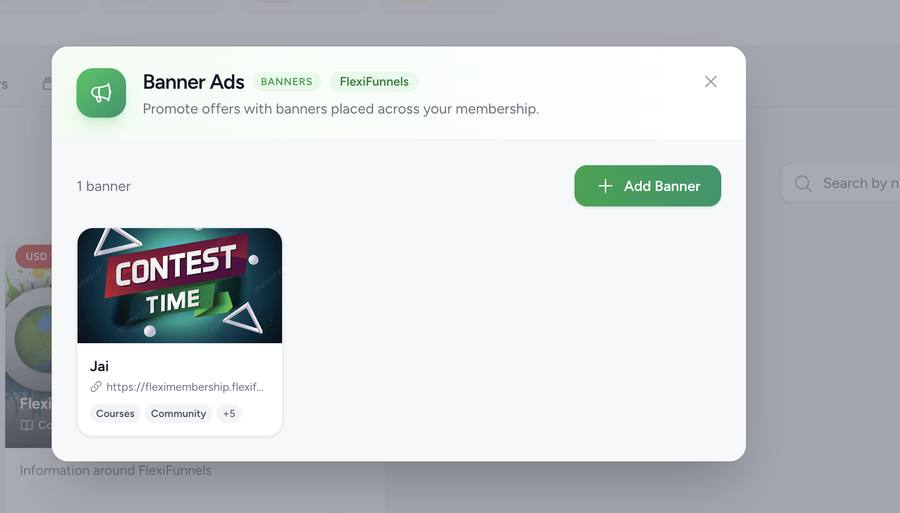
Banner Ads — inline promotional banners with a name, target URL, and image, shown across the placements you tag (courses, community, and more).
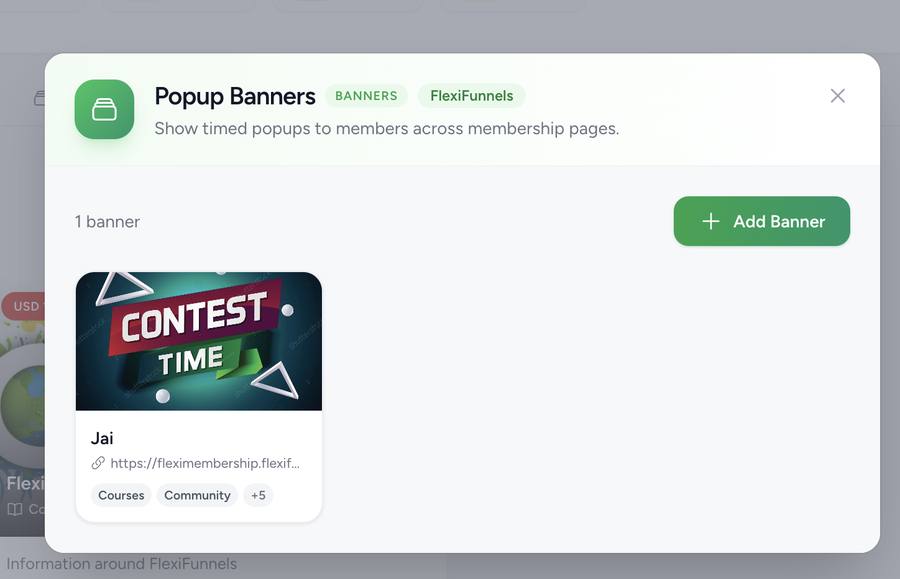
Popup Banners — the same idea, but as a timed popup you can set to show on load, after a delay, or on exit intent.
Part 8 — Security, menus & scripts (Settings > Access & Advanced)
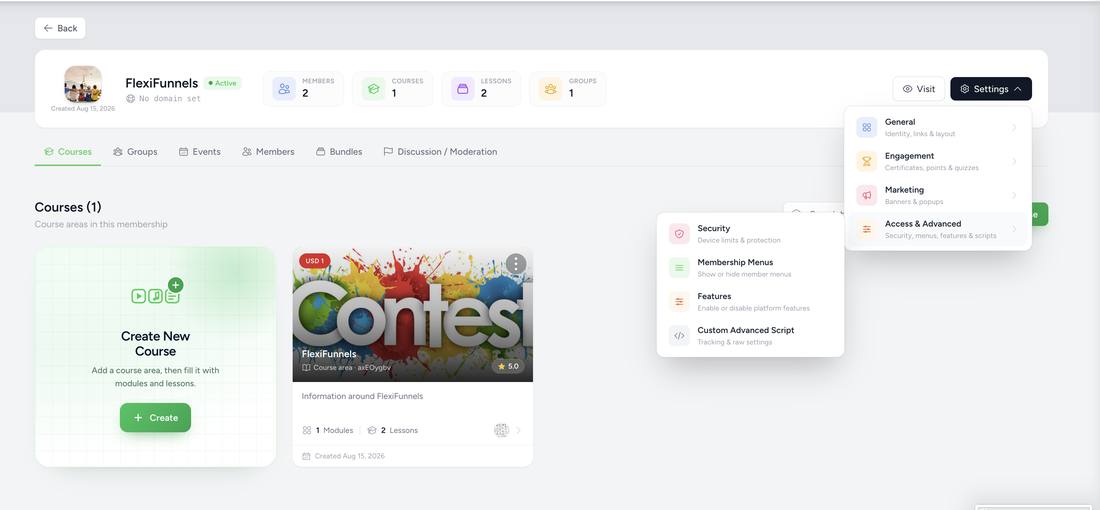
Access & Advanced expands into: Security, Membership Menus, Features, and Custom Advanced Script.
8.1 — Security
Two tabs: Sessions controls how many devices can be logged in at once (1, 2, 3, 5, or Unlimited); Protection adds an automatic-blocking layer on top of that.
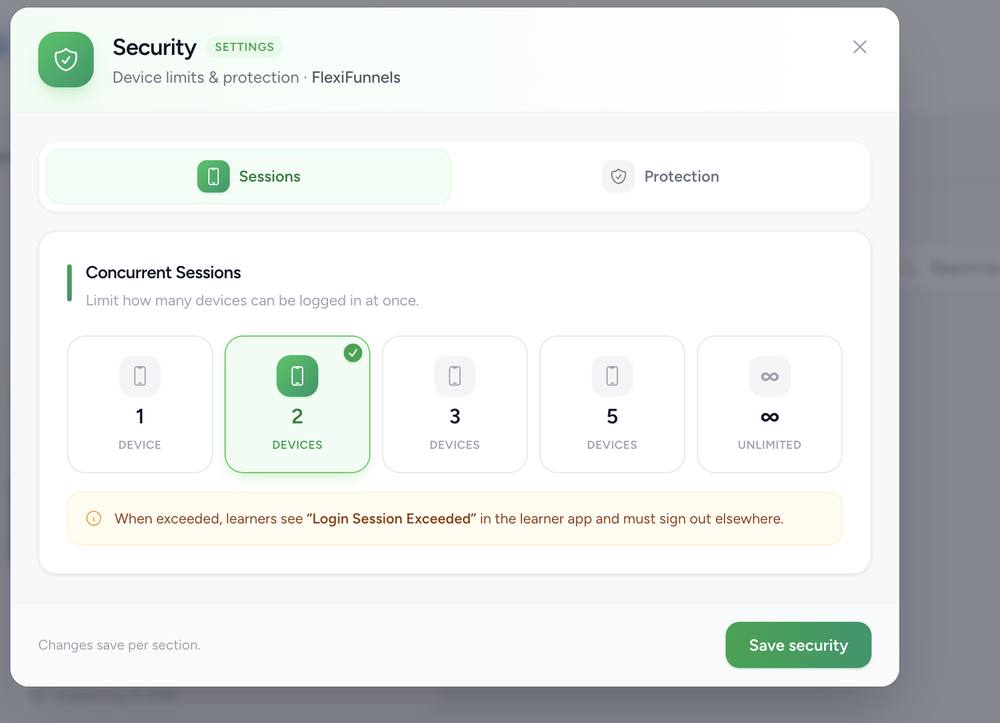
Sessions — when exceeded, learners see "Login Session Exceeded" and must sign out elsewhere.
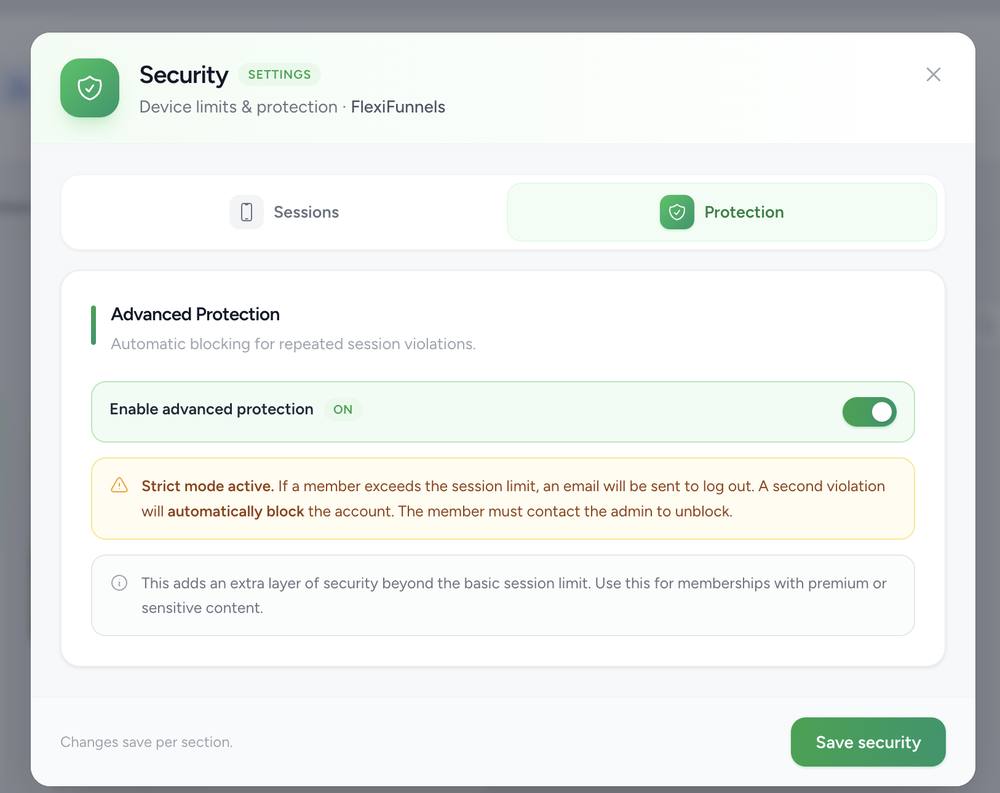
Protection — "Strict mode": a first violation emails the member to log out; a second violation auto-blocks the account.
8.2 — Membership Menus
Turn any of eight dashboard menu items on or off for every member at once: Courses, Community, Events, Members, Map, Leaderboard, Rewards, and Members Chat.
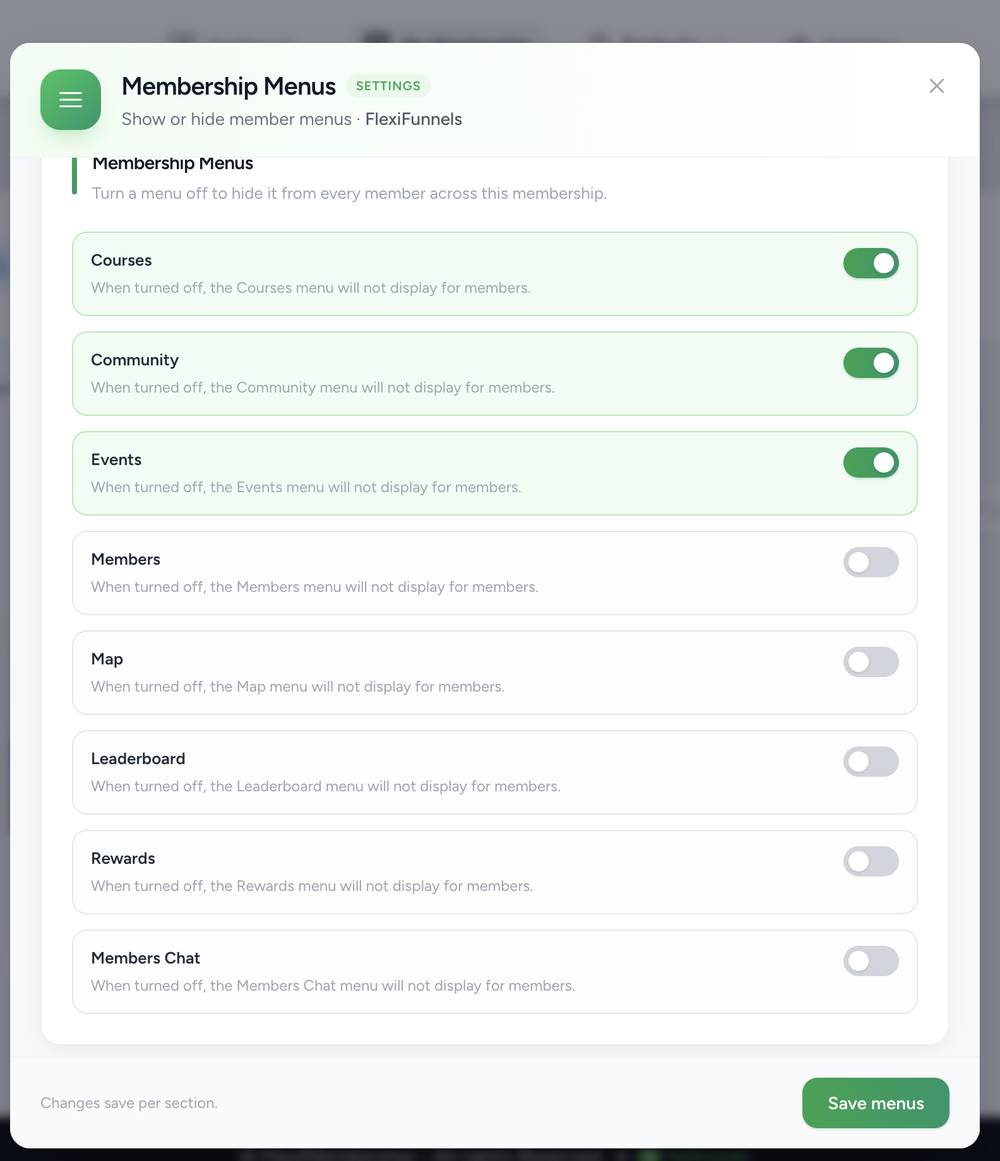
Turn a menu off here and it disappears for every member — useful for hiding features you haven't set up yet (like Leaderboard or Rewards) until you're ready.
8.3 — Features & Custom Advanced Script
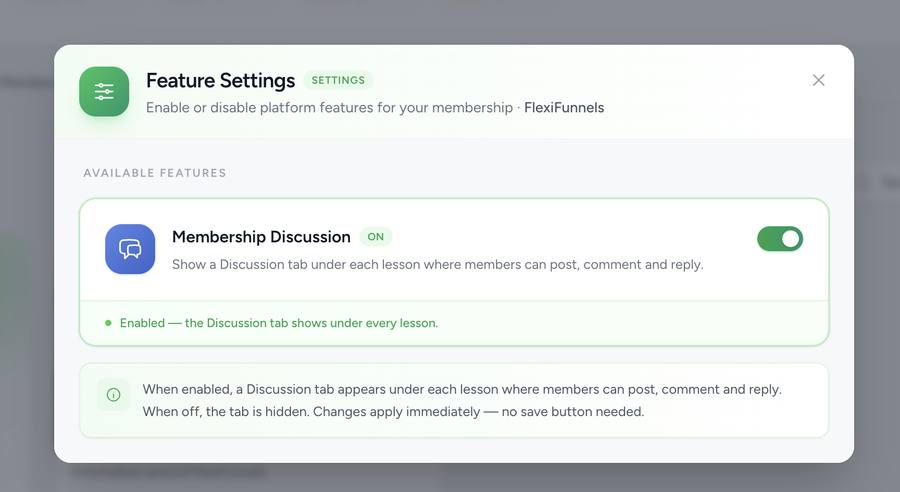
Feature Settings — currently controls the Membership Discussion tab (post/comment/reply under every lesson). Changes apply immediately, with no save button.
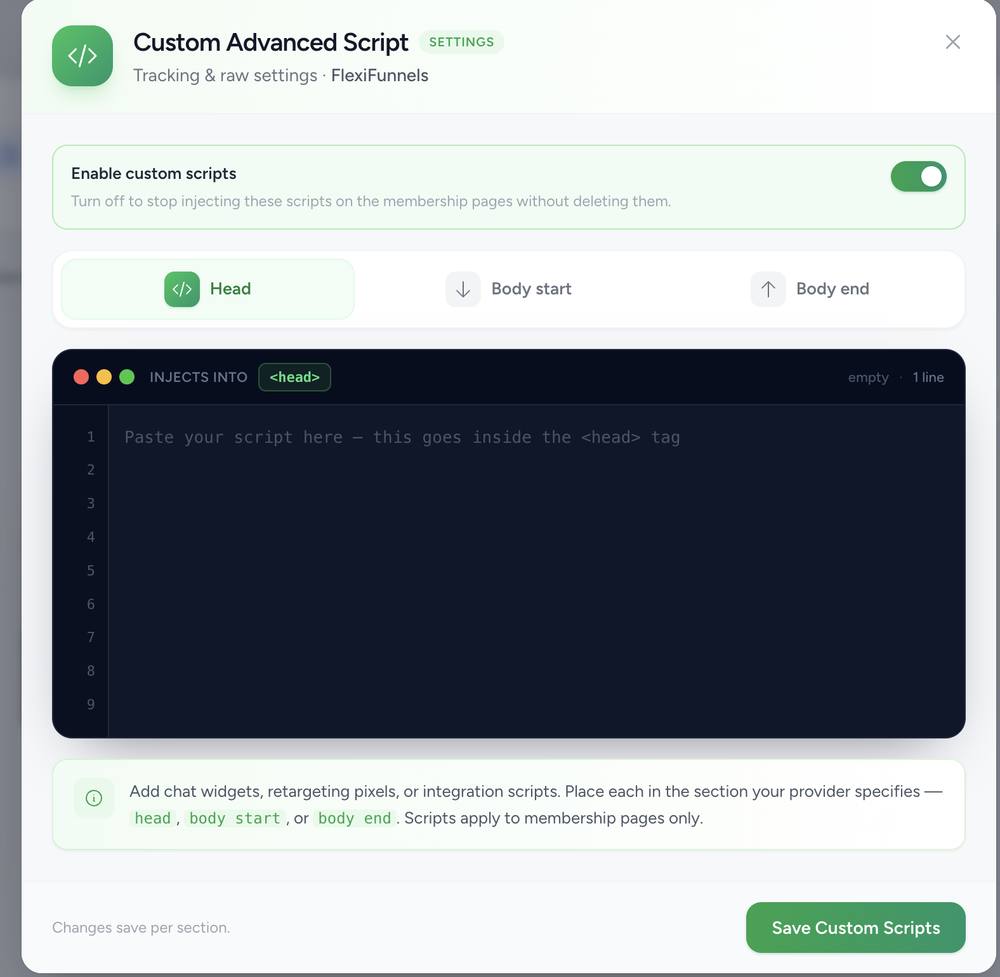
Custom Advanced Script — paste chat widgets, retargeting pixels, or integration scripts into <head>, body-start, or body-end. Applies to membership pages only.
Part 9 — Set up your product: pricing & pages
Switch to the Products tab and open the product that was created alongside your course (Part 3.4). The left sidebar has: General, Payment & Pricing, After Purchase, Landing page, Sales & Checkout page, Bump, Affiliate, Set Rules, Conversions API, Cart Abandonment, and Statistics.
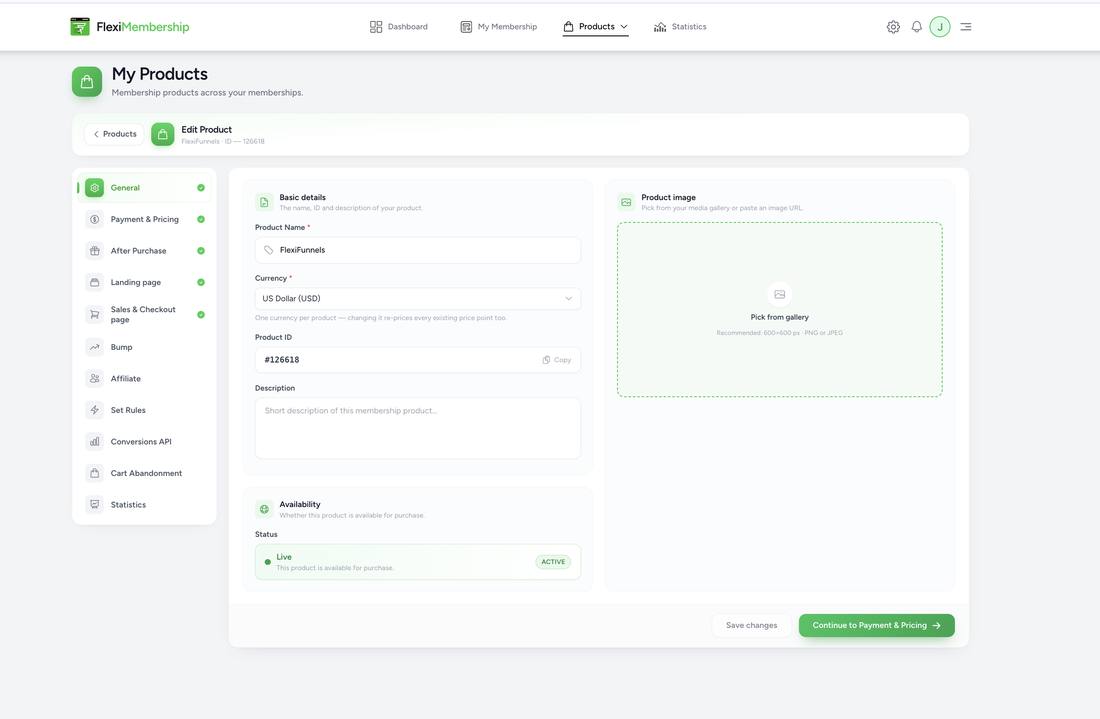
General — your product's name, currency, ID, description, and live/paused status.
Under Landing page, pick your Sales Page template from a gallery of nine-plus options, then work through the left sub-nav top to bottom:
| Section | What it covers |
|---|---|
| Template / Branding / Header / Video / Button link | Headline, sub-headline, an optional promo video, and your main CTA button's label, link, icon, and icon position (left/right). |
| About this product | Your main sales copy — plus meta tags/description for search, filled in automatically from the course. |
| Bundles & Courses / What you'll learn / Course includes | Bullet points of outcomes, a "show course curriculum" toggle, and what's bundled in. |
| Instructor / Testimonials | Pulls in the instructor you set up in Part 3.3; add review 1, review 2, review 3, etc. for social proof. |
| Money Back | A guarantee badge with your own copy and a day count (7-day, 30-day, or any number you choose) — or your own background image instead. |
| FAQ / CTA Section | An expandable question list, and a second CTA button block near the bottom of the page. |
| Social Media / Labels (under "More") | Your social handles and any custom label text shown on the page. |
| Retargeting Code / Cookie Consent (under "More") | Facebook/Google pixels and a cookie-consent banner, scoped to this page only. |
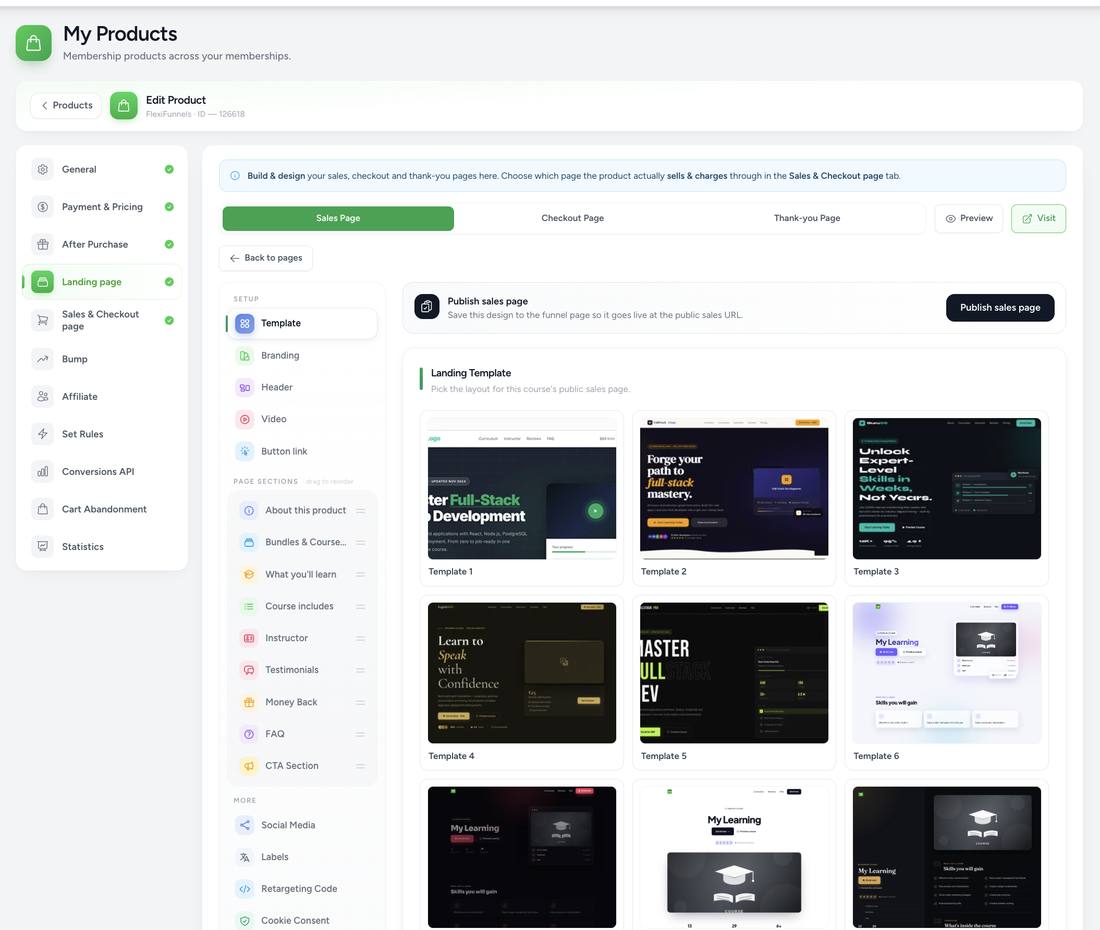
Sales Page templates — pick a layout, then fill in each section listed on the left.
The Checkout Page and Thank-you Page tabs work the same way — pick or create a page, choose a template, and customize it.
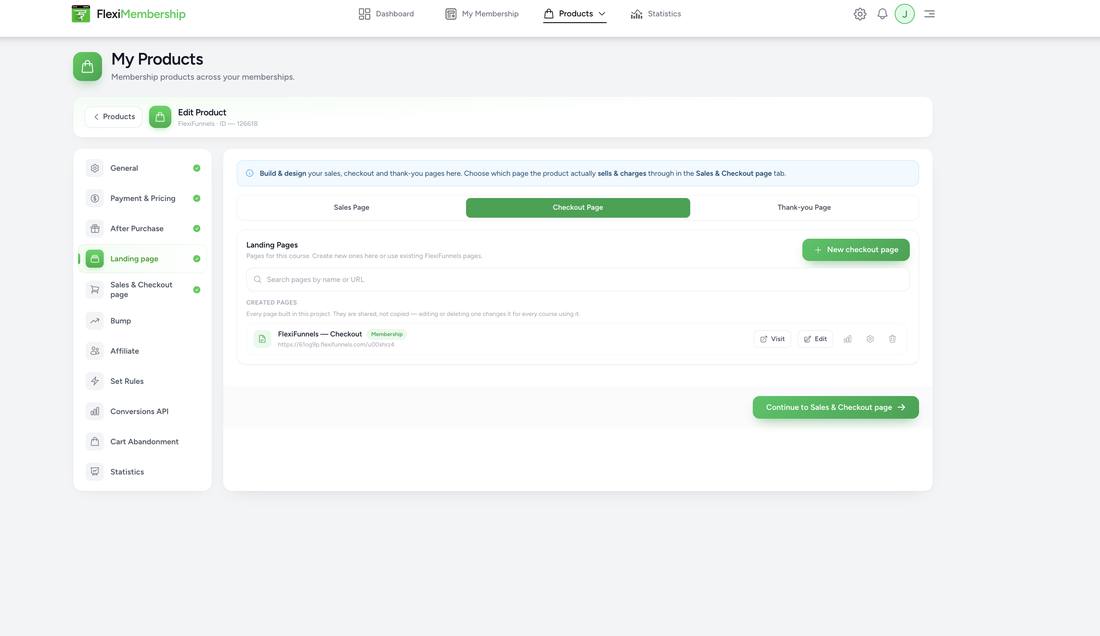
Checkout Page — created pages are shared, not copied, across every course that uses them; editing one changes it everywhere it's used.
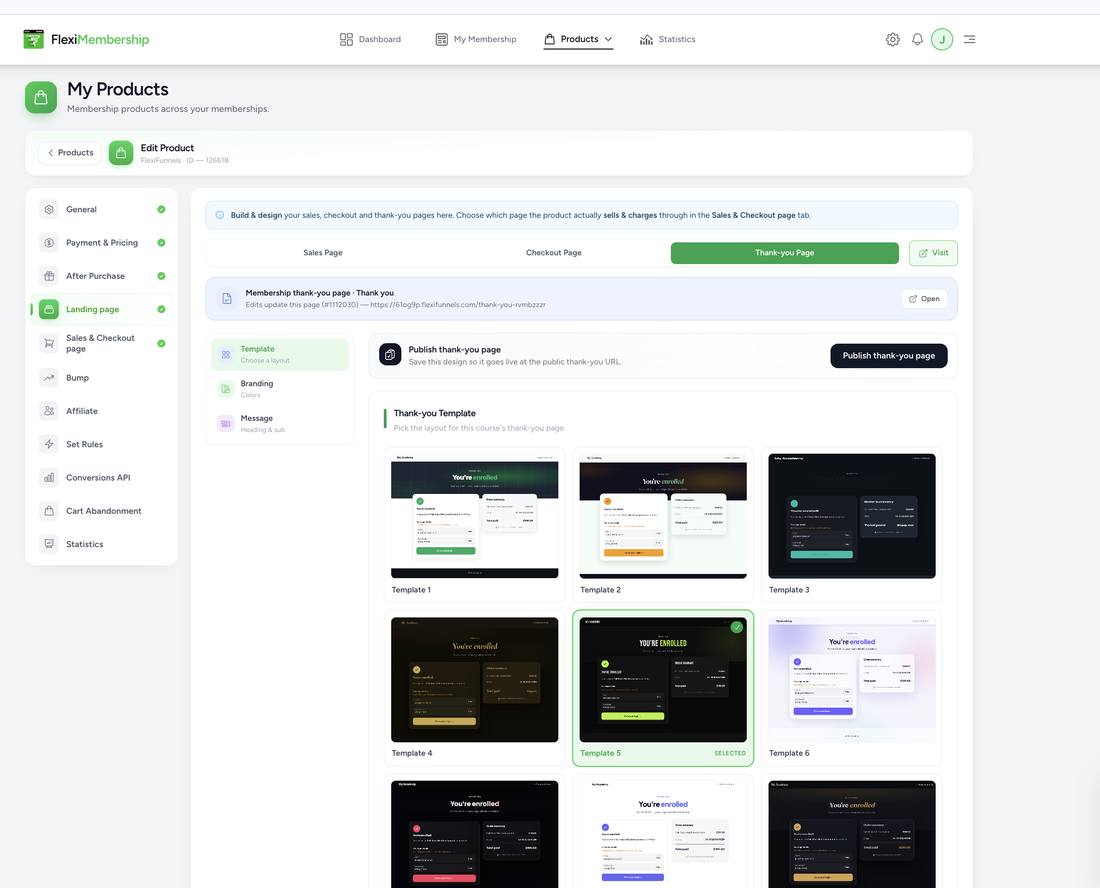
Thank-you Page — pick a template for the "you're enrolled" confirmation screen shown right after checkout.
Part 10 — Publish & test a real purchase
- On each of Sales Page, Checkout Page, and Thank-you Page, click the black Publish button for that specific page.
- Click Visit to open the live sales page in a new tab and confirm your content, video, and CTA button all appear correctly.
- Go through checkout yourself with a real (or gateway test-mode) card, completing contact and billing details.
- Check your inbox for the purchase confirmation email — it should contain your login link and, on first purchase, your password.
- Log in as that test buyer and confirm the course, any banners, and the menus you enabled are all visible and working.
Part 11 — Set up groups (your members' community)
From your membership project, open the Groups tab, then click + New Group.
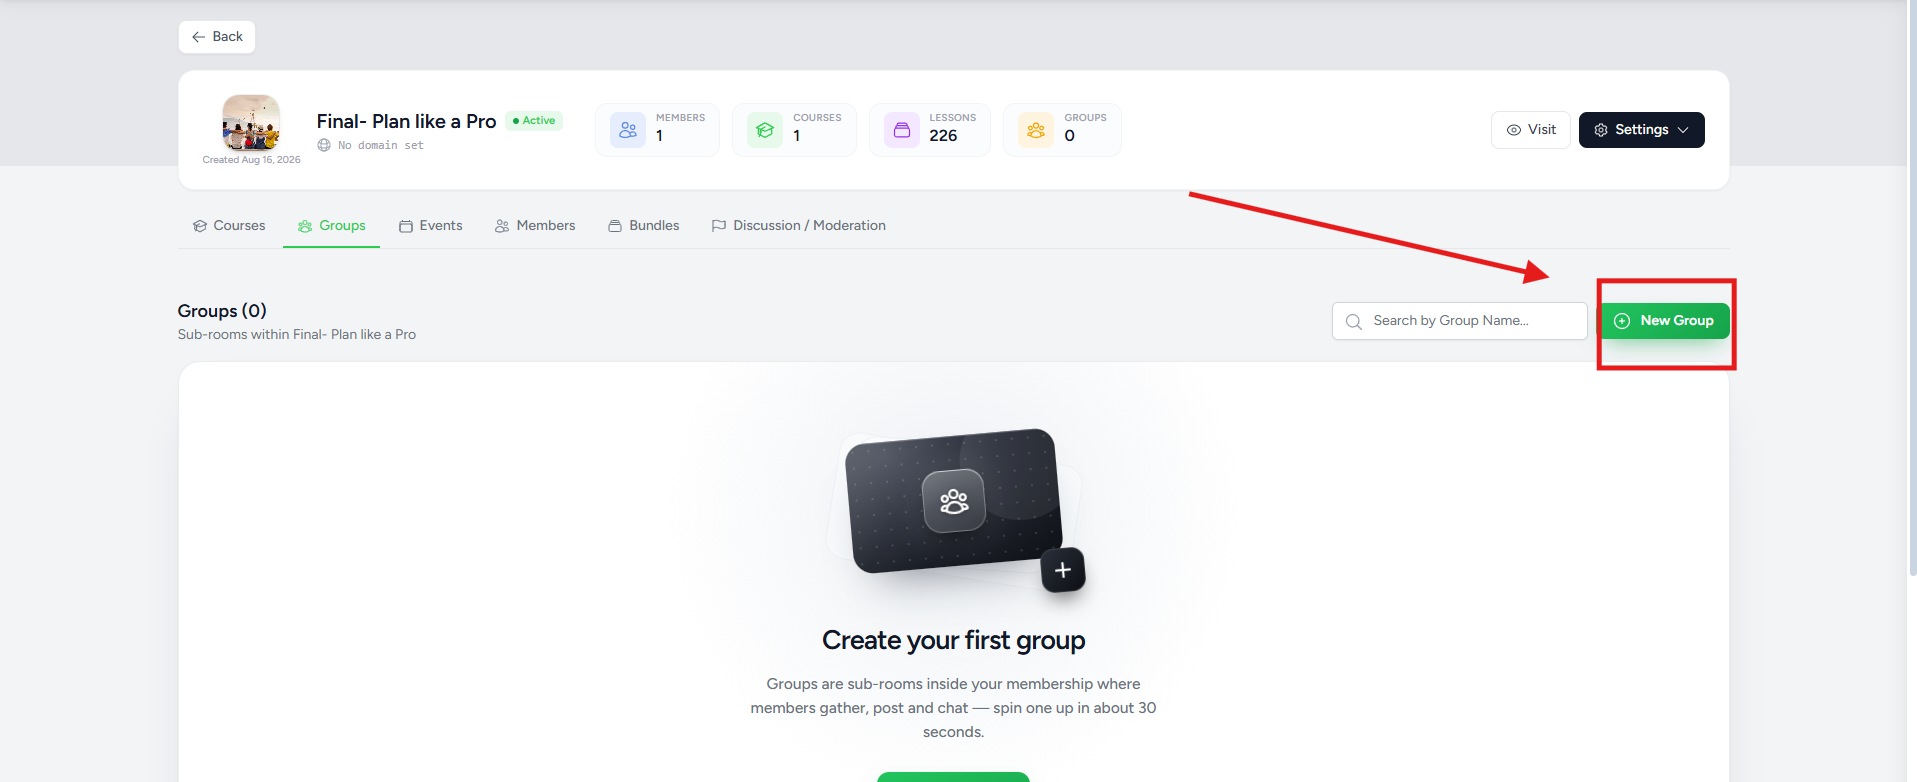
Groups (1) — every sub-room you've created for this membership lives here.
First, choose the access type:
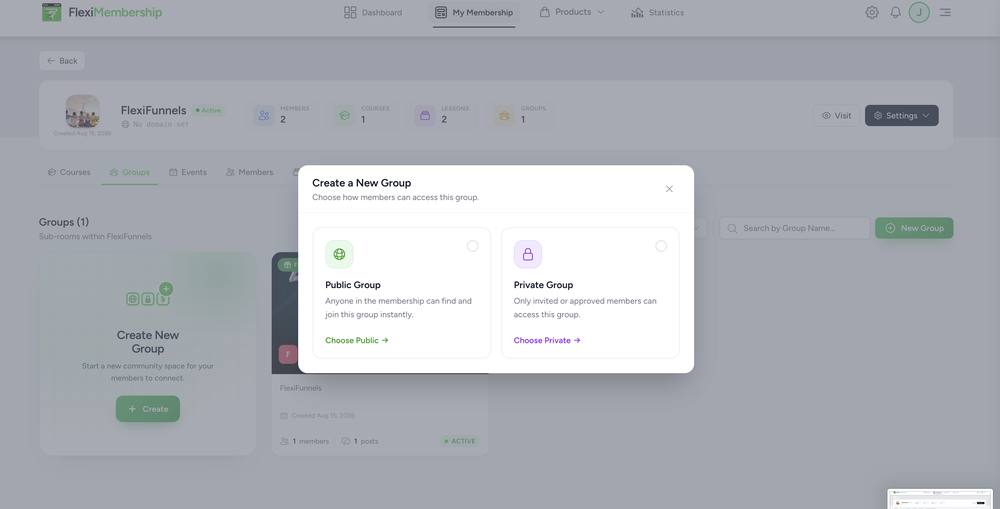
Public groups are joinable instantly by anyone in the membership; Private groups require the owner to invite or approve each member.
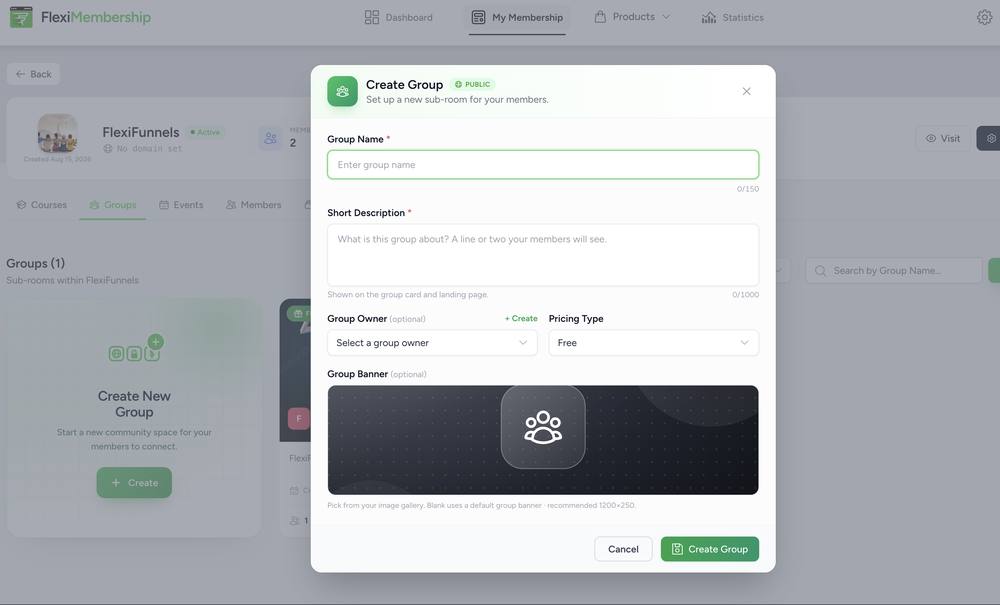
Public group form — Group Name, Short Description, an optional Owner, Pricing Type (Free, with Trial/Paid coming soon), and an optional banner.
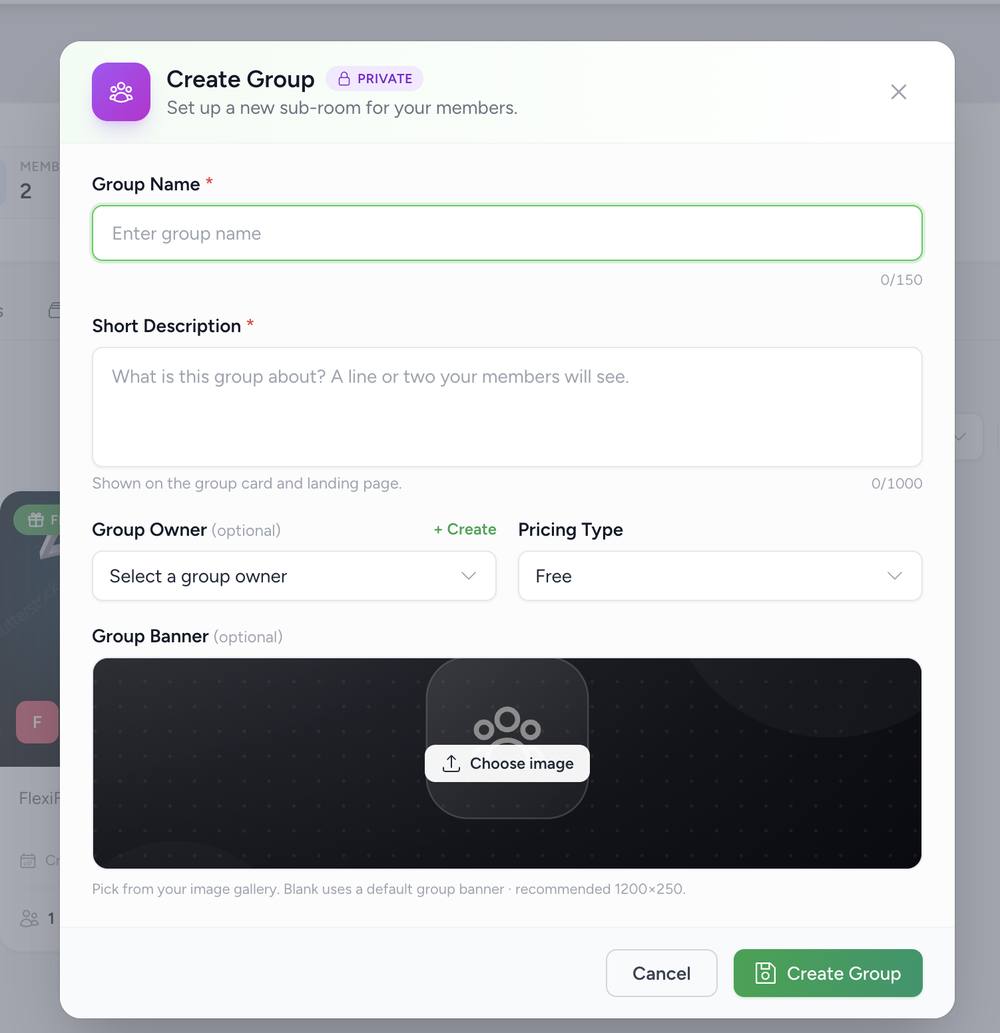
Private group form — identical fields, just gated behind approval instead of instant joining.
After creating a group, remember to turn its visibility on for members: open Settings > Access & Advanced > Membership Menus (Part 8.2) and switch Community on, or the group won't show up on anyone's dashboard even though it exists.
Part 12 — Set up events (webinars & live sessions)
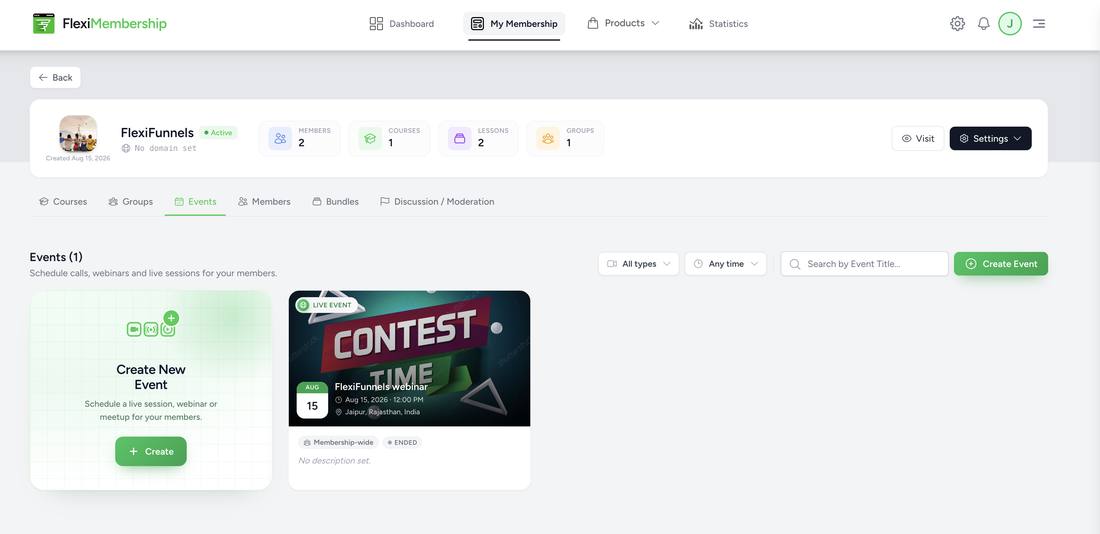
Events (1) — scheduled live sessions tied to this membership.
Click + Create Event and fill in:
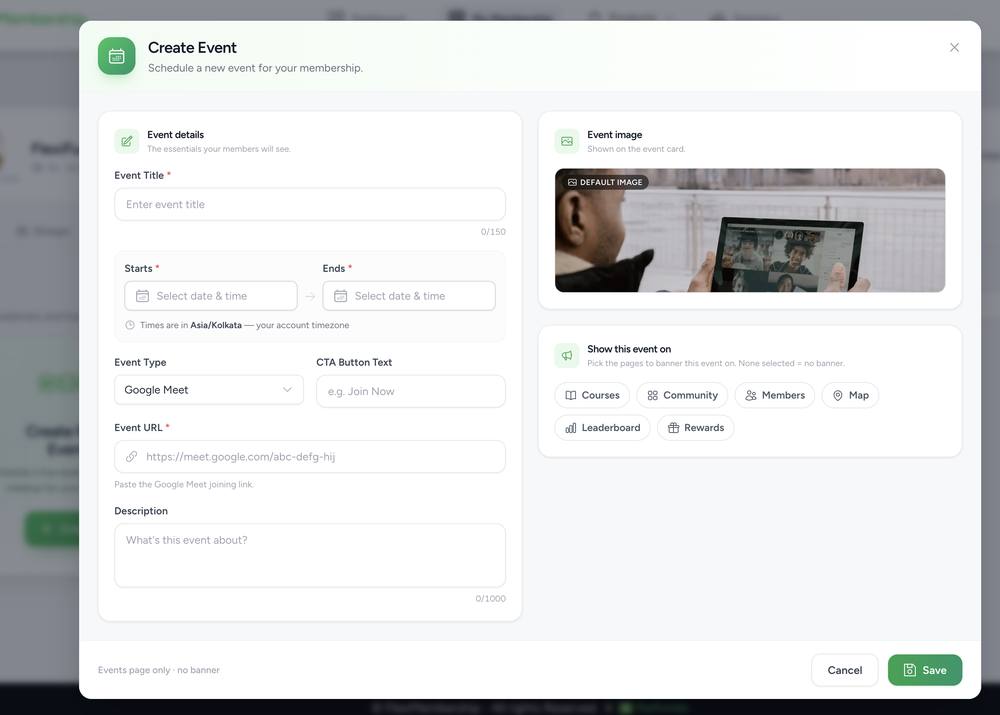
Create Event — title, start/end time (with your account's timezone shown), a platform (Google Meet, Zoom, or others) with a join URL, or an in-person event with a physical venue/address instead, a description, and where it appears (Courses, Community, Members, Map, Leaderboard, Rewards).
Like groups, a new event won't show on member dashboards until Events is switched on under Membership Menus (Part 8.2).
Part 13 — Members, bundles & moderation — day-to-day upkeep
Once you have real members, three tabs handle ongoing operations.
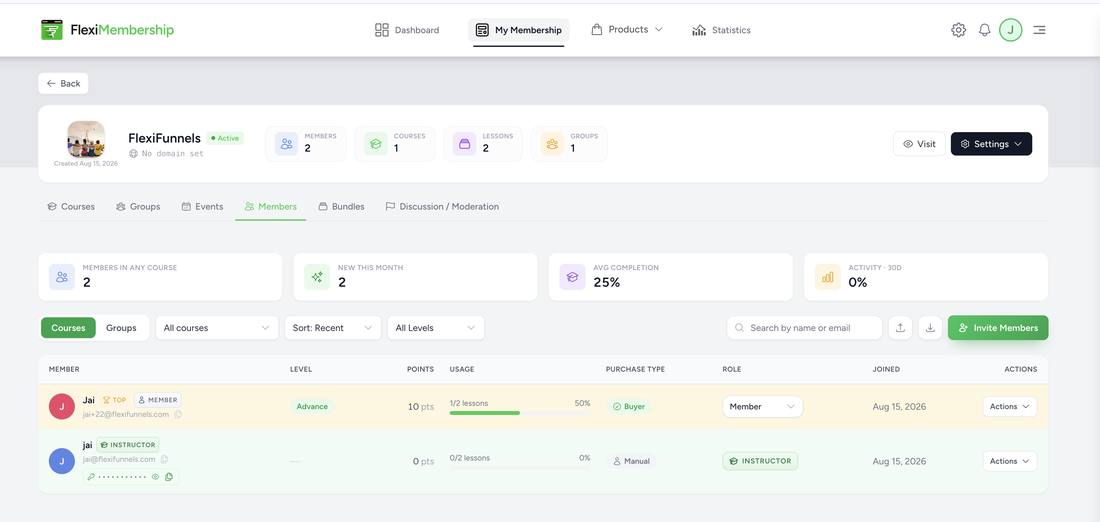
Members — see every member's role, level, points, and lesson-completion percentage, sort by activity, or invite new members directly.
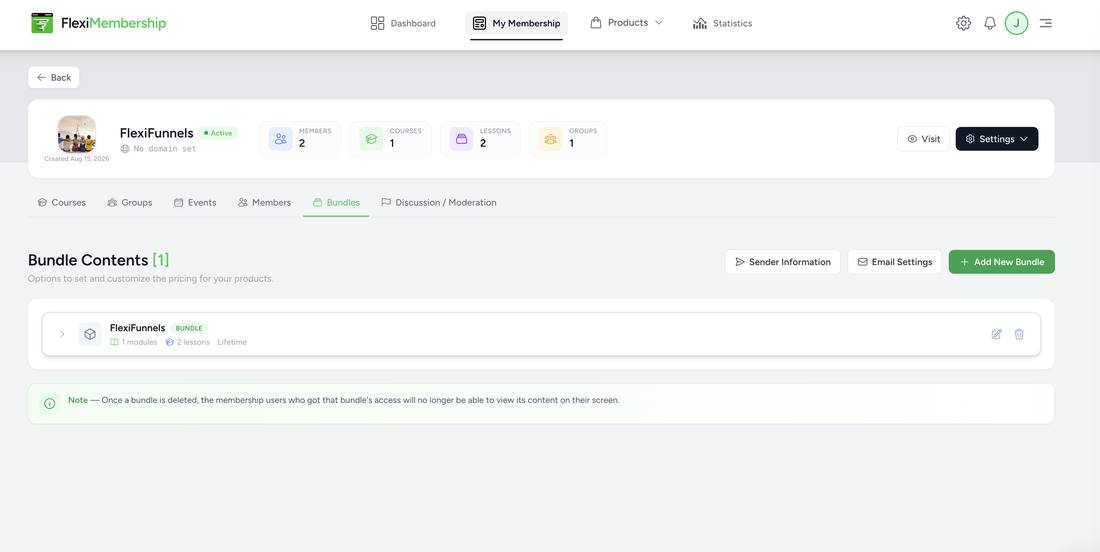
Bundles — each bundle shows how many modules/lessons it grants and for how long (Lifetime or limited).
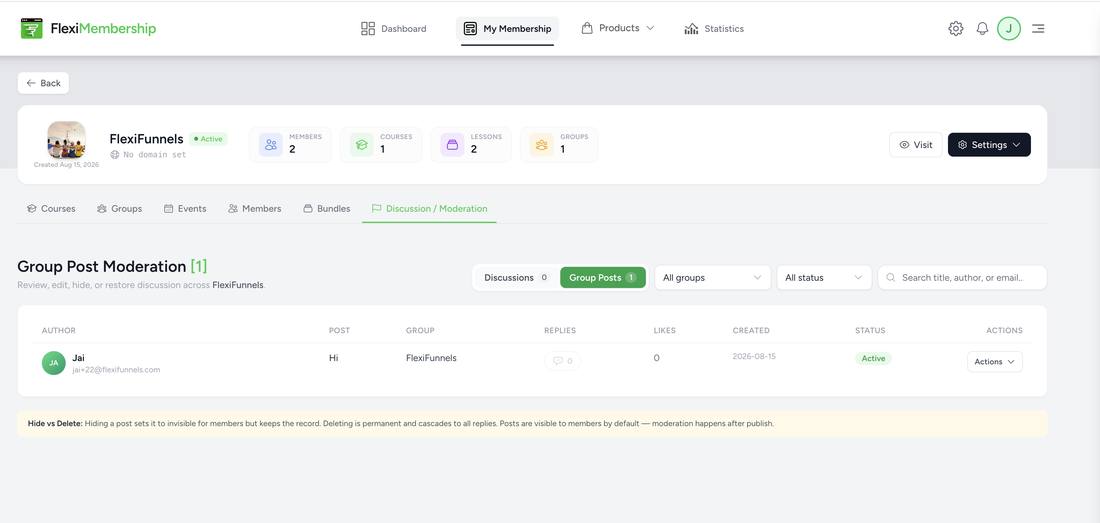
Discussion / Moderation — review and moderate lesson discussions and group posts from one queue, with separate counts for each.
Part 14 — Dashboard & Statistics — tracking performance
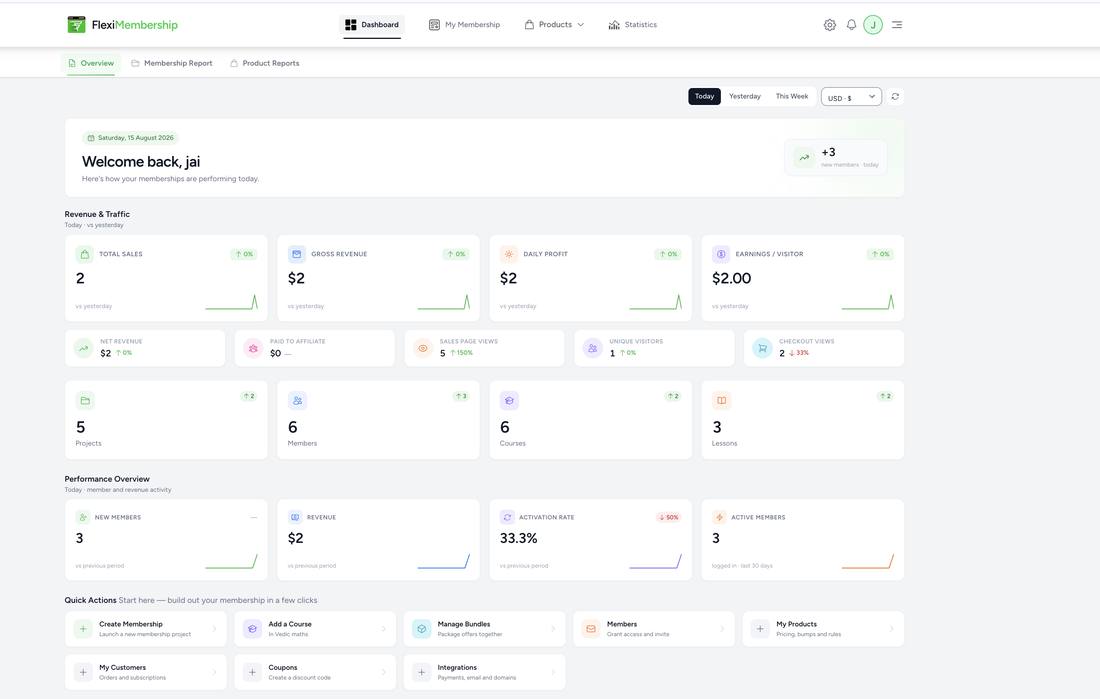
Dashboard > Overview — revenue & traffic (sales, gross revenue, page views, checkout views), performance (new members, activation rate), and quick-action shortcuts to common tasks.
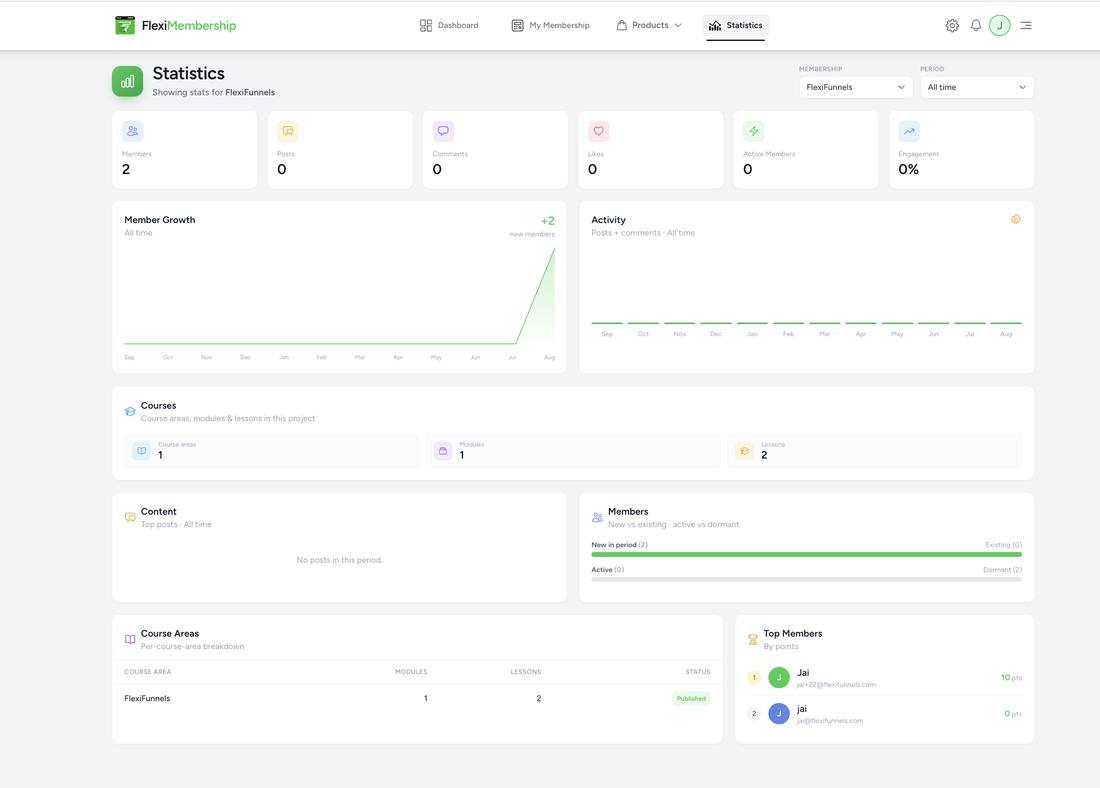
Statistics — member growth over time, posts/comments/likes engagement, a per-course-area breakdown, and a top-members leaderboard by points.
Common situations & quick fixes
Was this article helpful?
That’s Great!
Thank you for your feedback
Sorry! We couldn't be helpful
Thank you for your feedback
Feedback sent
We appreciate your effort and will try to fix the article