Subscription payments let you charge customers a recurring fee — weekly, monthly, quarterly, every 6 months, or yearly — instead of one single one-time charge. A customer pays a fixed amount every billing cycle and keeps getting charged automatically until the subscription ends, either because they cancel or because a fixed number of payments has been reached.
This guide walks you through creating a subscription product from scratch, configuring billing, free trials, upfront fees and tax, connecting it to your pages, and managing active subscriptions afterward — based on the current FlexiFunnels product builder.
Why Use Subscription Payments
Subscriptions turn one-time buyers into recurring revenue. Instead of relying only on new sales, your existing customers keep paying you every cycle — which makes your income far more predictable month to month.
Common use cases:
- Membership sites (course access, community, coaching)
- Software / tools sold as a monthly or annual plan
- Ongoing coaching or accountability programs
- Content subscriptions (exclusive articles, videos, downloads)
Prerequisites
Before you start, you need:
- A FlexiFunnels account
- A Project with a Sales Page, Checkout Page, and Thank You Page already created
- A payment provider connected and active for the product, tagged for Subscription pricing
- Webhooks enabled on that payment provider — this is mandatory. Without it, FlexiFunnels can't reliably know when a subscription is created, renewed, paused, cancelled, or has a failed payment, and customer access can fall out of sync.
Step-by-Step: Create a Subscription Product
1. Create Your Pages
Go to Projects in the top navigation. Inside a project, you'll see a Pages panel where you can add and manage pages for that project.
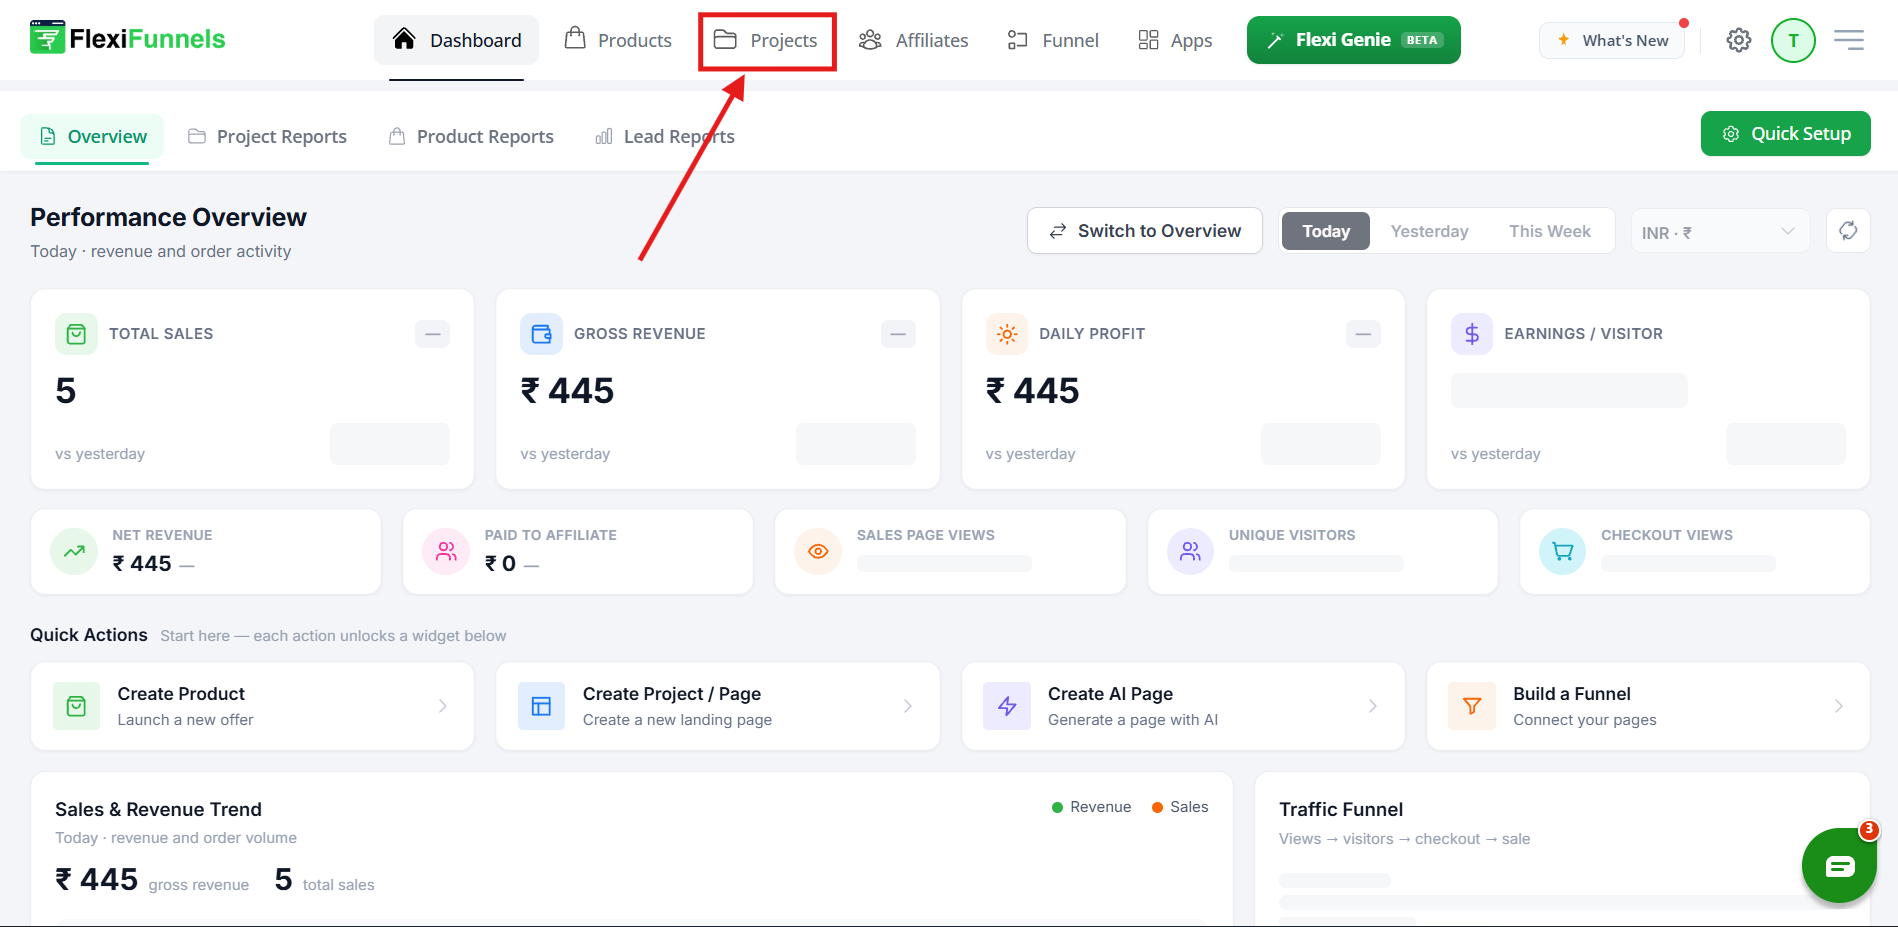
Open Projects from the top navigation
Create at minimum:
- Sales Page — describes the subscription and its benefits
- Checkout Page — where customers enter payment details
- Thank You Page — shown after a successful purchase
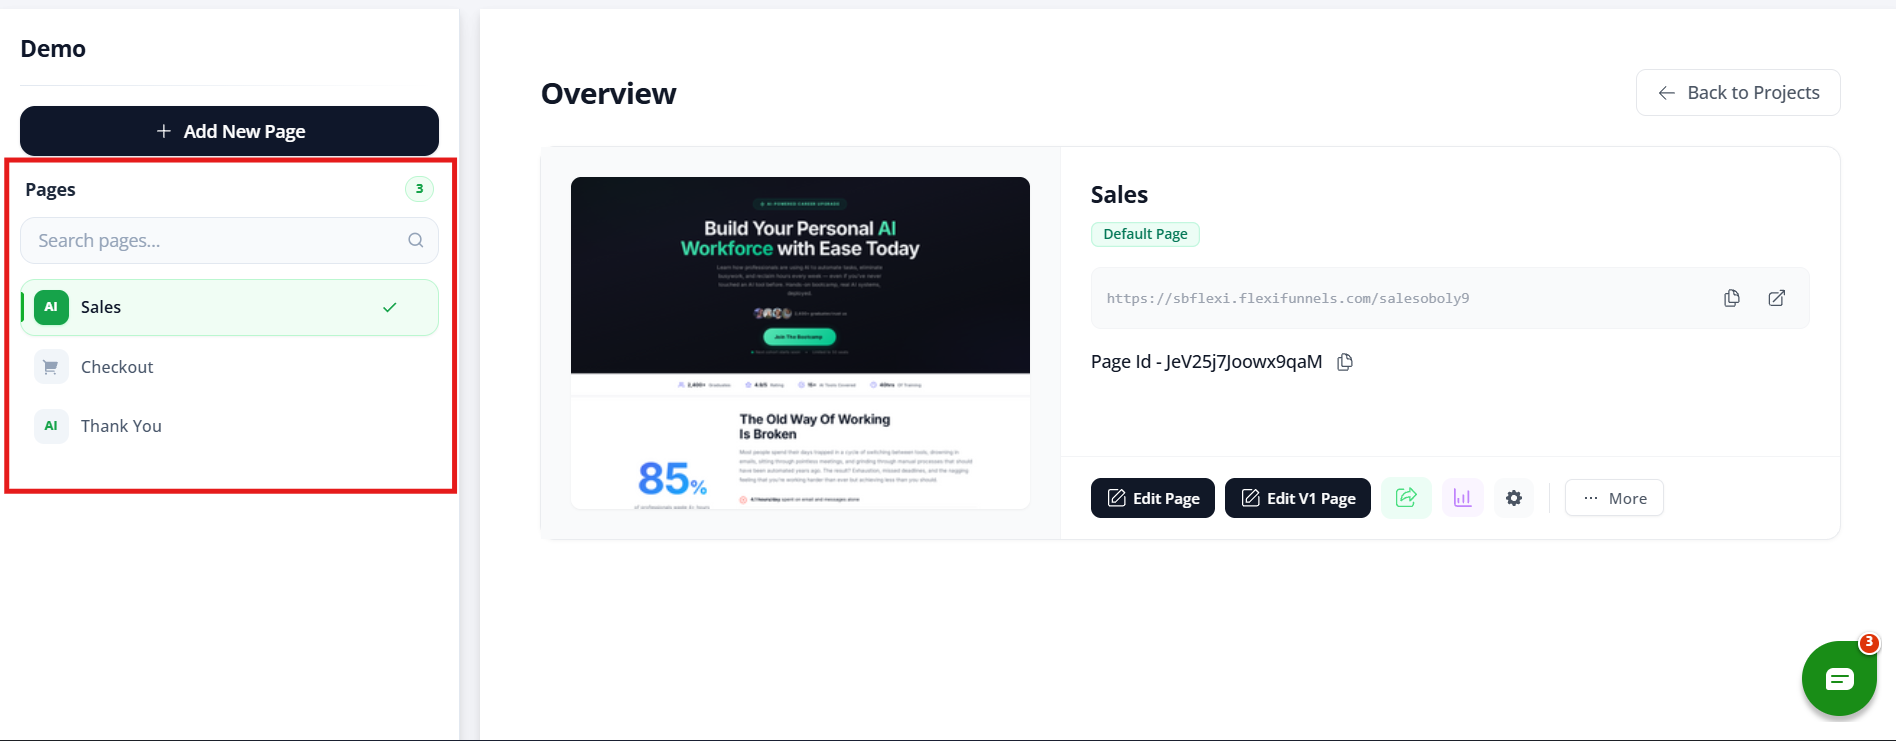
Your project's Pages panel with all three pages created
2. Create a New Product
Go to Products → My Products and click "Create Product" in the top-right.
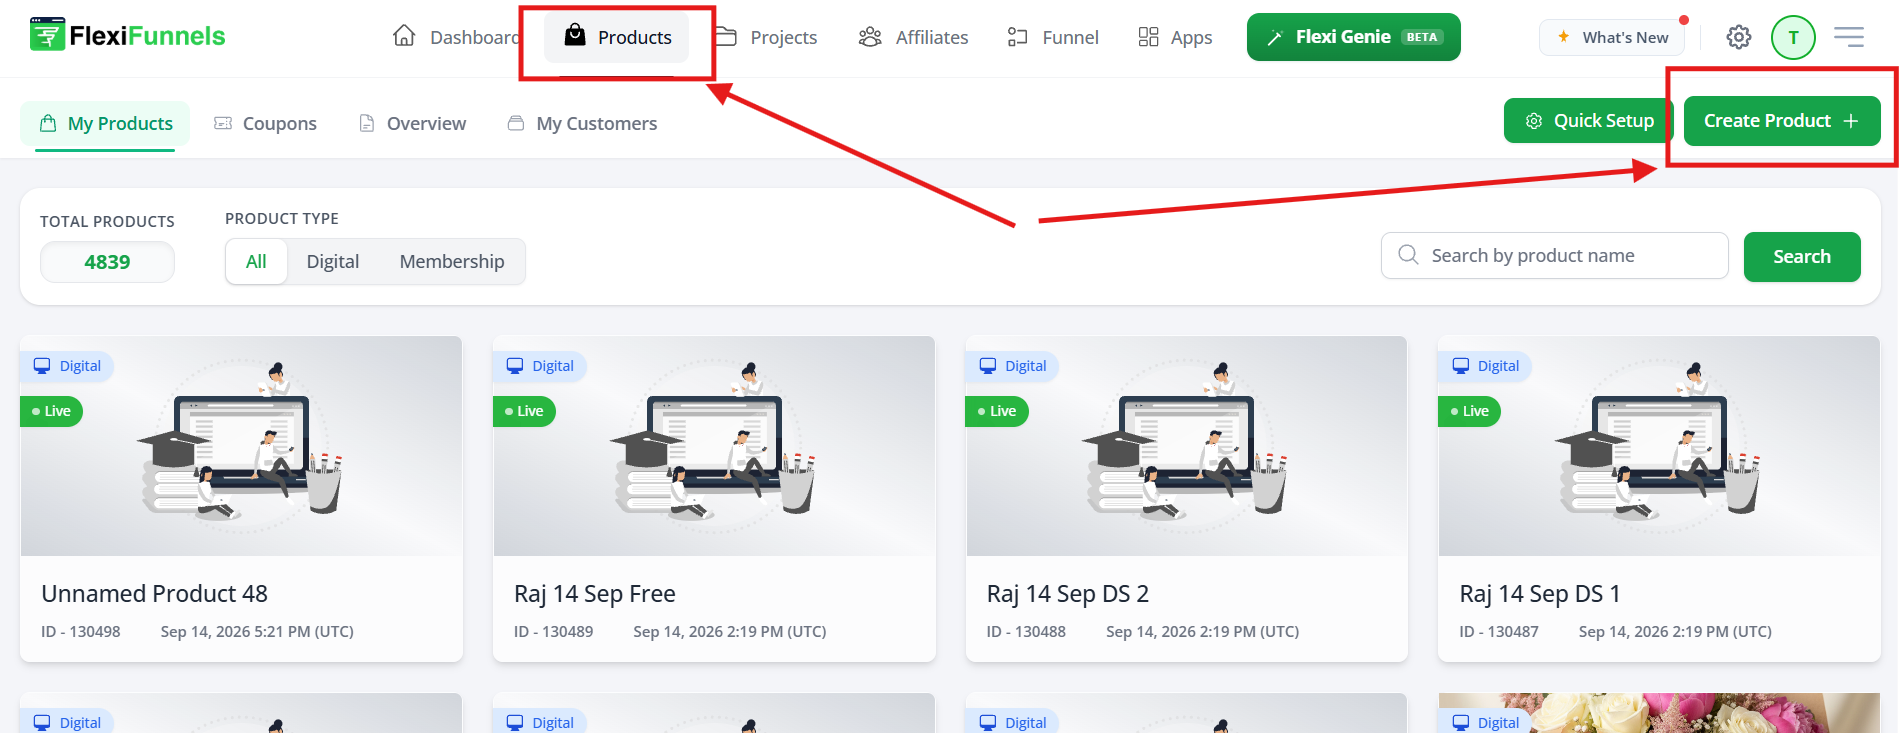
Products → My Products → Create Product
Choose the product type. For a subscription you'll typically pick:
- Digital Product — for instant access / digital delivery
- Membership Product — for ongoing access to courses, community, or exclusive content
3. Configure General Settings
On the General Settings tab, fill in:
- Product Title — a clear, descriptive name (e.g. "Monthly Fitness Coaching")
- Currency — set this before you add pricing. Once a price exists, currency locks and shows "Locked — pricing already exists," so choose carefully up front.
- Product Type — Digital Product or Membership Product, shown read-only here
- Status — toggle to Live when you're ready to sell (keep it off while you're still building)
- Product Image — optional, PNG/JPG up to 10MB
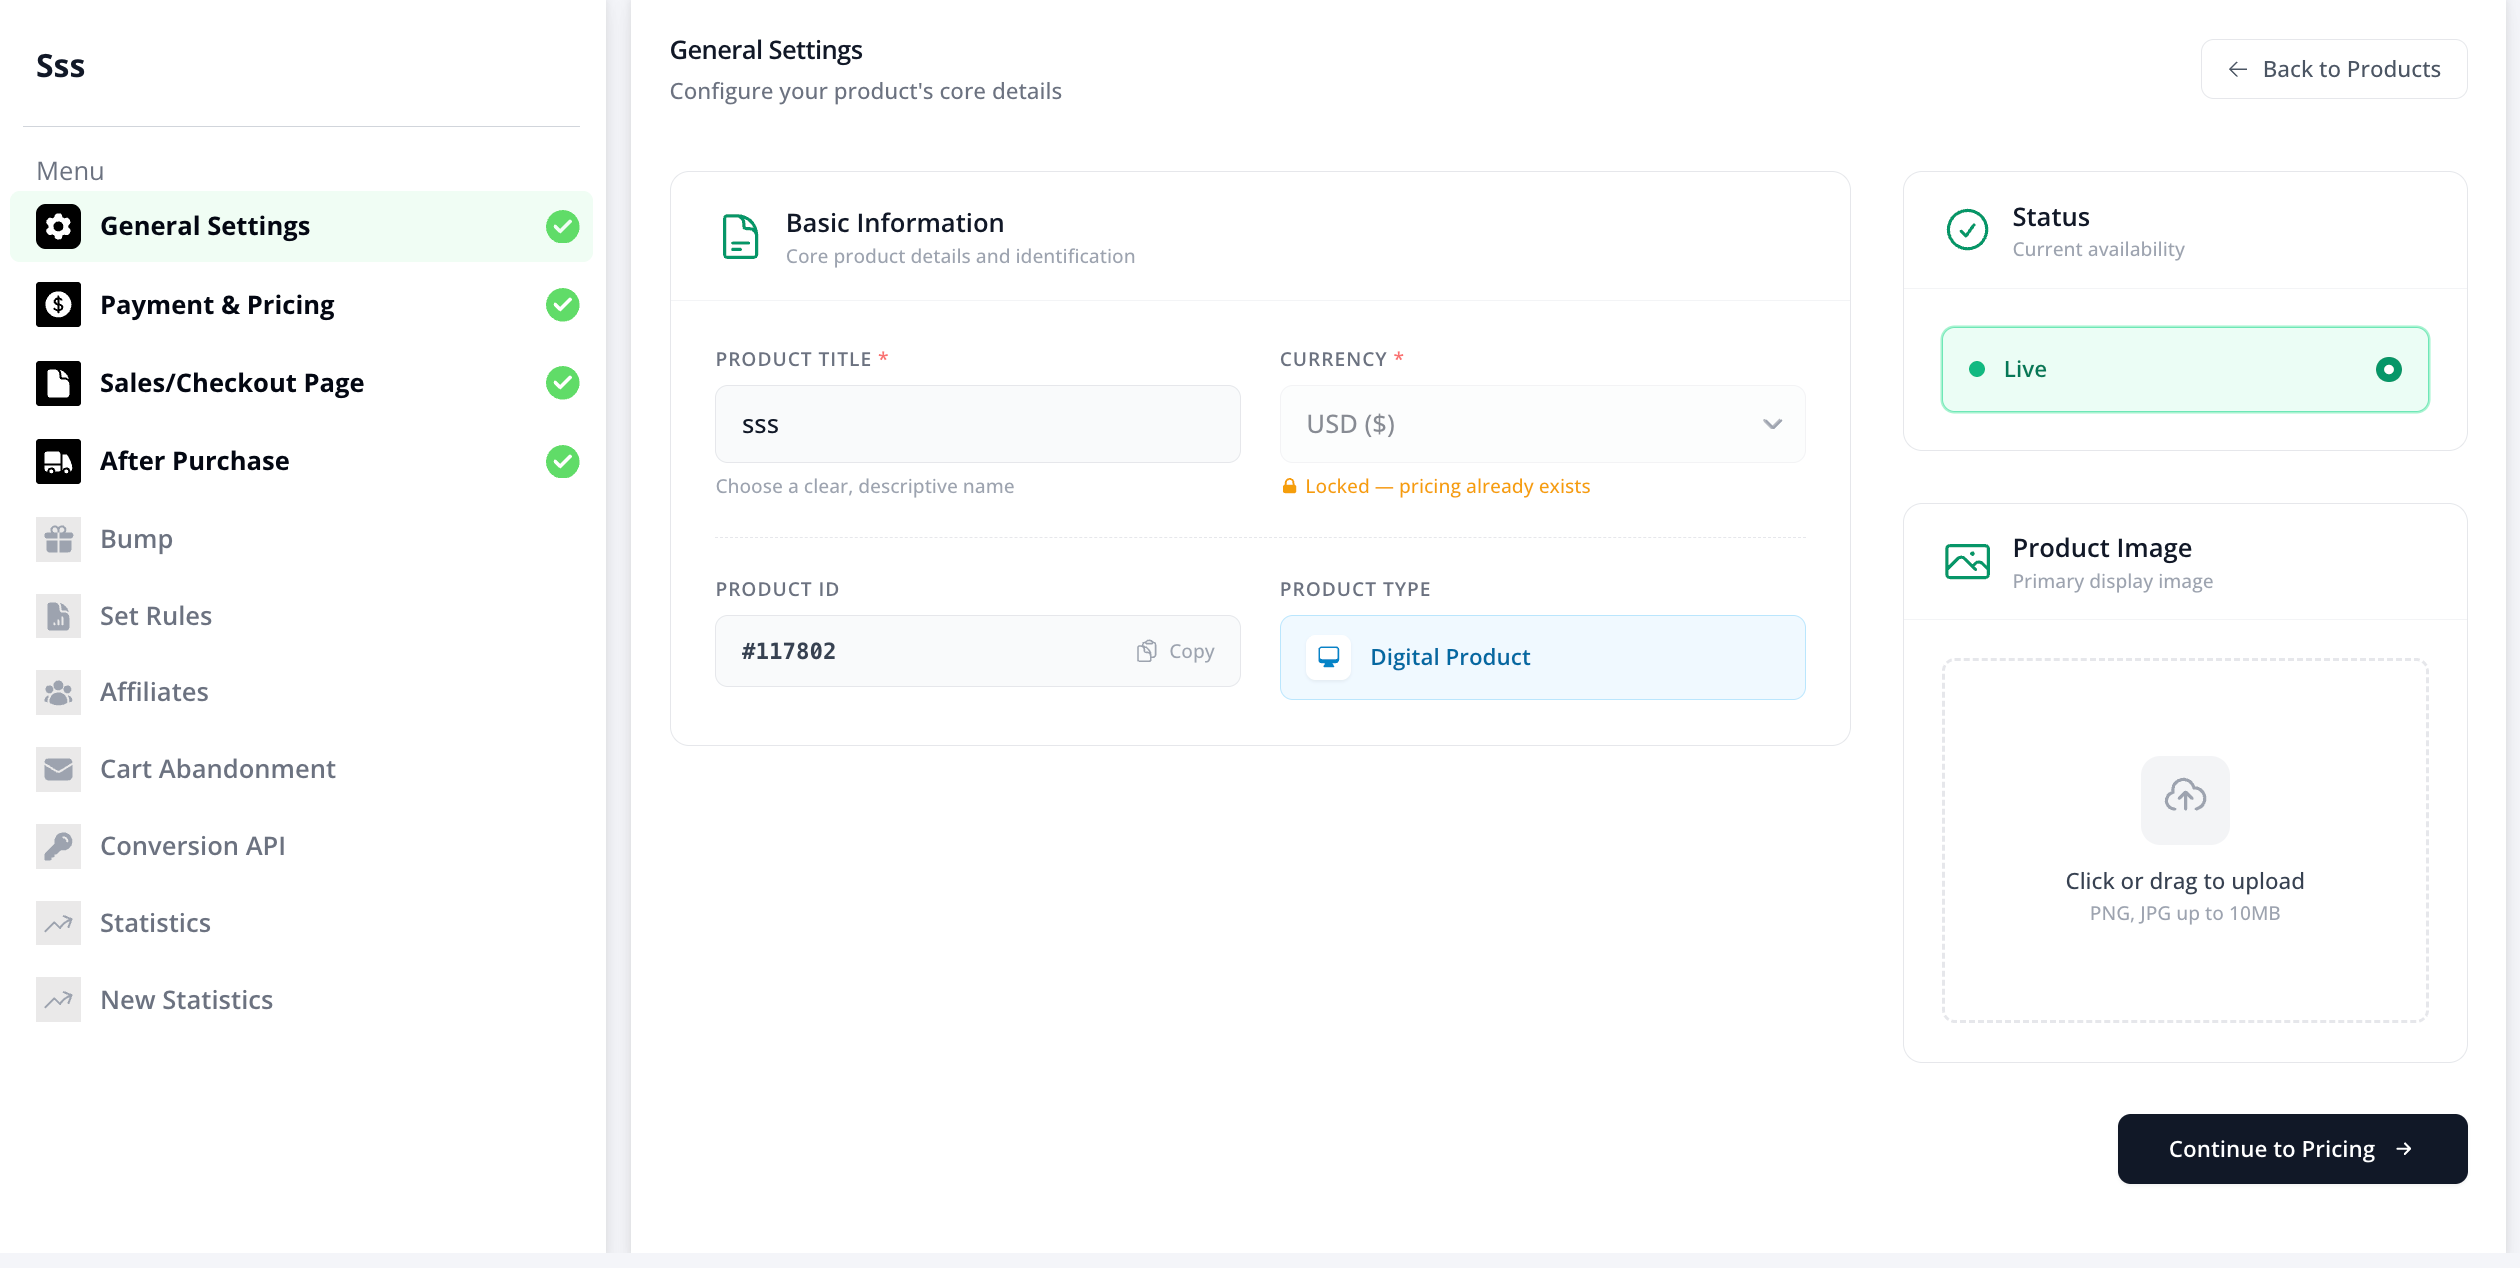
General Settings — set your currency here before adding any pricing
Click "Continue to Pricing" when done.
4. Connect a Payment Provider
On the Payment & Pricing tab, first choose Paid Product (not Free Product — subscriptions require a payment gateway).
Under the Payment Providers tab, click "Add Provider" if you haven't connected one yet, or activate an existing one using the toggle. Each connected provider shows which pricing types it supports as small tags — look for a Subscription tag next to the provider you plan to use.
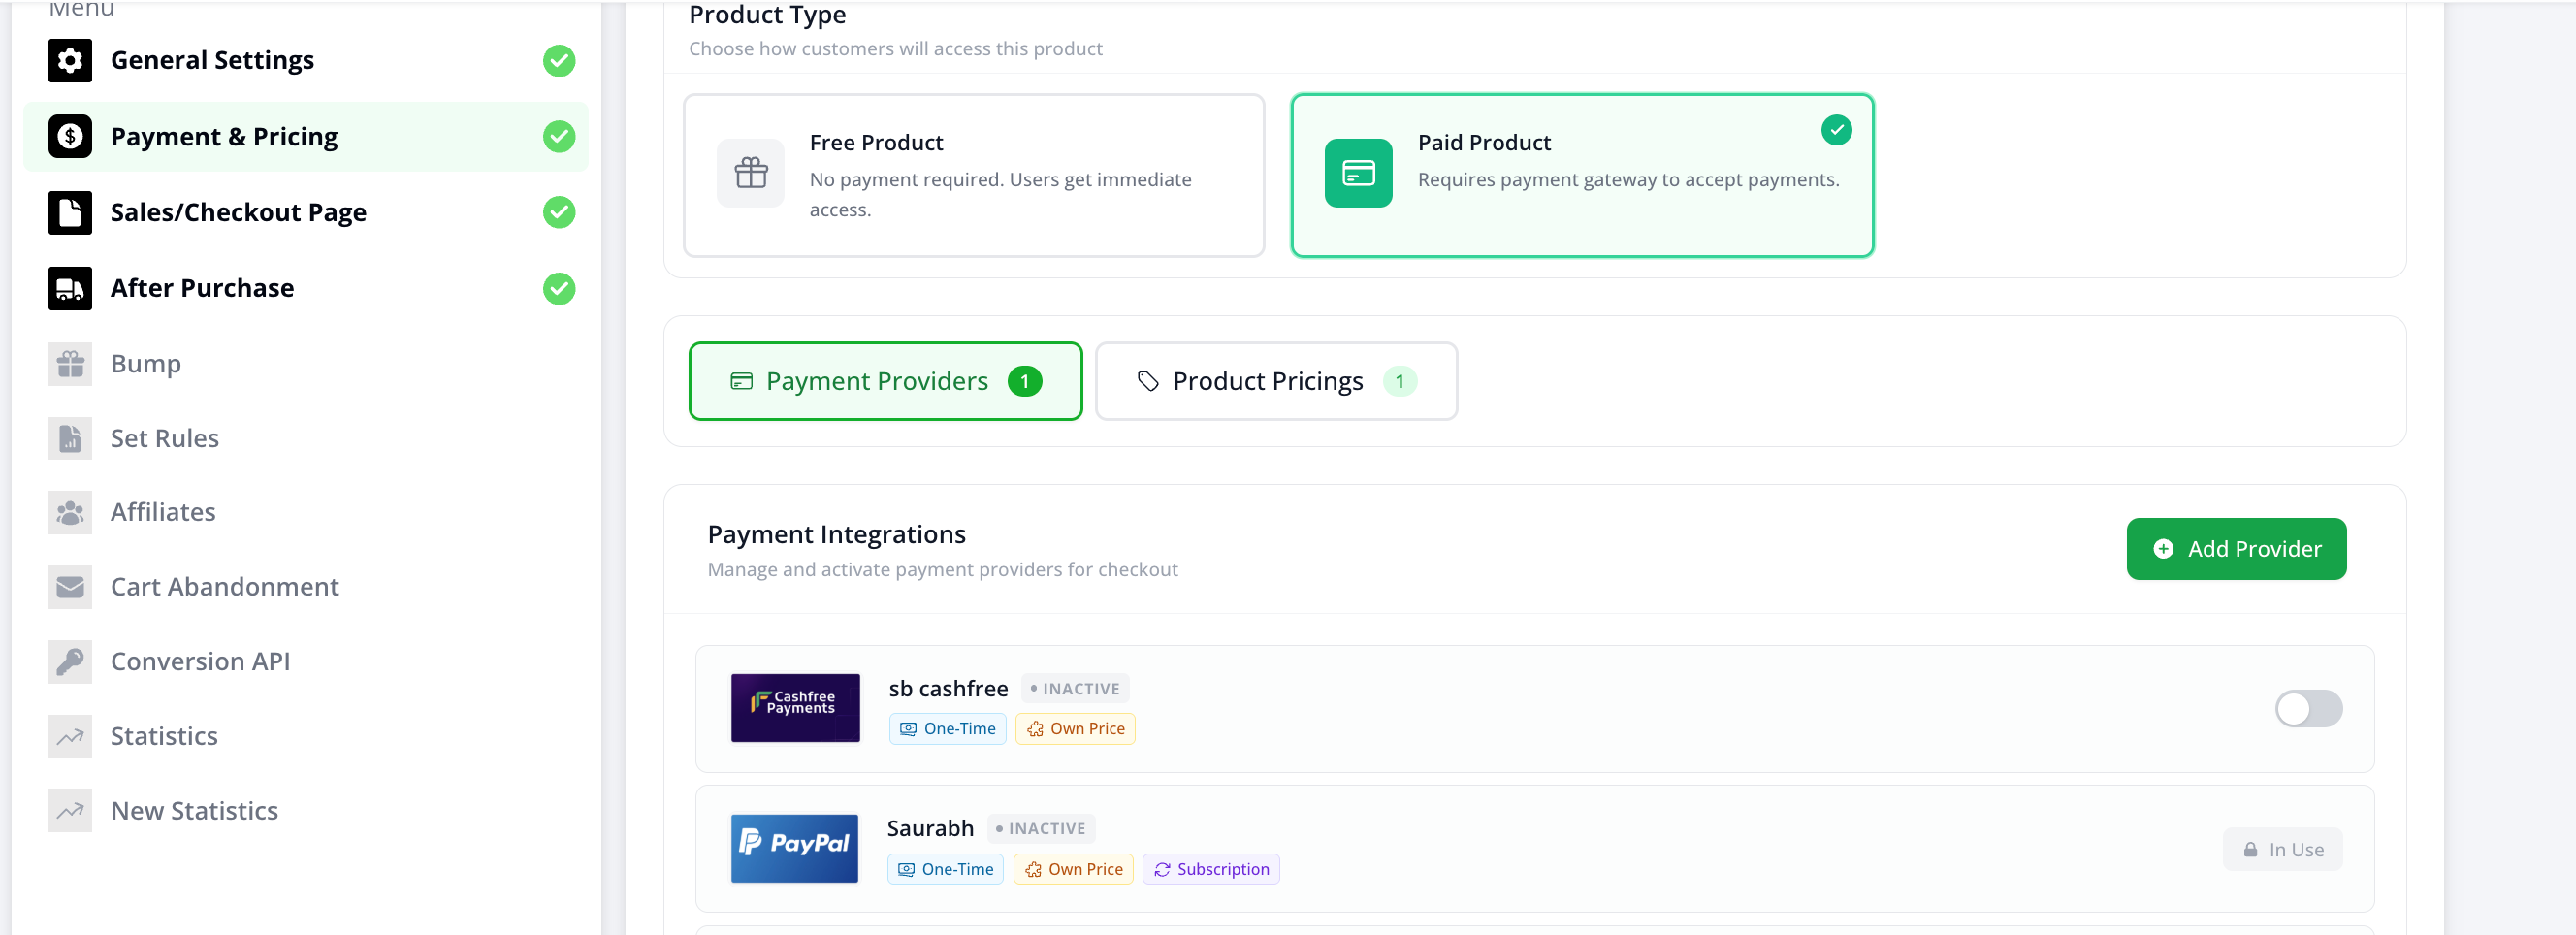
Connected payment integrations — look for the Subscription tag
5. Choose the Subscription Pricing Model
Still on Payment & Pricing, go to the Product Pricings tab and start the "Add New Pricing" wizard. On Step 1 of 3 — Pricing Model, you'll see three options:
- One-Time Payment ("Most Popular") — a single charge, lifetime access
- Pay Your Own Price ("Flexible Pricing") — customer sets their own amount
- Subscription ("Best Revenue") — recurring payments
Select Subscription. The wizard also shows which payment methods are connected and available for this pricing step.
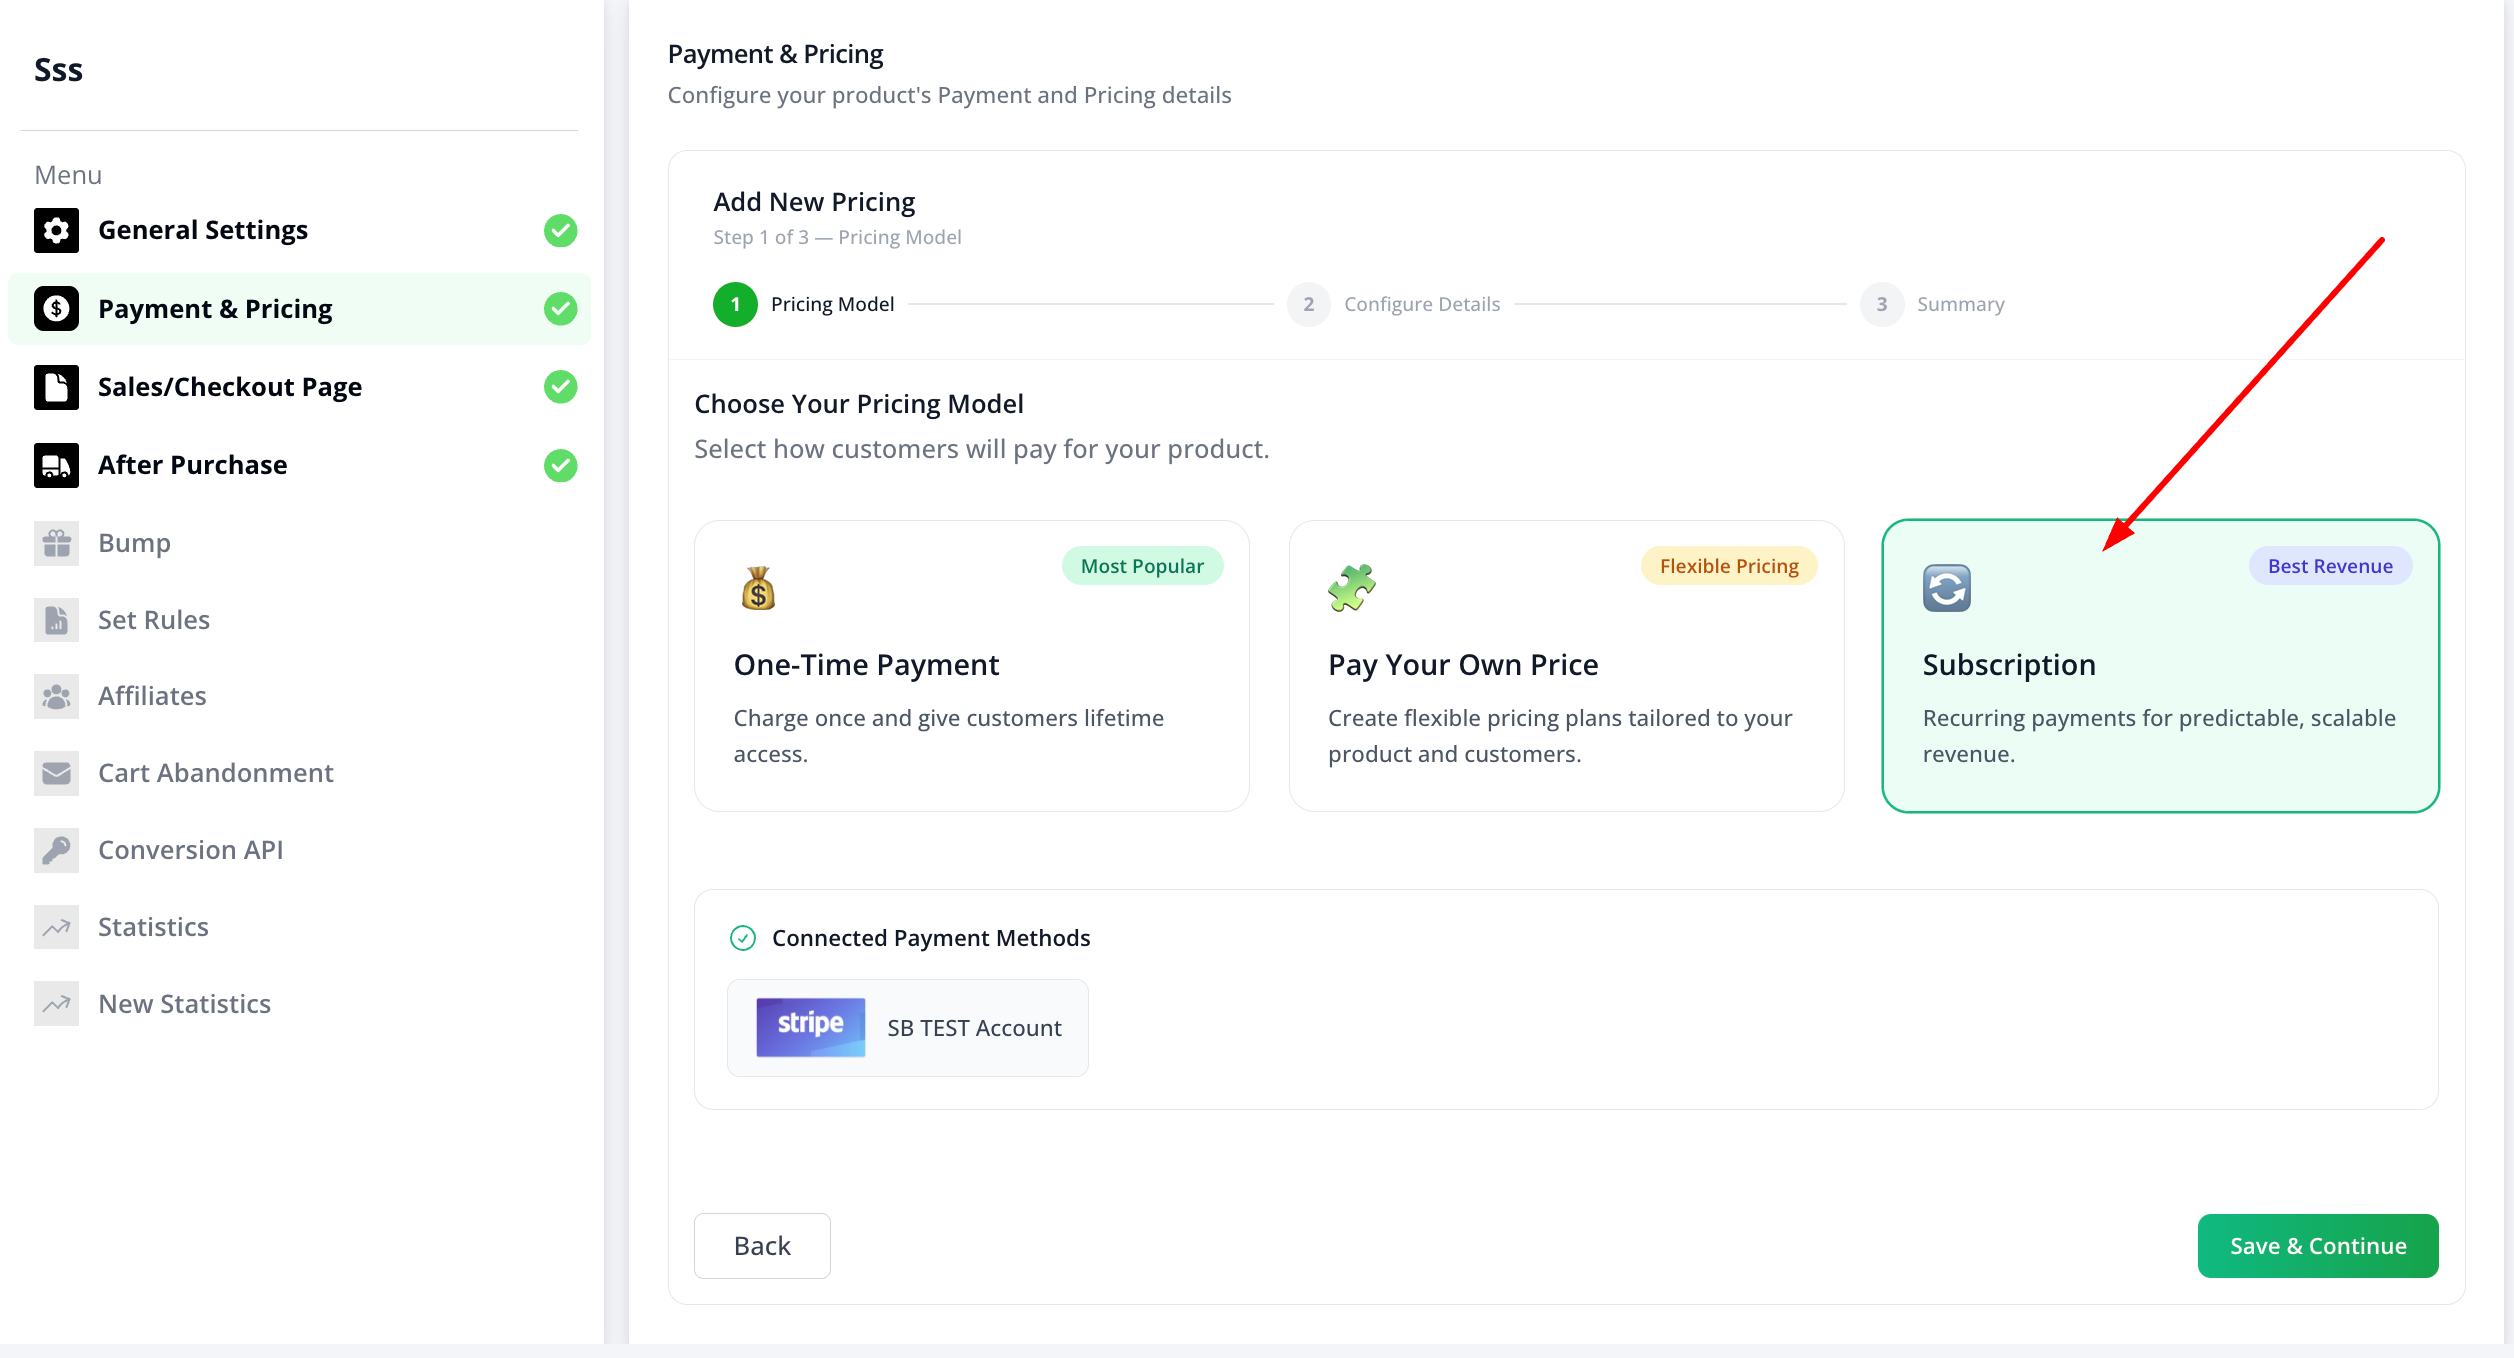
Step 1 of 3 — select Subscription as your pricing model
Click "Save & Continue".
6. Configure Subscription Details
You're now on Step 2 of 3 — Configure Details, under Subscription Pricing. Fill in:
Pricing Display Name
What you'll call this pricing tier internally (e.g. "Monthly Membership," "$29/Month Premium Access"). This does not have to match the product title.
Currency
Auto-filled from your General Settings and locked here — you cannot change it once pricing exists for this product.
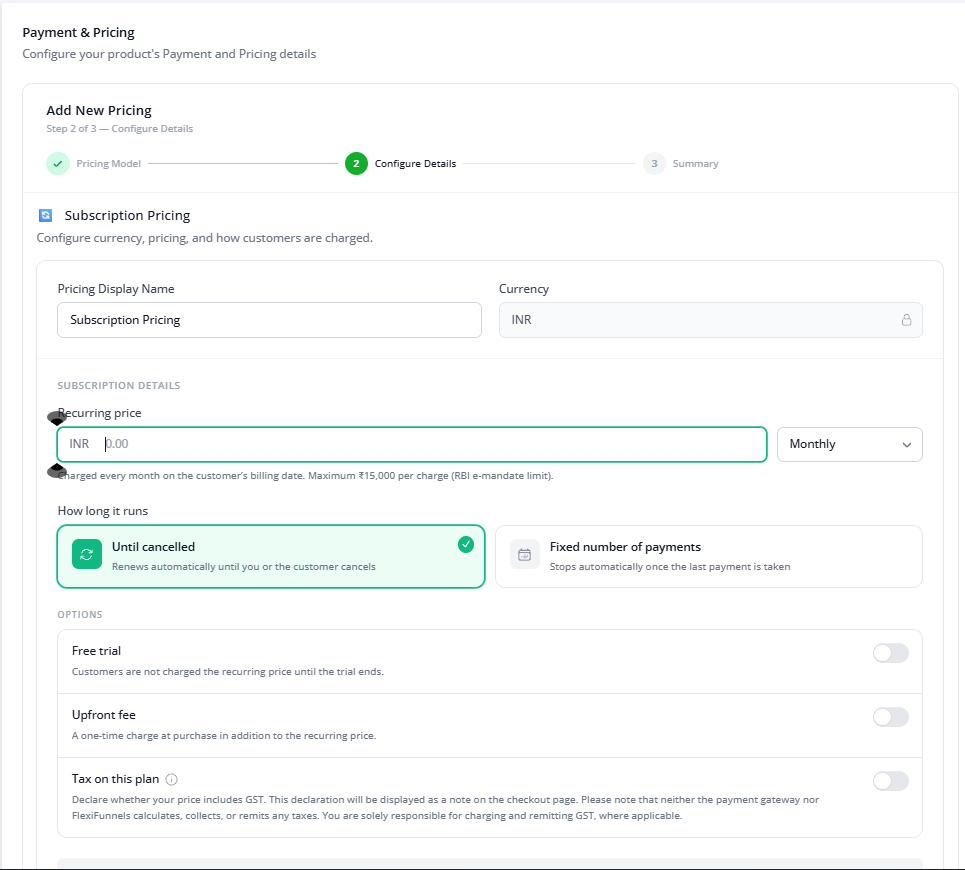
Recurring price and billing frequency
Enter the amount charged each cycle, and choose how often it's charged from the dropdown next to it:
- Weekly
- Monthly
- Quarterly
- 6 Months
- Yearly
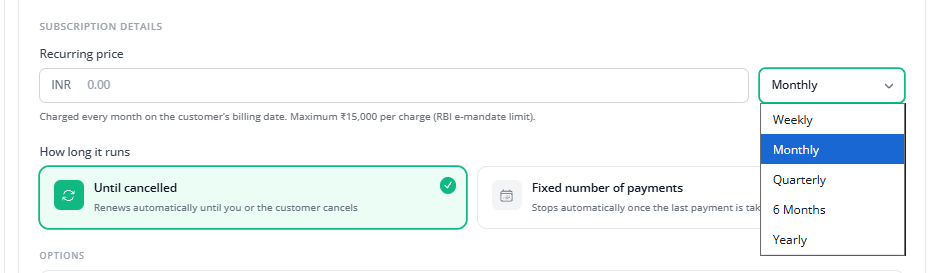
Configure Details, and the billing frequency dropdown options
How long it runs
Choose one:
- Until cancelled — renews automatically until you or the customer cancels. Best for ongoing memberships, SaaS, and open-ended coaching.
- Fixed number of payments — stops automatically once the last payment is taken. A "Stop after [N] payments" field appears so you can set the exact count (e.g. 12 payments for a 12-month program).
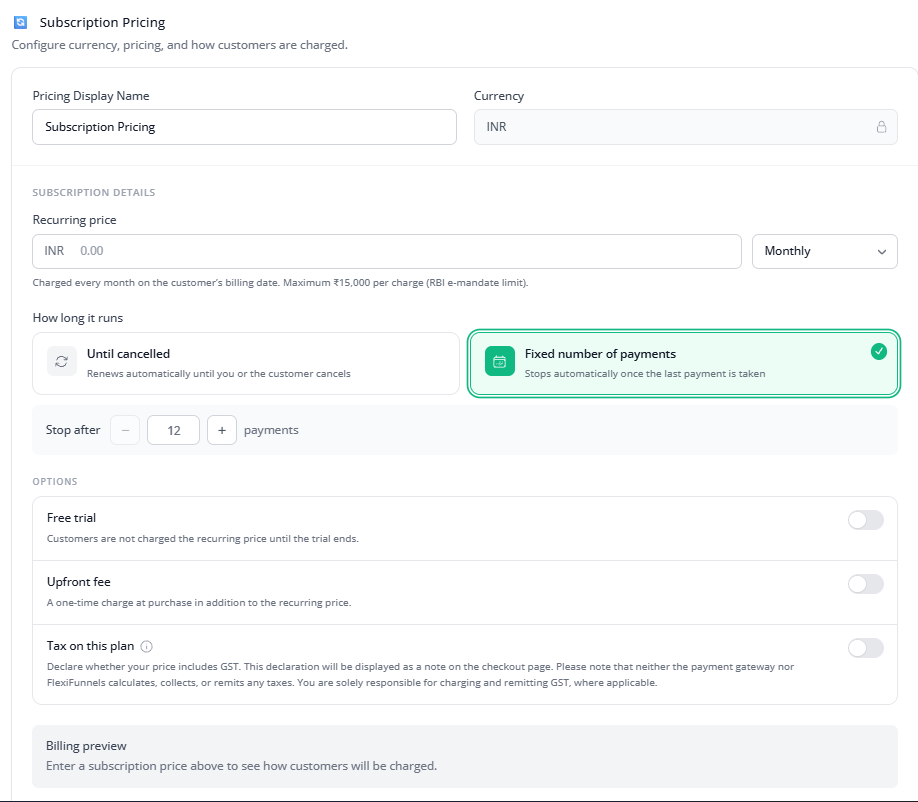

Fixed-payments option, and the Razorpay UPI Autopay verification note
7. Optional: Free Trial
Toggle on "Free trial" if you want customers to try before being charged. Enter the number of days free.
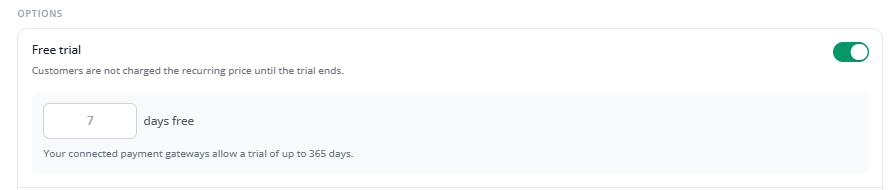
Free trial toggled on, set to 7 days
Best practice: 7–14 days works well for most products; up to 30 days for something more complex (a full course or software). Avoid making the trial too long — it can hurt conversion.
FRONTEND VIEW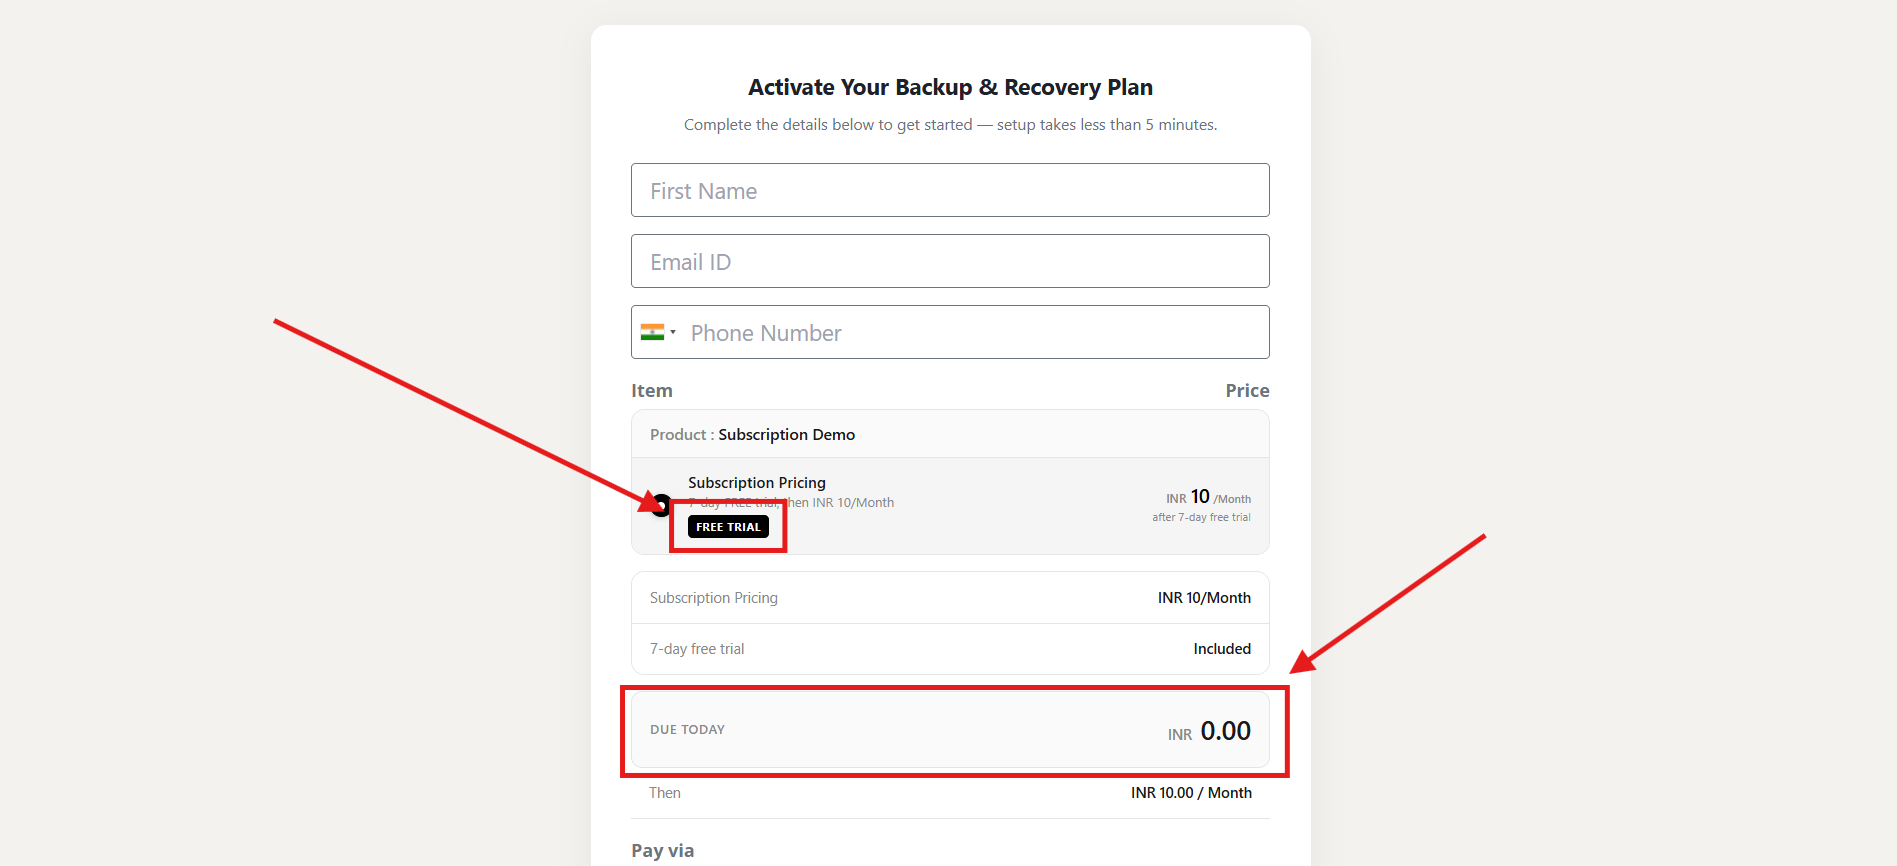
This is what your customer actually sees on the live checkout page when a free trial is active
8. Optional: Upfront Fee
Toggle on "Upfront fee" to add a one-time charge collected at purchase, in addition to the recurring price. Enter the amount.

Upfront fee toggled on, set to INR 10.00
FRONTEND VIEW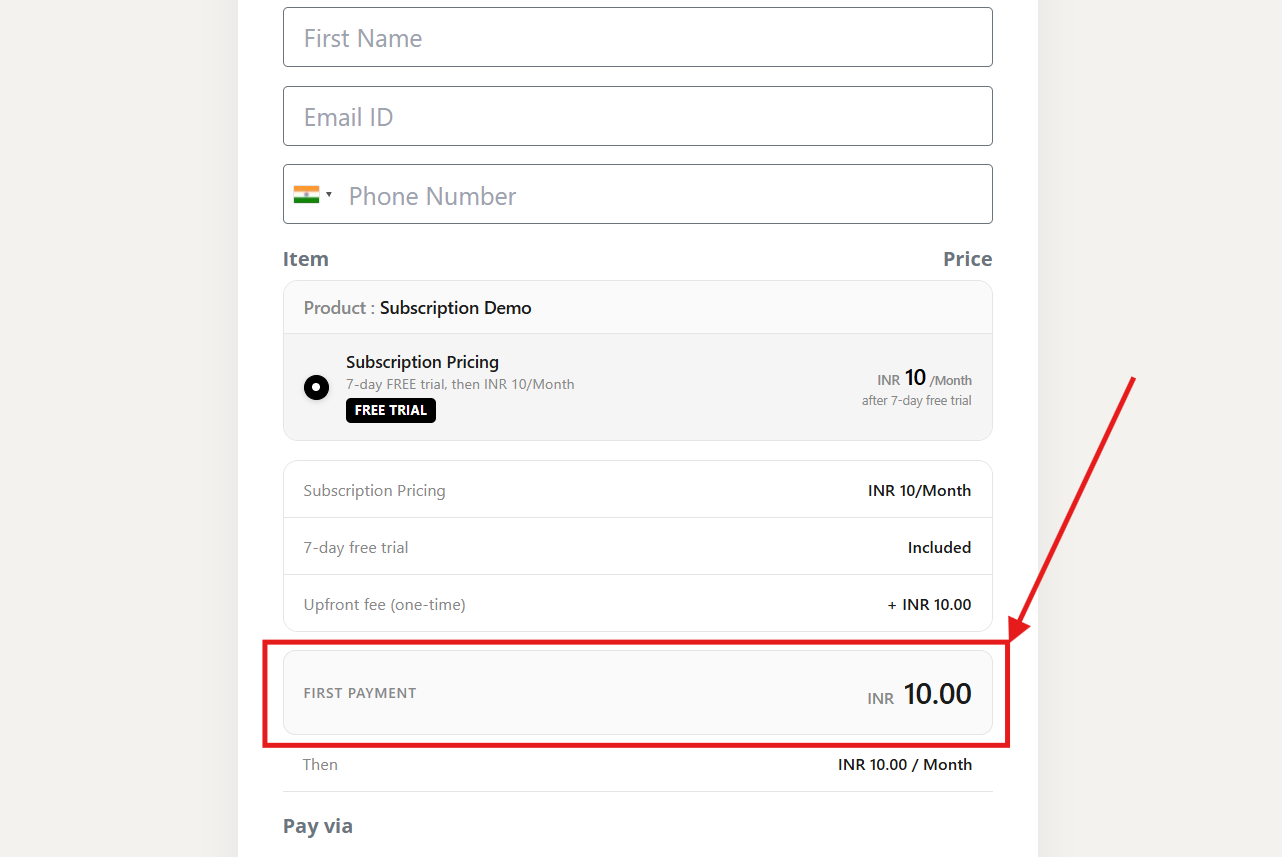
How the upfront fee appears to customers on the live checkout page
9. Optional: Tax on This Plan (GST)
Toggle on "Tax on this plan" if you need to declare whether your price includes GST.

The Tax on this plan toggle
The first time you turn this on, a confirmation modal appears — read it before continuing:
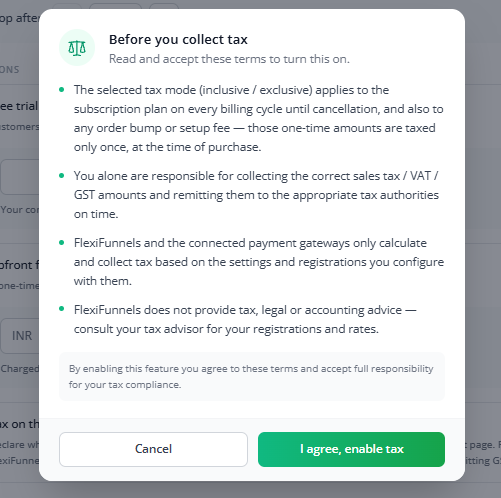
Read this confirmation carefully before enabling tax
- The selected tax mode (inclusive/exclusive) applies to the subscription plan on every billing cycle until cancellation, and also to any order bump or setup fee — those one-time amounts are taxed only once, at the time of purchase.
- You alone are responsible for collecting the correct sales tax/VAT/GST amounts and remitting them to the appropriate tax authorities on time.
- FlexiFunnels and the connected payment gateways only calculate and collect tax based on the settings and registrations you configure with them.
- FlexiFunnels does not provide tax, legal, or accounting advice — consult your tax advisor for your registrations and rates.
Click "I agree, enable tax" to proceed. You'll then choose one of two display modes:
- Price excludes GST — the checkout page shows "Prices are exclusive of GST." The customer pays only your listed price; collecting GST separately is up to you.
- Price includes GST — the checkout page shows "All prices are inclusive of GST." GST is treated as already folded into your listed price.
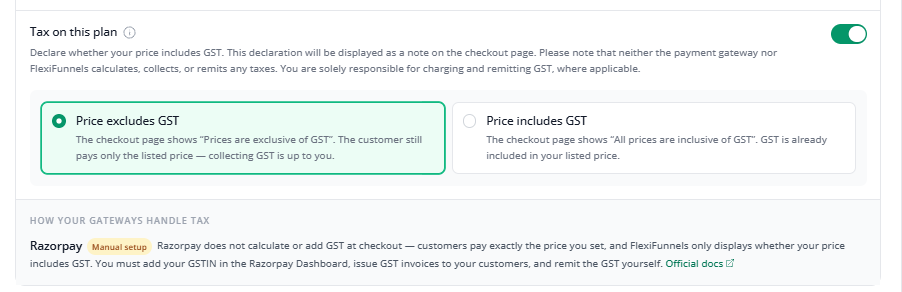
"Price excludes GST" selected, with the Razorpay manual setup note visible
FRONTEND VIEW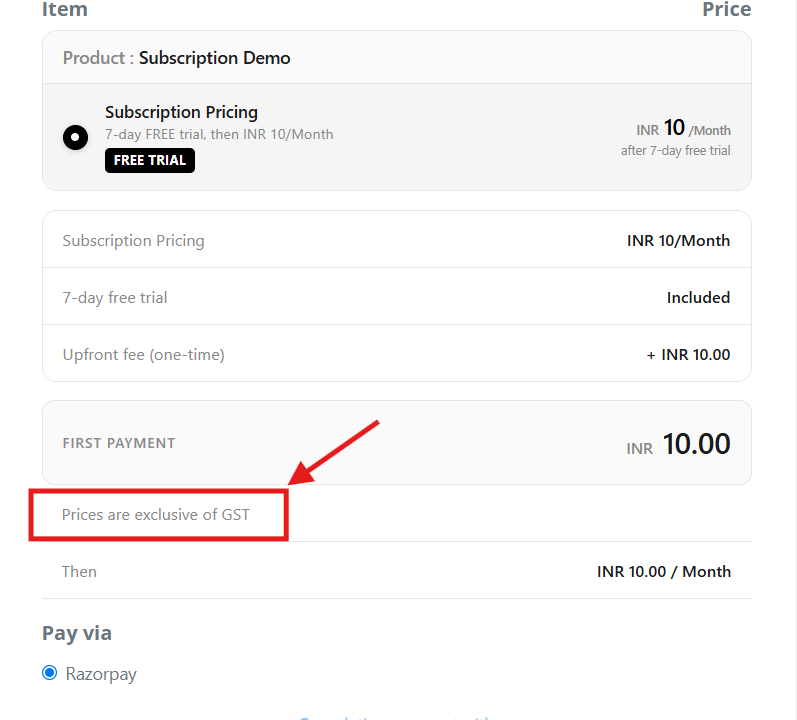
What customers see at checkout when prices exclude GST
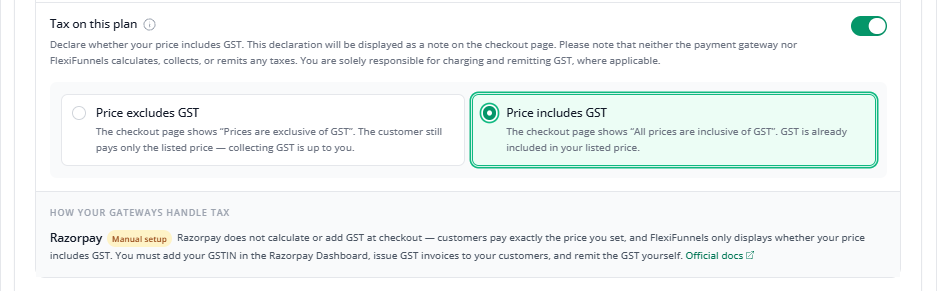
"Price includes GST" selected
FRONTEND VIEW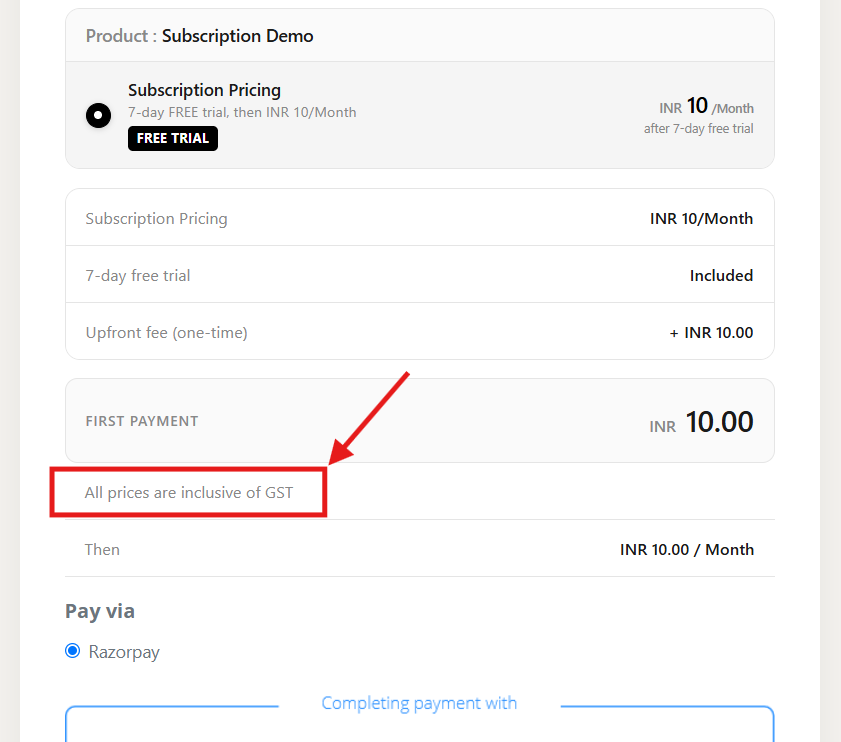
What customers see at checkout when prices include GST
A billing preview and the same Razorpay UPI Autopay note appear at the bottom before you continue.
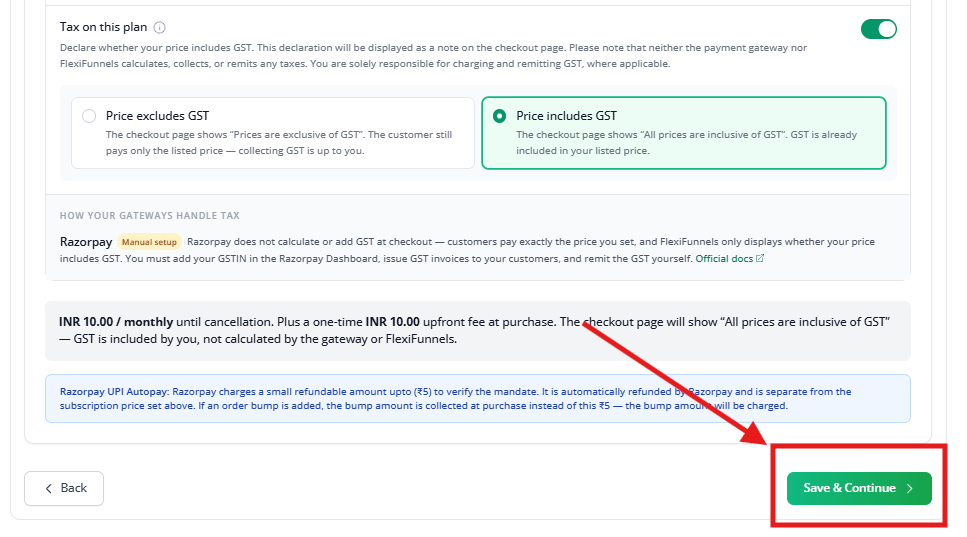
Billing preview summarizing your full pricing setup
Click "Save & Continue".
10. Review and Finish Setup
You're now on Step 3 of 3 — Summary. Double-check everything before saving: pricing model, pricing name, price and billing cycle, currency, and which payment provider(s) are connected to this pricing.
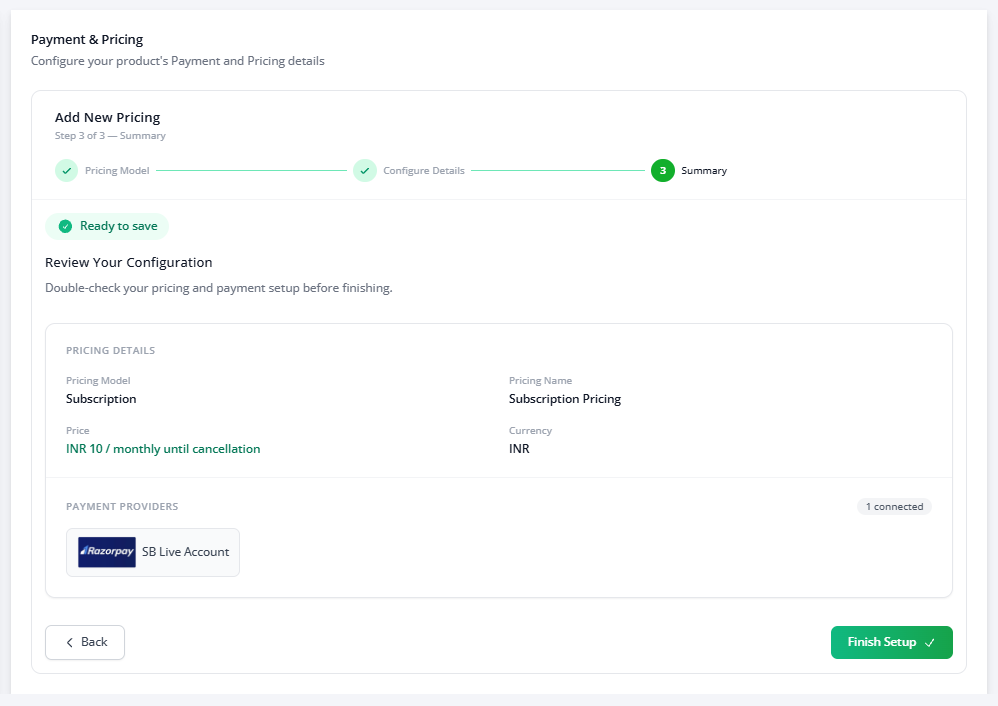
Step 3 of 3 — review your pricing summary, then Finish Setup
Click "Finish Setup."
11. Connect Your Sales and Checkout Pages
Go to the Sales/Checkout Page tab. Switch between the Sales Page and Checkout Page sub-tabs and, for each, select the Project and the specific page you created in Step 1.
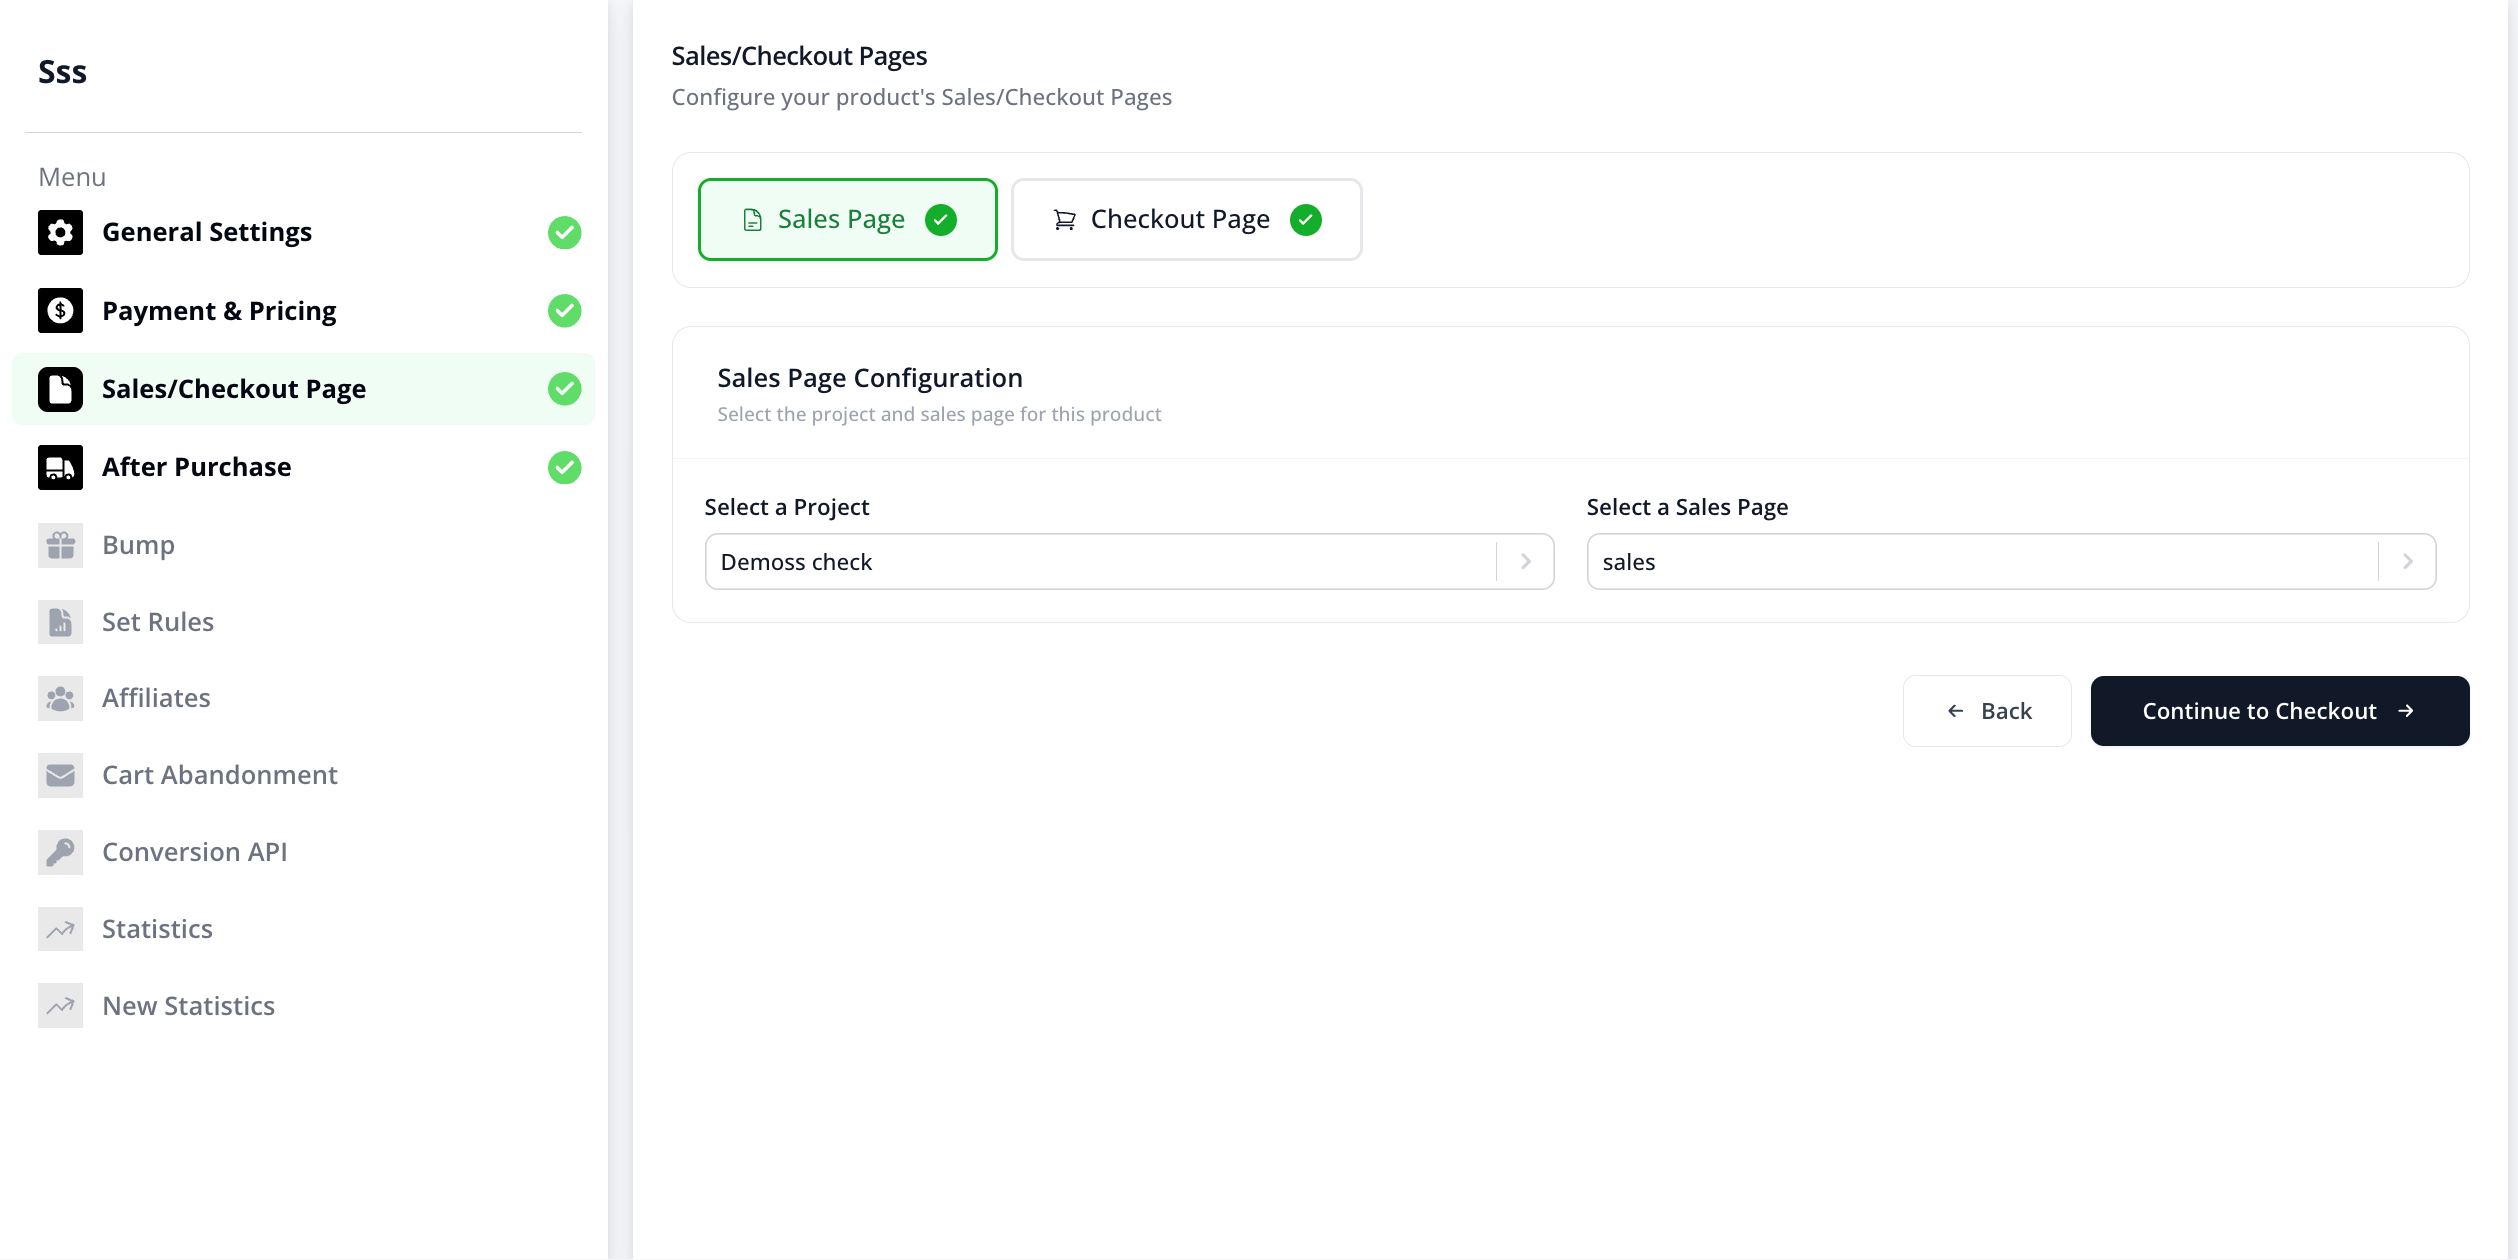
Select your Project and Sales Page
Click "Continue to Checkout" and repeat the selection for the Checkout Page tab.
12. Configure After Purchase Settings
On the After Purchase tab, fill in the Product Basics sub-tab:
- Support Email/URL — where customers can reach you
- Select a Digital Asset — the file or content they'll receive/access
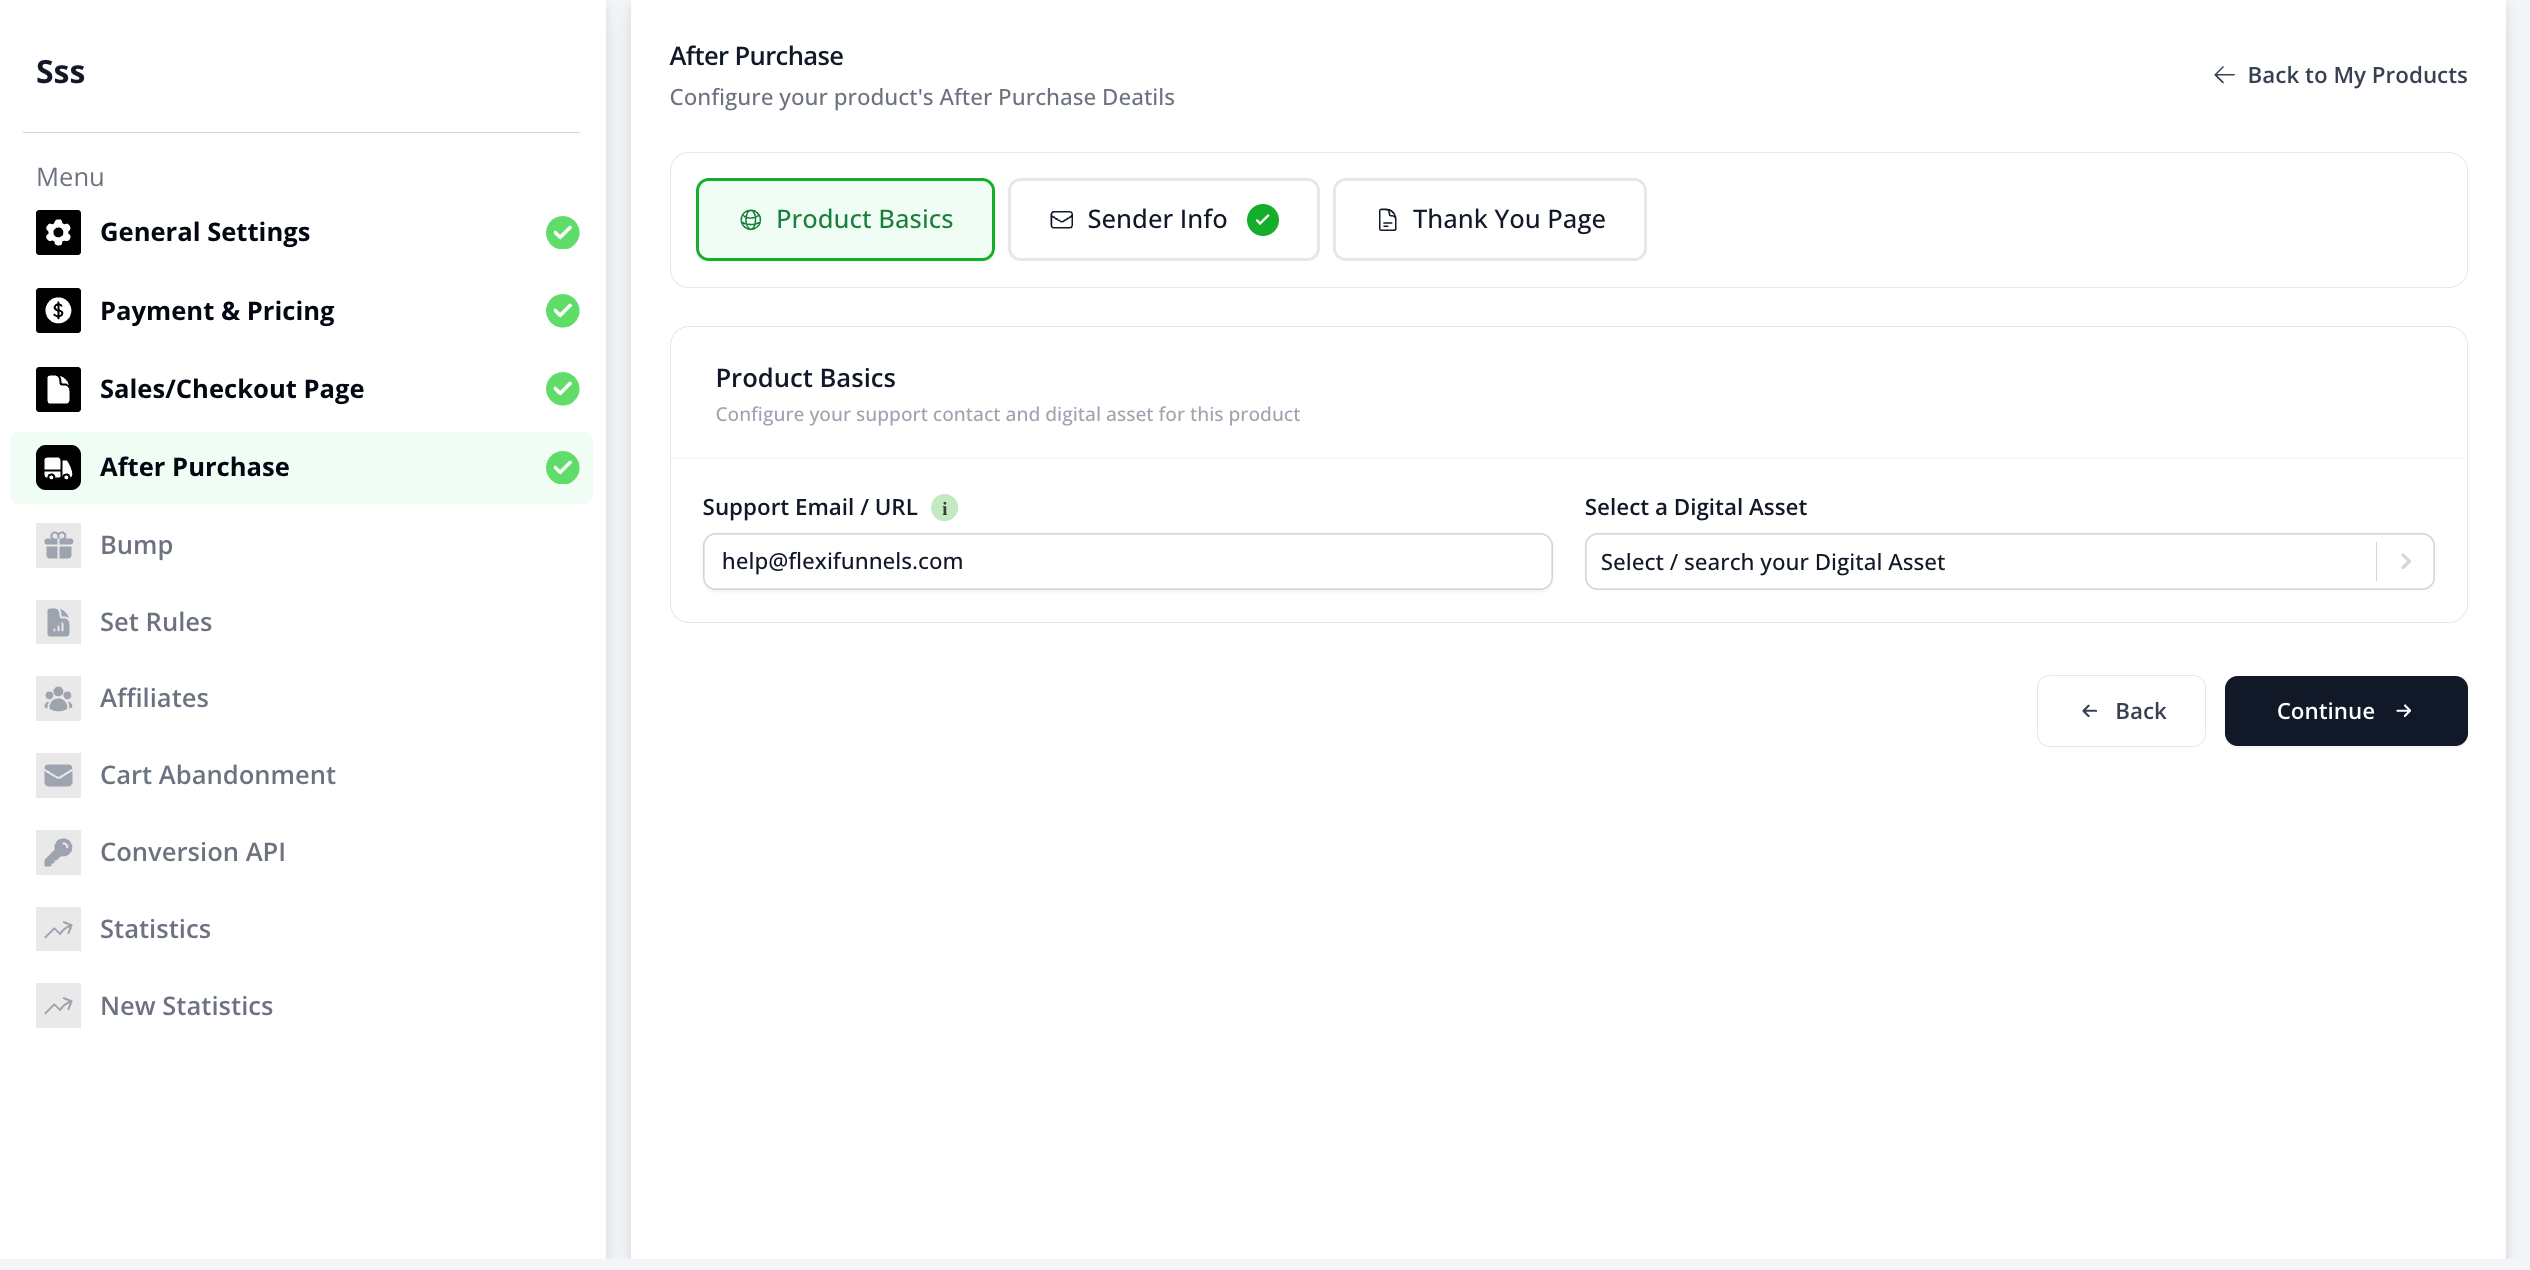
Product Basics — support contact and digital asset delivery
Also review the Sender Info and Thank You Page sub-tabs on this same screen before clicking "Continue."
13. Wire Your Sales Page Button
On your Sales Page, add or edit a call-to-action button. In its action settings, choose "Go To Next Step In Product" and select your subscription product from the dropdown.
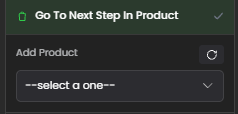
Button action set to "Go To Next Step In Product"
This routes the visitor from your Sales Page into the checkout flow for this specific product.
14. Add the Order Form to Your Checkout Page
Open your Checkout Page in the editor. In the left-hand Components panel, go to the Others category and drag the Order Form element onto the page. This is the element that renders the actual payment fields the customer fills in.
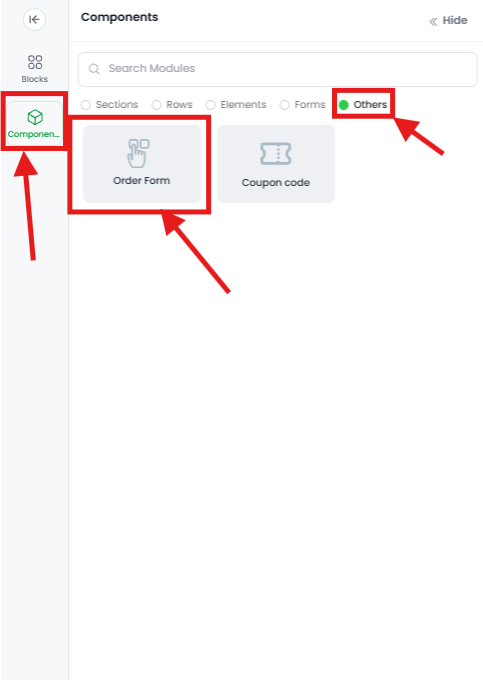
Drag the Order Form element from Components → Others
15. Publish and Test
Publish your Sales Page, Checkout Page, and Thank You Page — subscriptions only work on published pages, not in the editor preview.
Then run a full test purchase using your gateway's test/sandbox credentials before going live, and confirm:
- The subscription button on your Sales Page correctly opens the checkout
- The free trial (if enabled) displays correctly
- The upfront fee and/or tax note (if enabled) display correctly
- The Thank You Page appears after a successful test payment
Managing Active Subscriptions
Once customers start subscribing, manage everything from Products → My Customers → Subscriptions.

Products → My Customers → Subscriptions
Subscription Overview Dashboard
The Subscriptions dashboard gives you a live snapshot of your subscription business:
| Metric | What it shows |
|---|---|
| Active Subscribers | Total customers with a currently active subscription |
| MRR | Monthly Recurring Revenue from active subscriptions only |
| Churn | Percentage of subscribers lost this week |
| Recovery | How many of your failed renewals were successfully recovered |
| New Subscribers | Newly started subscriptions in the selected period |
| Active Trials | Customers currently in a free trial period |
| Past Due | Subscriptions where a charge failed and is awaiting retry/resolution |
| Failed (30D) | Renewal attempts that failed in the last 30 days |
| Cancelled | Subscriptions that have been cancelled |
Below these cards, a Revenue summary (new / renewal / recovered / failed renewals) and a Revenue Trend chart show how billing is trending over time, alongside a Revenue by Product breakdown.
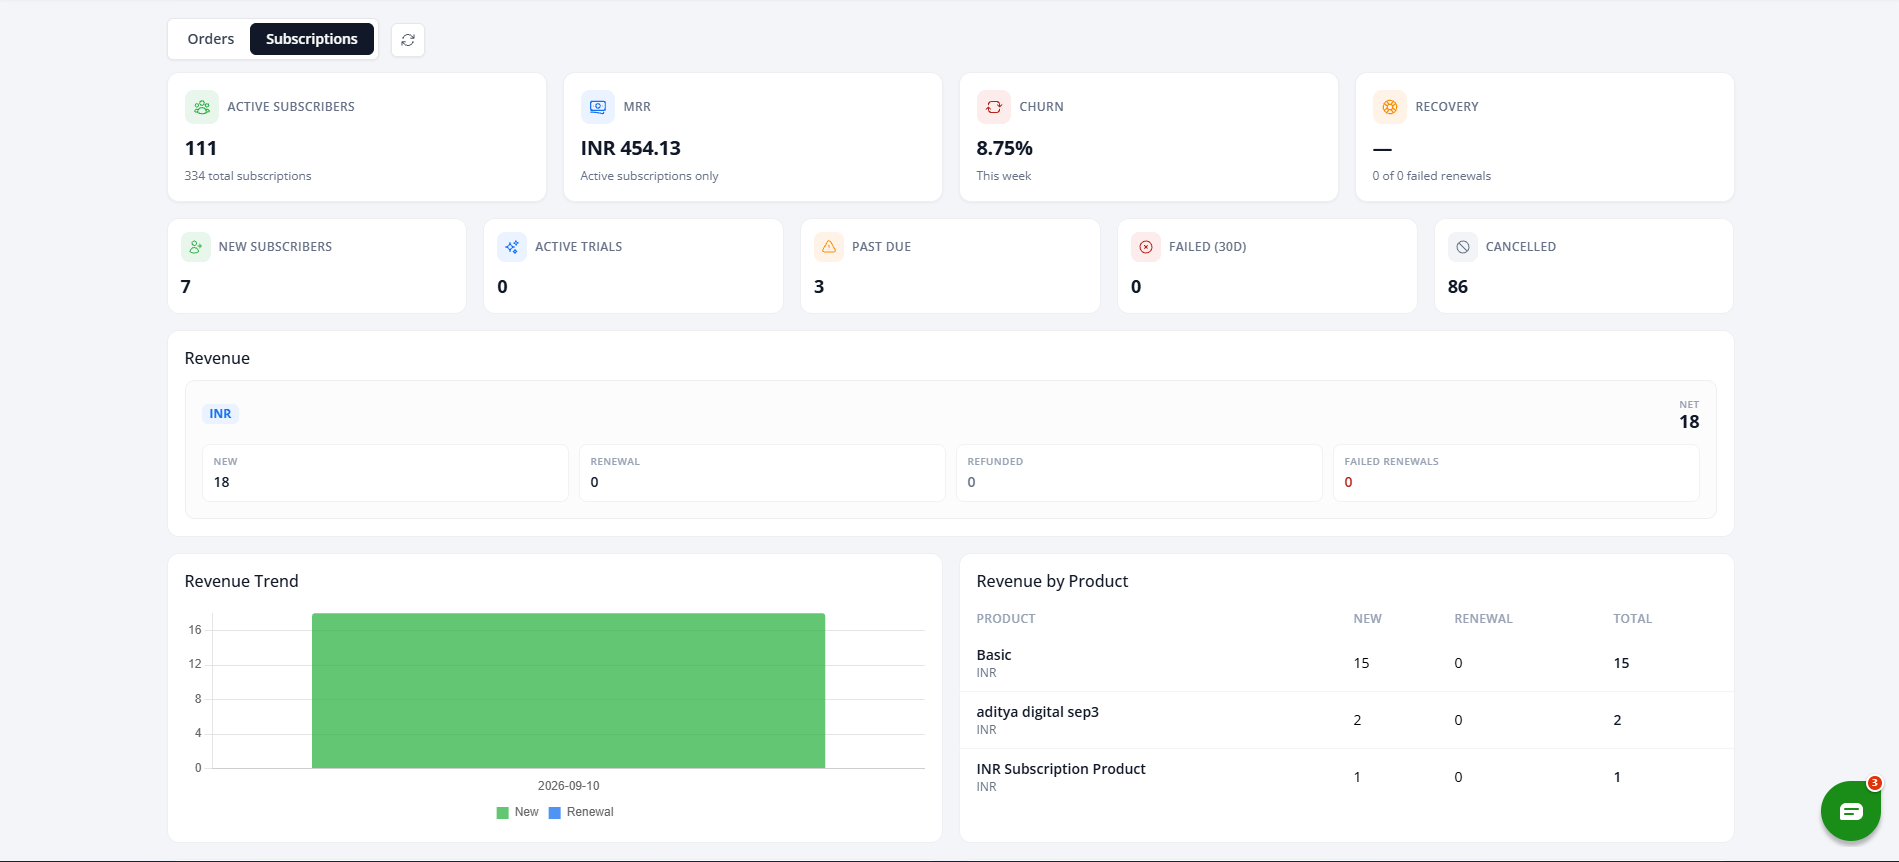
The Subscriptions dashboard — your live business snapshot
Gateway Performance and Attention Items
A Gateway Performance panel breaks down active, cancelled, and failed subscriptions, MRR, and churn per connected gateway (e.g. Razorpay, Cashfree, Paddle, Stripe) — useful for spotting if one gateway is under-performing or has a technical issue.
A "Needs Attention — Past Due" panel lists specific customers with a payment problem (e.g. "Your payment mandate for this subscription could not be processed"), with a direct "Manage" action so you can follow up quickly.
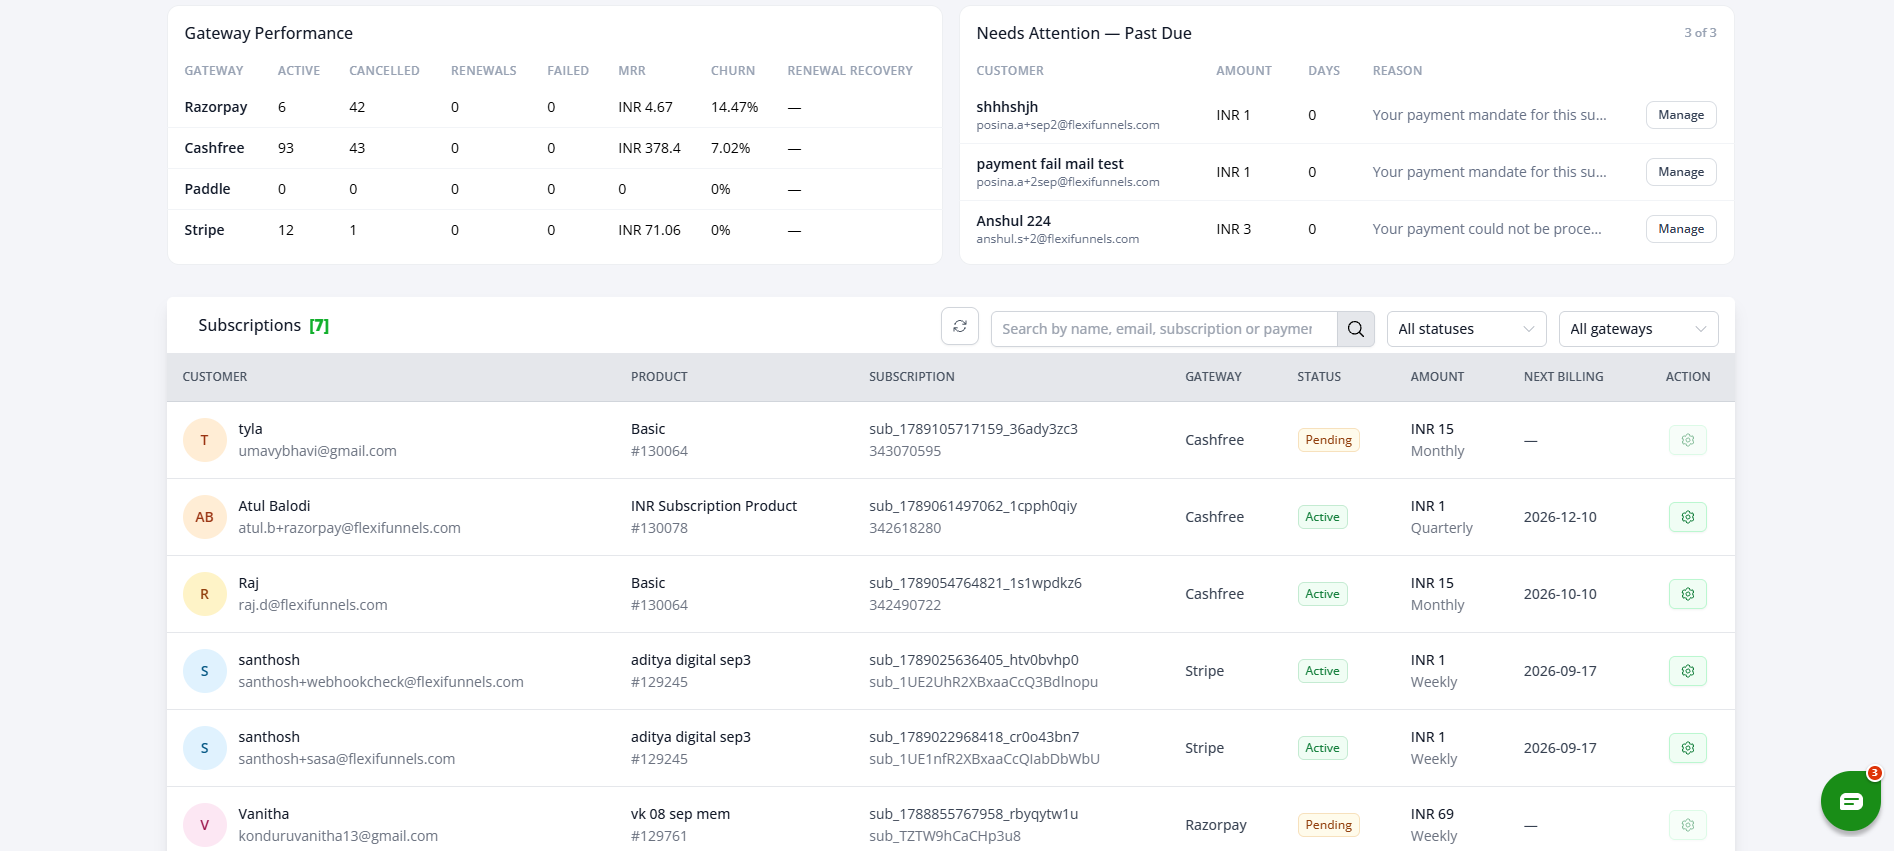
Gateway Performance and Needs Attention — Past Due
The Subscriptions Table
Below the dashboard, a table lists every subscription with columns for Customer, Product, Subscription (ID), Gateway, Status, Amount, Next Billing, and an Action icon.


The Subscriptions table and its column headers
Use the search bar to find a subscription by name, email, subscription ID, or payment reference, and the "All statuses" / "All gateways" dropdowns to filter the list — for example, to see only Past Due subscriptions on a specific gateway.

Filter by status and gateway
Click the gear/action icon at the end of any row to open that subscription's management panel.
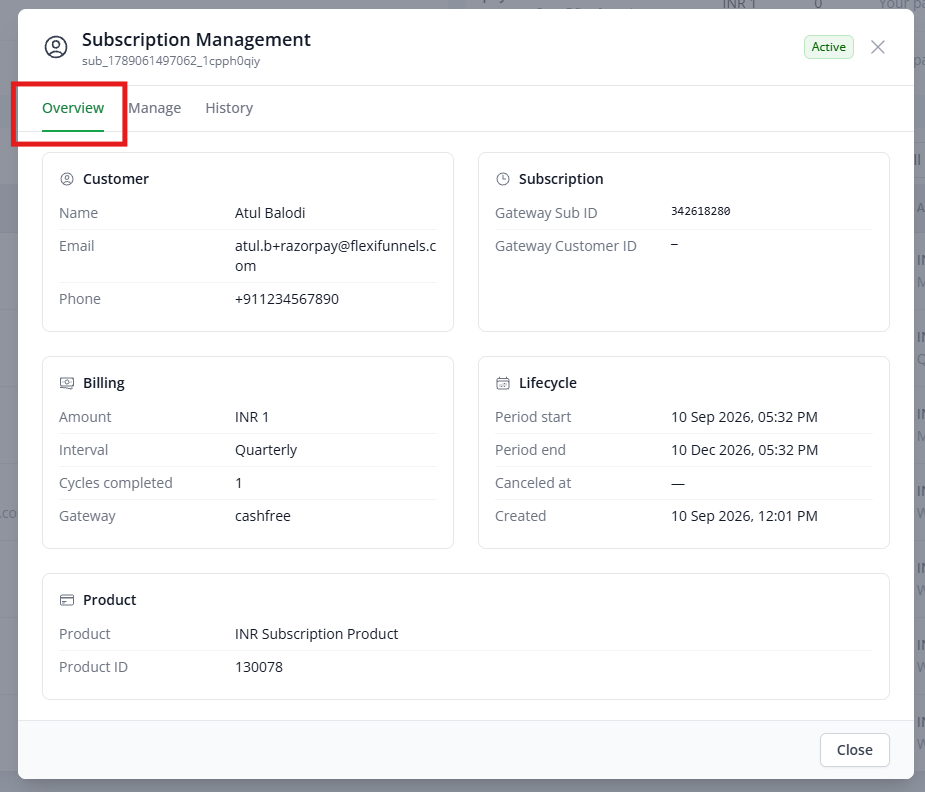
Click the gear icon to manage a specific subscription
Managing an Individual Subscription
The Subscription Management panel has three tabs: Overview, Manage, and History.
Overview — read-only details: Customer (name, email, phone), Subscription (gateway subscription ID, gateway customer ID), Billing (amount, interval, cycles completed, gateway), Lifecycle (period start/end, cancelled date, created date), and Product.
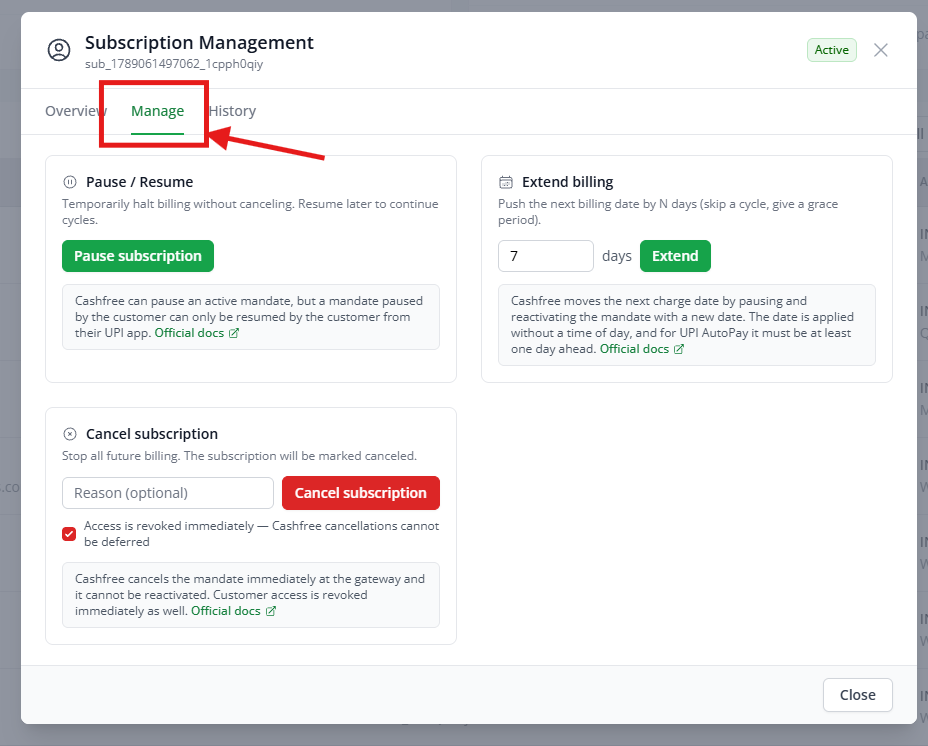
The Overview tab — full read-only subscription details
Manage — the actions you can actually take:
- Pause/Resume — temporarily halt billing without cancelling; resume later to continue where it left off. Note: for gateways like Cashfree, a mandate paused by the customer can only be resumed by the customer from their own UPI app, not by you.
- Extend billing — push the next billing date forward by a set number of days (skip a cycle or give a grace period). For Cashfree, the new date must be applied without a specific time of day, and for UPI AutoPay it must be at least one day ahead.
- Cancel subscription — stops all future billing, with an optional reason field. Note: for Cashfree specifically, cancellation is immediate and cannot be reversed or deferred — the mandate is cancelled at the gateway right away and customer access is revoked immediately.
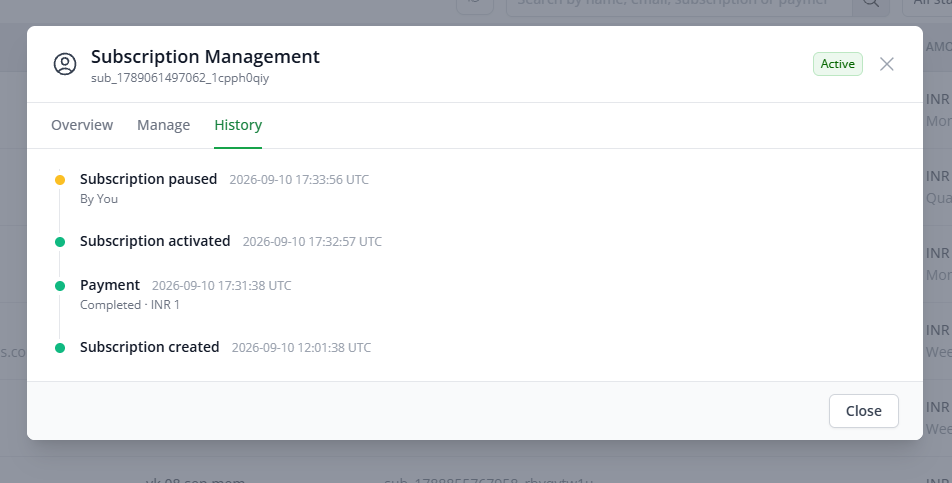
The Manage tab — Pause/Resume, Extend billing, Cancel subscription
History — a chronological activity log for the subscription (for example: Subscription created → Payment completed → Subscription activated → Subscription paused), each entry timestamped and, where relevant, attributed to who performed the action ("By You"). It's a simple timeline view, reached the same way as Overview and Manage.
Enable the Subscription Webhook (Mandatory)
Webhooks are what let your payment gateway tell FlexiFunnels in real time when a subscription is created, paused, cancelled, expired, or has a failed payment — without this, subscription statuses and customer access can get out of sync.
Go to your payment provider's integration settings, then the Webhook tab:
- Make sure the payment integration itself is enabled in the Credentials tab first — the Webhook tab will show a reminder if it isn't.
- Check the Status field — it will show "Not connected" if this hasn't been set up.
- Click "Connect webhook."
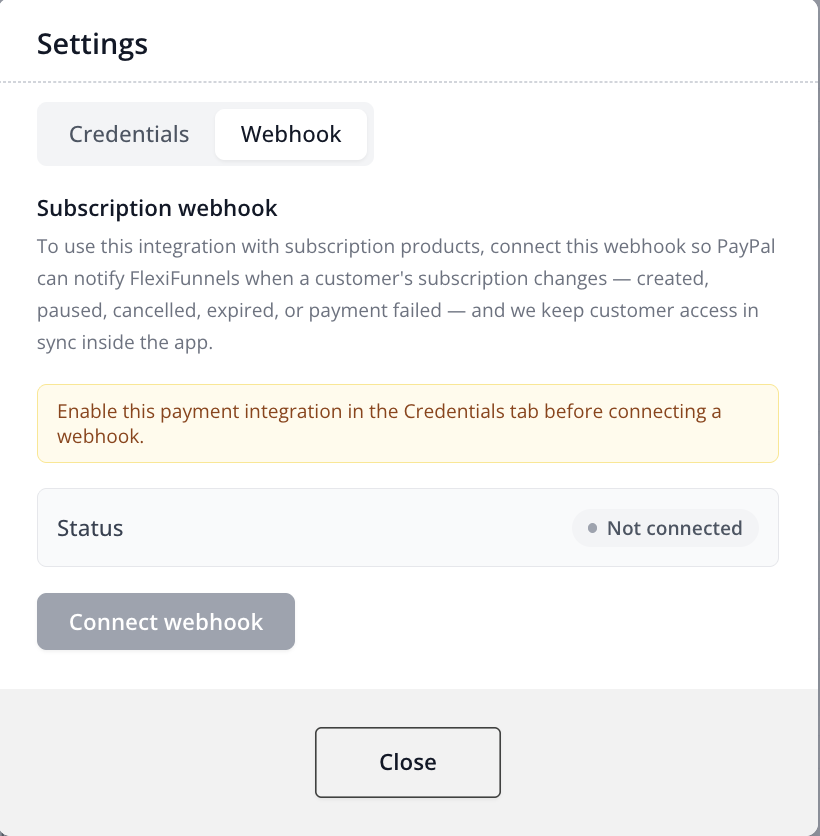
The Webhook tab — click "Connect webhook" to enable it
Important Notes
- Subscription payments support INR and USD, and work with PayPal, Paddle, Stripe, Razorpay, and Cashfree. Gateway-specific rules still apply — for example, the ₹15,000 RBI e-mandate cap and Razorpay's UPI Autopay verification charge apply to INR mandate billing. Confirm with your connected gateway's dashboard what currencies and limits apply to your account.
- Webhooks are mandatory — enable them for every payment provider used for subscriptions, or subscription statuses won't sync correctly. This is especially critical for Stripe, Paddle and PayPal.
- Currency locks once a price exists on a product — set it correctly in General Settings before adding your first price.
- Upfront fees are charged even during a free trial — make this clear to customers on your sales page if you use both features together.
- Tax settings are your responsibility. FlexiFunnels and its connected gateways only display or apply the tax mode you configure — they don't calculate, collect, or remit GST/VAT/sales tax on your behalf. Some gateways (e.g. Razorpay) require manual GSTIN setup and manual invoicing on your end.
- Cancellations can be immediate and irreversible on some gateways (e.g. Cashfree) — there's no "undo" once you cancel from the Manage tab, so double-check before confirming.
- Pauses initiated by the customer on some gateways can only be resumed by the customer, not by you from the dashboard.
- Subscriptions only work on published pages — always test the full flow after publishing, before going live.
Subscription Payments vs. One-Time Purchases
| Aspect | Subscription | One-Time |
|---|---|---|
| When to use | Ongoing access, recurring value | Single purchase, no ongoing delivery |
| Billing | Weekly, monthly, quarterly, 6-monthly, or yearly | Once |
| Revenue type | Recurring, more predictable | One-off |
| Customer commitment | Moderate — can cancel anytime (subject to gateway rules) | High, upfront |
| Trial support | Yes, built in (up to 365 days depending on gateway) | No — would need a separate offer |
| Extra charges | Optional upfront fee, optional tax declaration | Price set once |
| Management overhead | Higher — pause, resume, extend, cancel, webhooks | Lower |
Common Situations & Quick Fixes
- Open the "Needs Attention — Past Due" panel on the Subscriptions dashboard, or filter the table by status.
- Click "Manage" next to the affected customer to see the specific reason (e.g. a failed payment mandate).
- Depending on the gateway, you may be able to extend billing to give the customer more time, or reach out to them directly to update their payment method.
- Open their subscription and go to the Manage tab.
- Use Extend billing and enter the number of days to push the next charge back.
- Confirm — the new billing date is applied per your gateway's rules (for example, Cashfree/UPI AutoPay requires the new date to be at least one day ahead).
- Open their subscription's Manage tab and click Pause subscription.
- They keep their access based on your after-purchase settings, and billing stops until resumed.
- Note: on some gateways, if the customer paused it from their own UPI app, only they can resume it — you may not be able to resume it from your dashboard.
- Find their subscription in My Customers → Subscriptions.
- Click the gear/action icon, then the Manage tab.
- Click Cancel subscription, optionally add a reason, and confirm.
- Be aware this may be immediate and irreversible depending on the gateway.
- Confirm the Free trial toggle is on and a day value is entered in Configure Details.
- Confirm the pricing was saved through the full 3-step wizard (Pricing Model → Configure Details → Summary → Finish Setup).
- Make sure the Checkout Page has been republished after the change.
- Hard-refresh your browser — cached pages sometimes don't reflect new pricing details right away.
- Is your payment provider connected, active, and tagged for Subscription pricing?
- Is the webhook connected for that provider (Settings → Webhook tab → Status)? This is especially important for Stripe, Paddle and PayPal.
- Are you testing with your gateway's official test/sandbox credentials, not a live card?
- Does the amount exceed your gateway's per-charge limit (e.g. the ₹15,000 RBI e-mandate cap for INR mandates)?
- Try a different browser or an incognito window in case a cached checkout page is being served.
Before Contacting Support
- Confirm the payment provider is connected, active, and shows a Subscription tag.
- Confirm the webhook Status shows connected, not "Not connected."
- Confirm the Sales, Checkout, and Thank You pages are all published, not just saved.
- Re-check the subscription's History tab for the exact sequence of events (created, paused, payment, cancelled).
- Note the exact Subscription ID and Gateway shown on the Overview tab — support will need these to investigate.
Was this article helpful?
That’s Great!
Thank you for your feedback
Sorry! We couldn't be helpful
Thank you for your feedback
Feedback sent
We appreciate your effort and will try to fix the article